--- /dev/null
+---
+_edit_last: "1"
+categories:
+ - hibernate
+ - java
+ - maven
+date: "2012-11-28"
+lastmod: "2020-06-15T19:15:58+00:00"
+guid: http://juplo.de/?p=34
+parent_post_id: null
+post_id: "34"
+title: hibernate4-maven-plugin
+url: /hibernate4-maven-plugin-a-simple-plugin-for-generating-a-database-schema-from-hibernate-4-mapping-annotations/
+
+---
+## A simple Plugin for generating a Database-Schema from Hibernate 4 Mapping-Annotations
+
+Hibernate comes with the buildin functionality, to automatically create or update the database schema. This functionality is configured in the session-configuraton via the parameter `hbm2ddl.auto` (see [Hibernate Reference Documentation - Chapter 3.4. Optional configuration properties](http://docs.jboss.org/hibernate/orm/4.1/manual/en-US/html_single/#configuration-optional)). But doing so [is not very wise](http://stackoverflow.com/questions/221379/hibernate-hbm2ddl-auto-update-in-production), because you can easily corrupt or erase your production database, if this configuration parameter slips through to your production environment.
+
+Alternatively, you can [run the tools **SchemaExport** or **SchemaUpdate** by hand](http://stackoverflow.com/questions/835961/how-to-creata-database-schema-using-hibernate). But that is not very comfortable and being used to maven you will quickly long for a plugin, that does that job automatically for you, when you fire up your test cases.
+
+In the good old times, there was the [Maven Hibernate3 Plugin](http://mojo.codehaus.org/maven-hibernate3/hibernate3-maven-plugin/), that does this for you. But unfortunatly, this plugin is not compatible with Hibernate 4.x. Since there does not seem to be any successor for the Maven Hibernate3 Plugin and [googeling](http://www.google.de/search?q=hibernate4+maven+plugin) does not help, I decided to write up this simple plugin (inspired by these two articles I found: [Schema Export with Hibernate 4 and Maven](http://www.tikalk.com/alm/blog/schema-export-hibernate-4-and-maven) and [Schema generation with Hibernate 4, JPA and Maven](http://doingenterprise.blogspot.de/2012/05/schema-generation-with-hibernate-4-jpa.html)).
+
+I hope, the resulting simple to use buletproof [hibernate4-maven-plugin](/hibernate4-maven-plugin/) is usefull!
+
+**[Try it out now!](/hibernate4-maven-plugin/)**
--- /dev/null
+---
+_edit_last: "2"
+categories:
+ - hibernate
+ - java
+ - maven
+date: "2013-10-18"
+lastmod: "2014-01-15T20:12:55+00:00"
+guid: http://juplo.de/?p=114
+parent_post_id: null
+post_id: "114"
+title: hibernate4-maven-plugin 1.0.3 released!
+url: /hibernate4-maven-plugin-1-0-3-released/
+
+---
+Today we released the version 1.0.3 of [hibernate4-maven-plugin](/hibernate4-maven-plugin "hibernate4-maven-plugin") to [Central](http://search.maven.org/ "Central").
+
+## Scanning dependencies
+
+This release of the plugin now supports scanning of dependencies. By default all dependencies in the scope `compile` are scanned for annotated classes. Thanks to Guido Wimmel, who pointed out, that this was really missing and supported the implementation with a little test-project for this use-case. [Learn more...](/hibernate4-maven-plugin/export-mojo.html#scanDependencies "Configuring dependency-scanning")
+
+## Support for Hibernate Envers
+
+Another new feature of this release is support for [Hibernate Envers - Easy Entity Auditing](http://docs.jboss.org/envers/docs/ "Open documentation"). Thanks a lot to Victor Tatai, how implemented this, and Erik-Berndt Scheper, who helped integrating it and who supported the testin with a little test-project, that demonstrates the new feature. You can [visit it at bitbucket](https://bitbucket.org/fbascheper/hibernate4-maven-plugin-envers-sample "Open the example project") as a starting point for your own experiments with this technique.
+
+## Less bugs!
+
+Many thanks also to Stephen Johnson and Eduard Szente, who pointed out bugs and helped eleminating them...
+
+## Get your hands on - on central!
+
+**[hibernate4-maven-plugin 1.0.3](/hibernate4-maven-plugin/ "hibernate4-maven-plugin")** is available in the [Central Maven Repository](http://search.maven.org/#artifactdetails|de.juplo|hibernate4-maven-plugin|1.0.3|maven-plugin "Central Maven Repository").
+
+- hibernate4-maven-plugin? [What's that for?!?](/hibernate4-maven-plugin/ "hibernate4-maven-plugin")
+- [Read more about the hibernate4-maven-plugin...](/hibernate4-maven-plugin-a-simple-plugin-for-generating-a-database-schema-from-hibernate-4-mapping-annotations/ "About the hibernate4-maven-plugin")
+- [Jump to the quickstart-guide!](/hibernate4-maven-plugin/configuration.html "Quickstart")
+
+## Release notes:
+
+```
+commit adb20bc4da63d4cec663ca68648db0f808e3d181
+Author: Kai Moritz
+Date: Fri Oct 18 01:52:27 2013 +0200
+ Added missing documentation for skip-configuration
+commit 99a7eaddd1301df0d151f01791e3d177297670aa
+Author: Kai Moritz
+Date: Fri Oct 18 00:38:29 2013 +0200
+ Added @since-Annotation to configuration-parameters
+commit 221d977368ee1897377f80bfcdd50dcbcd1d4b83
+Author: Kai Moritz
+Date: Wed Oct 16 01:18:53 2013 +0200
+ The plugin now scans for annotated classes in dependencies too
+commit ef1233a6095a475d9cdded754381267c5d1e336f
+Author: Kai Moritz
+Date: Wed Oct 9 21:37:58 2013 +0200
+ Project-Documentation now uses the own skin juplo-skin
+commit 84e8517be79d88d7e2bec2688a8f965f591394bf
+Author: Kai Moritz
+Date: Wed Oct 9 21:30:28 2013 +0200
+ Reworked APT-Documentation: page-titles were missing
+commit f27134cdec6c38b4c8300efb0bb34fc8ed381033
+Author: Kai Moritz
+Date: Wed Oct 9 21:29:30 2013 +0200
+ maven-site-plugin auf Version 3.3 aktualisiert
+commit d38b2386641c7ca00f54d69cb3f576c20b0cdccc
+Author: Kai Moritz
+Date: Wed Sep 18 23:59:13 2013 +0200
+ Reverted to old behaviour: export is skipped, when maven.test.skip=true
+commit 7d935b61a3d80260b9cacf959984e14708c3a96b
+Author: Kai Moritz
+Date: Wed Sep 18 18:15:38 2013 +0200
+ No configuration for hibernate.dialect might be a valid configuration too
+commit caa492b70dc1daeaef436748db38df1c19554943
+Author: Kai Moritz
+Date: Wed Sep 18 18:14:54 2013 +0200
+ Improved log-messages
+commit 2b1147d5e99c764c1f6816f4d4f000abe260097c
+Author: Kai Moritz
+Date: Wed Sep 18 18:10:32 2013 +0200
+ Variable "envers" should not be put into hibernate.properties
+
+ "hibernate.exoprt.envers" is no Hibernate-Configuration-Parameter.
+ Hence, it should not be put into the hibernate.properties-file.
+commit 0a52dca3dd6729b8b6a43cc3ef3b69eb22755b0a
+Author: Erik-Berndt Scheper
+Date: Tue Sep 10 16:18:47 2013 +0200
+ Rename envers property to hibernate.export.envers
+commit 0fb85d6754939b2f30ca4fc18823c5f7da1add31
+Author: Erik-Berndt Scheper
+Date: Tue Sep 10 08:20:23 2013 +0200
+ Ignore IntelliJ project files
+commit e88830c968c1aabc5c32df8a061a8b446c26505c
+Author: Victor Tatai
+Date: Mon Feb 25 16:23:29 2013 -0300
+ Adding envers support (contribution from Victor Tatai)
+commit e59ac1191dda44d69dfb8f3afd0770a0253a785c
+Author: Kai Moritz
+Date: Tue Sep 10 20:46:55 2013 +0200
+ Added Link to old Version 1.0.2 in documentation
+commit 97a45d03e1144d30b90f2f566517be22aca39358
+Author: Kai Moritz
+Date: Tue Sep 10 20:29:15 2013 +0200
+ Execution is only skipped, if explicitly told so
+commit 8022611f93ad6f86534ddf3568766f88acf863f3
+Author: Kai Moritz
+Date: Sun Sep 8 00:25:51 2013 +0200
+ Upgrade to Scannotation 1.0.3
+commit 9ab53380a87c4a1624654f654158a701cfeb0cae
+Author: Kai Moritz
+Date: Sun Sep 8 00:25:02 2013 +0200
+ Upgrade to Hibernate 4.2.5.Final
+commit 5715c7e29252ed230389cfce9c1a0376fec82813
+Author: Kai Moritz
+Date: Sat Aug 31 09:01:43 2013 +0200
+ Fixed failure when target/classes does not exist when runnin mvn test phase
+
+ Thanks to Stephen Johnson
+
+ Details from the original email:
+ ---------
+ The following patch stops builds failing when target/classes (or no main java exists), and target/test-classes and src/tests exist.
+
+ So for example calling
+
+ mvn test -> invokes compiler:compile and if you have export bound to process-classes phase in executions it will fail. Maybe better to give info and carry on. Say for example they want to leave the executions in place that deal with process-classes and also process-test-classes but they do not want it to fail if there is no java to annotate in src/classes. The other way would be to comment out the executions bound to process-classes. What about export being bound to process-class by default? Could this also cause issues?
+
+ In either case I think the plugin code did checks for src/classes directory existing, in which case even call "mvn test" would fail as src/classes would not exist as no java existed in src/main only in src/test. Have a look through the patch and see if its of any use.
+commit 9414e11c9ffb27e195193f5fa53c203c6297c7a4
+Author: Kai Moritz
+Date: Sat Aug 31 11:28:51 2013 +0200
+ Improved log-messages
+commit da0b3041b8fbcba6175d05a2561b38c365111ed8
+Author: Kai Moritz
+Date: Sat Aug 31 08:51:03 2013 +0200
+ Fixed NPE when using nested classes in entities with @EmbeddedId/@Embeddable
+
+ Patch supplied by Eduard Szente
+
+ Details:
+ ----------------
+ Hi,
+
+ when using your plugin for schema export the presence of nested classes
+ in entities (e.g. when using @EmbeddedId/@Embeddable and defining the Id
+ within the target entity class)
+ yields to NPEs.
+
+ public class Entity {
+
+ @EmbeddedId
+ private Id id;
+
+ @Embeddable
+ public static class Id implements Serializable {
+ ....
+ }
+
+ }
+
+ Entity.Id.class.getSimplename == "Id", while the compiled class is named
+ "Entity$Id.class"
+
+ Patch appended.
+
+ Best regards,
+ Eduard
+```
--- /dev/null
+---
+_edit_last: "2"
+_wp_old_slug: logout-from-wrong-account-with-maven-appengine-plugin
+categories:
+ - appengine
+ - java
+ - maven
+ - oauth2
+date: "2013-10-03"
+lastmod: "2016-01-12T12:50:07+00:00"
+guid: http://juplo.de/?p=97
+parent_post_id: null
+post_id: "97"
+title: Log out from wrong Account with maven-appengine-plugin
+url: /log-out-from-wrong-account-with-maven-appengine-plugin/
+
+---
+Do you work with the [maven-appengine-plugin](https://developers.google.com/appengine/docs/java/tools/maven "Open documentation") and several google-accounts? If you do, or if you ever were logged in to the wrong google-account while executing `mvn appengine:update`, like me yesterday, you surely wondering, **how to logout from maven-appengine-plugin**.
+
+maven-appengine-plugin somehow miracolously stores your credentials for you, when you attemp to upload an app for the first time. This comes in very handy, if you work with just one google-account. But it might get a "pain-in-the-ass", if you work with several accounts. Because, if you once logged in into an account, there is no way (I mean: no goal of the maven-appengine-plugin) to log out, in order to change the account!
+
+## The solution: clear the credentials, that the maven-appengine-plugin stored on your behalf
+
+Only after hard googling, i found a solution to this problem in a [blog-post](http://www.radomirml.com/blog/2009/09/20/delete-cached-google-app-engine-credentials/ "Open the blog-post"): maven-appengine-plugin stores its oauth2-credentials in the file `.appcfg_oauth2_tokens_java` in your home directory (on Linux - sorry Windows-folks, you have to figure out yourself, where the plugin stores the credentials on Windows).
+
+**Just delete the file `.appcfg_oauth2_tokens_java` and your logged out!** The next time you call `mvn appengine:upload` you will be asked again to accept the request and, hence, can switch accounts. _If you are not using oauth2, just look for `.appcfg*`-files in your home directory. I am sure, you will find another file with stored credentials, that you can delet to logout, like Radomir, who [deleted `.appcfg_cookiesy` to log out](http://www.radomirml.com/blog/2009/09/20/delete-cached-google-app-engine-credentials/ "Open Radomir's Blog-Post to read more...")_.
--- /dev/null
+---
+_edit_last: "2"
+categories:
+ - java
+ - jetty
+date: "2014-02-23"
+lastmod: "2018-08-17T10:29:23+00:00"
+guid: http://juplo.de/?p=209
+parent_post_id: null
+post_id: "209"
+title: Configure HTTPS for jetty-maven-plugin 9.0.x
+url: /configure-https-for-jetty-maven-plugin-9-0-x/
+
+---
+## For the impatient
+
+If you do not want to know why it does not work and how I fixed it, just [jump to the quick fix](#quick-fix)!
+
+## jetty-maven-plugin 9.0.x breaks the HTTPS-Connector
+
+With Jetty 9.0.x the configuration of the `jetty-maven-plugin` (formaly known as `maven-jetty-plugin`) has changed dramatically. Since then, it is no more possible to configure a HTTPS-Connector in the plugin easily. Normally, connecting your development-container via HTTPS was not often necessary. But since [Snowden](http://en.wikipedia.org/wiki/Edward_Snowden "Read more about Edward Snowden"), encryption is on everybodys mind. And so, testing the encrypted part of your webapp becomes more and more important.
+
+## Why it is "broken" in `jetty-maven-plugin` 9.0.x
+
+[A bug-report](https://bugs.eclipse.org/bugs/show_bug.cgi?id=408962 "Read the bug-report") stats, that
+
+Since the constructor signature changed for Connectors in jetty-9 to require the Server instance to be passed into it, it is no longer possible to configure Connectors directly with the plugin (because maven requires no-arg constructor for any <configuration> elements).
+
+[The documentation](http://www.eclipse.org/jetty/documentation/current/jetty-maven-plugin.html "Jump to the documentation of the jetty-maven-plugin") includes an example, [how to configure a HTTPS Connector with the help of a `jetty.xml`-file](http://www.eclipse.org/jetty/documentation/current/jetty-maven-plugin.html#maven-config-https "Jump to the example in the documentation of the jetty-maven-plugin"). But unfortunatly, this example is broken. Jetty refuses to start with the following error: `[ERROR] Failed to execute goal org.eclipse.jetty:jetty-maven-plugin:9.0.5.v20130815:run (default-cli) on project FOOBAR: Failure: Unknown configuration type: New in org.eclipse.jetty.xml.XmlConfiguration@4809f93a -> [Help 1]`.
+
+## Get HTTPS running again
+
+So, here is, what you have to do to fix this [broken example](http://www.eclipse.org/jetty/documentation/current/jetty-maven-plugin.html#maven-config-https "Jump to the example in the documentation of the jetty-maven-plugin"): the content shown for the file `jetty.xml` in the example is wrong. It has to look like the other example-files. That is, ith has to start with a `<Configure>`-tag. The corrected content of the file looks like this:
+
+<a id="jetty-xml"></a>
+```html
+<?xml version="1.0"?>
+<!DOCTYPE Configure PUBLIC "-//Jetty//Configure//EN" "http://www.eclipse.org/jetty/configure_9_0.dtd">
+
+<!-- ============================================================= -->
+<!-- Configure the Http Configuration -->
+<!-- ============================================================= -->
+<Configure id="httpConfig" class="org.eclipse.jetty.server.HttpConfiguration">
+ <Set name="secureScheme">https</Set>
+ <Set name="securePort"><Property name="jetty.secure.port" default="8443" /></Set>
+ <Set name="outputBufferSize">32768</Set>
+ <Set name="requestHeaderSize">8192</Set>
+ <Set name="responseHeaderSize">8192</Set>
+ <Set name="sendServerVersion">true</Set>
+ <Set name="sendDateHeader">false</Set>
+ <Set name="headerCacheSize">512</Set>
+
+ <!-- Uncomment to enable handling of X-Forwarded- style headers
+ <Call name="addCustomizer">
+ <Arg><New class="org.eclipse.jetty.server.ForwardedRequestCustomizer"/></Arg>
+ </Call>
+ -->
+</Configure>
+```
+
+## But it's not running!
+
+If you are getting the error `[ERROR] Failed to execute goal org.eclipse.jetty:jetty-maven-plugin:9.0.5.v20130815:run (default-cli) on project FOOBAR: Failure: etc/jetty.keystore (file or directory not found) -> [Help 1]` now, this is because you have to create/get a certificate for your HTTPS-Connector. For development, a selfsigned certificate is sufficient. You can easily create one like back in the [good old `maven-jetty-plugin`-times](http://mrhaki.blogspot.de/2009/05/configure-maven-jetty-plugin-for-ssl.html "Example for configuring the HTTPS-Connector of the old maven-jetty-plugin"), with this command:
+
+<a id="keytool"></a>
+```bash
+keytool -genkey \
+ -alias jetty \
+ -keyalg RSA \
+ -keystore src/test/resources/jetty.keystore \
+ -storepass secret \
+ -keypass secret \
+ -dname "CN=localhost"
+```
+
+Just be sure, to change the example file `jetty-ssl.xml`, to reflect the path to your new keystore file and password. Your `jetty-ssl.xml` should look like:
+
+<a id="jetty-ssl-xml"></a>
+```html
+<?xml version="1.0"?>
+<!DOCTYPE Configure PUBLIC "-//Jetty//Configure//EN" "http://www.eclipse.org/jetty/configure_9_0.dtd">
+
+<!-- ============================================================= -->
+<!-- Configure a TLS (SSL) Context Factory -->
+<!-- This configuration must be used in conjunction with jetty.xml -->
+<!-- and either jetty-https.xml or jetty-spdy.xml (but not both) -->
+<!-- ============================================================= -->
+<Configure id="sslContextFactory" class="org.eclipse.jetty.util.ssl.SslContextFactory">
+ <Set name="KeyStorePath"><Property name="jetty.base" default="." />/<Property name="jetty.keystore" default="src/test/resources/jetty.keystore"/></Set>
+ <Set name="KeyStorePassword"><Property name="jetty.keystore.password" default="secret"/></Set>
+ <Set name="KeyManagerPassword"><Property name="jetty.keymanager.password" default="secret"/></Set>
+ <Set name="TrustStorePath"><Property name="jetty.base" default="." />/<Property name="jetty.truststore" default="src/test/resources/jetty.keystore"/></Set>
+ <Set name="TrustStorePassword"><Property name="jetty.truststore.password" default="secret"/></Set>
+ <Set name="EndpointIdentificationAlgorithm"></Set>
+ <Set name="ExcludeCipherSuites">
+ <Array type="String">
+ <Item>SSL_RSA_WITH_DES_CBC_SHA</Item>
+ <Item>SSL_DHE_RSA_WITH_DES_CBC_SHA</Item>
+ <Item>SSL_DHE_DSS_WITH_DES_CBC_SHA</Item>
+ <Item>SSL_RSA_EXPORT_WITH_RC4_40_MD5</Item>
+ <Item>SSL_RSA_EXPORT_WITH_DES40_CBC_SHA</Item>
+ <Item>SSL_DHE_RSA_EXPORT_WITH_DES40_CBC_SHA</Item>
+ <Item>SSL_DHE_DSS_EXPORT_WITH_DES40_CBC_SHA</Item>
+ </Array>
+ </Set>
+
+ <!-- =========================================================== -->
+ <!-- Create a TLS specific HttpConfiguration based on the -->
+ <!-- common HttpConfiguration defined in jetty.xml -->
+ <!-- Add a SecureRequestCustomizer to extract certificate and -->
+ <!-- session information -->
+ <!-- =========================================================== -->
+ <New id="sslHttpConfig" class="org.eclipse.jetty.server.HttpConfiguration">
+ <Arg><Ref refid="httpConfig"/></Arg>
+ <Call name="addCustomizer">
+ <Arg><New class="org.eclipse.jetty.server.SecureRequestCustomizer"/></Arg>
+ </Call>
+ </New>
+
+</Configure>
+```
+
+## But it's still not running!
+
+Unless you are running `mvn jetty:run` as `root`, you should see another error now: `[ERROR] Failed to execute goal org.eclipse.jetty:jetty-maven-plugin:9.0.5.v20130815:run (default-cli) on project FOOBAR: Failure: Permission denied -> [Help 1]`. This is, because the ports are set to the numbers `80` and `443` of the privileged port-range.
+
+<a id="jetty-http-xml"></a>
+You have to change `jetty-http.xml` like this:
+
+```html
+<?xml version="1.0"?>
+<!DOCTYPE Configure PUBLIC "-//Jetty//Configure//EN" "http://www.eclipse.org/jetty/configure_9_0.dtd">
+
+<!-- ============================================================= -->
+<!-- Configure the Jetty Server instance with an ID "Server" -->
+<!-- by adding a HTTP connector. -->
+<!-- This configuration must be used in conjunction with jetty.xml -->
+<!-- ============================================================= -->
+<Configure id="Server" class="org.eclipse.jetty.server.Server">
+
+ <!-- =========================================================== -->
+ <!-- Add a HTTP Connector. -->
+ <!-- Configure an o.e.j.server.ServerConnector with a single -->
+ <!-- HttpConnectionFactory instance using the common httpConfig -->
+ <!-- instance defined in jetty.xml -->
+ <!-- -->
+ <!-- Consult the javadoc of o.e.j.server.ServerConnector and -->
+ <!-- o.e.j.server.HttpConnectionFactory for all configuration -->
+ <!-- that may be set here. -->
+ <!-- =========================================================== -->
+ <Call name="addConnector">
+ <Arg>
+ <New class="org.eclipse.jetty.server.ServerConnector">
+ <Arg name="server"><Ref refid="Server" /></Arg>
+ <Arg name="factories">
+ <Array type="org.eclipse.jetty.server.ConnectionFactory">
+ <Item>
+ <New class="org.eclipse.jetty.server.HttpConnectionFactory">
+ <Arg name="config"><Ref refid="httpConfig" /></Arg>
+ </New>
+ </Item>
+ </Array>
+ </Arg>
+ <Set name="host"><Property name="jetty.host" /></Set>
+ <Set name="port"><Property name="jetty.port" default="8080" /></Set>
+ <Set name="idleTimeout"><Property name="http.timeout" default="30000"/></Set>
+ </New>
+ </Arg>
+ </Call>
+
+</Configure>
+```
+
+<a id="jetty-https-xml"></a>
+... and `jetty-https.xml` like this:
+
+```html
+<?xml version="1.0"?>
+<!DOCTYPE Configure PUBLIC "-//Jetty//Configure//EN" "http://www.eclipse.org/jetty/configure_9_0.dtd">
+
+<!-- ============================================================= -->
+<!-- Configure a HTTPS connector. -->
+<!-- This configuration must be used in conjunction with jetty.xml -->
+<!-- and jetty-ssl.xml. -->
+<!-- ============================================================= -->
+<Configure id="Server" class="org.eclipse.jetty.server.Server">
+
+ <!-- =========================================================== -->
+ <!-- Add a HTTPS Connector. -->
+ <!-- Configure an o.e.j.server.ServerConnector with connection -->
+ <!-- factories for TLS (aka SSL) and HTTP to provide HTTPS. -->
+ <!-- All accepted TLS connections are wired to a HTTP connection.-->
+ <!-- -->
+ <!-- Consult the javadoc of o.e.j.server.ServerConnector, -->
+ <!-- o.e.j.server.SslConnectionFactory and -->
+ <!-- o.e.j.server.HttpConnectionFactory for all configuration -->
+ <!-- that may be set here. -->
+ <!-- =========================================================== -->
+ <Call id="httpsConnector" name="addConnector">
+ <Arg>
+ <New class="org.eclipse.jetty.server.ServerConnector">
+ <Arg name="server"><Ref refid="Server" /></Arg>
+ <Arg name="factories">
+ <Array type="org.eclipse.jetty.server.ConnectionFactory">
+ <Item>
+ <New class="org.eclipse.jetty.server.SslConnectionFactory">
+ <Arg name="next">http/1.1</Arg>
+ <Arg name="sslContextFactory"><Ref refid="sslContextFactory"/></Arg>
+ </New>
+ </Item>
+ <Item>
+ <New class="org.eclipse.jetty.server.HttpConnectionFactory">
+ <Arg name="config"><Ref refid="sslHttpConfig"/></Arg>
+ </New>
+ </Item>
+ </Array>
+ </Arg>
+ <Set name="host"><Property name="jetty.host" /></Set>
+ <Set name="port"><Property name="https.port" default="8443" /></Set>
+ <Set name="idleTimeout"><Property name="https.timeout" default="30000"/></Set>
+ </New>
+ </Arg>
+ </Call>
+</Configure>
+```
+
+Now, it should be running, _but..._
+
+## That is all much to complex. I just want a quick fix to get it running!
+
+So, now it is working. But you still have to clutter your project with several files and avoid some pitfalls (belive me or not: if you put the filenames in the `<jettyXml>`-tag of your `pom.xml` on separate lines, jetty won't start!). Last but not least, the HTTP-Connector will stop working, if you forget to add the `jetty-http.xml`, that is mentioned at the end of the example.
+
+Because of that, I've created a simple 6-step quick-fix-guide to get the HTTPS-Connector of the `jetty-maven-plugin` running.
+
+## <a id="quick-fix"></a>Quick Fix
+
+1. Download [jetty.xml](/wp-uploads/2014/02/jetty.xml) or copy it [from above](#jetty-xml) and place it in `src/test/resources/jetty.xml`
+1. Download [jetty-http.xml](/wp-uploads/2014/02/jetty-http.xml) or copy it [from above](#jetty-http-xml) and place it in `src/test/resources/jetty-http.xml`
+1. Download [jetty-ssl.xml](/wp-uploads/2014/02/jetty-ssl.xml) or copy it [from above](#jetty-ssl-xml) and place it in `src/test/resources/jetty-ssl.xml`
+1. Download [jetty-https.xml](/wp-uploads/2014/02/jetty-https.xml) or copy it [from above](#jetty-https-xml) and place it in `src/test/resources/jetty-https.xml`
+1. Download [jetty.keystore](/wp-uploads/2014/02/jetty.keystore) or generate it with the command [keytool-command from above](#keytool) and place it in `src/test/resources/jetty.keystore`
+1. Update the configuration of the `jetty-maven-plugin` in your `pom.xml` to include the XML-configurationfiles. But be aware, the ordering of the files is important and there should be no newlines inbetween. You have been warned! It should look like:
+
+ ```html
+
+ <plugin>
+ <groupId>org.eclipse.jetty</groupId>
+ <artifactId>jetty-maven-plugin</artifactId>
+ <configuration>
+ <jettyXml>
+ ${project.basedir}/src/test/resources/jetty.xml,${project.basedir}/src/test/resources/jetty-http.xml,${project.basedir}/src/test/resources/jetty-ssl.xml,${project.basedir}/src/test/resources/jetty-https.xml
+ </jettyXml>
+ </configuration>
+ </plugin>
+
+ ```
+
+That's it. You should be done!
--- /dev/null
+---
+_edit_last: "2"
+categories:
+ - uncategorized
+classic-editor-remember: classic-editor
+date: "2014-03-16"
+lastmod: "2020-04-22T17:45:06+00:00"
+guid: http://juplo.de/?p=275
+parent_post_id: null
+post_id: "275"
+title: Der Benutzer ist nicht dazu berechtigt, diese Anwendung zu sehen
+url: /der-benutzer-ist-nicht-dazu-berechtigt-diese-anwendung-zu-sehen/
+
+---
+Du bist gerade bei Facebook über die folgende Fehlermeldung gestolpert:
+
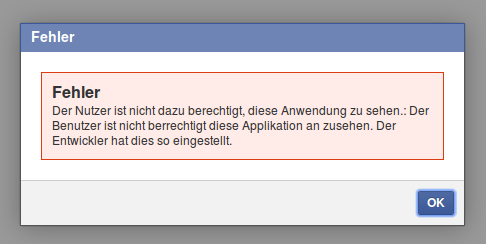
+**Fehler**
+
+Der Nutzer ist nicht dazu berechtigt, diese Anwendung zu sehen.:
+
+Der Benutzer ist nicht berrechtigt diese Applikation an zusehen. Der Entwickler hat dies so eingestellt.
+
+
+
+Da dazu nichts bei Googel zu finden war, hier die einfache Erklärung, was da schief läuft:
+
+**Du hast die bei Facebook als Testbenutzer einer deiner Apps eingeloggt und das beim Zugriff auf eine andere App vergessen!**
+
+Die Testbenutzer einer App dürfen offensichtlich nur auf diese App und sonst auf keine Seiten/Apps in Facebook zugreifen - macht ja auch Sinn.
+Verwirrend nur, dass Facebook behauptet, man hättte da etwas selber von Hand eingestellt...
--- /dev/null
+---
+_edit_last: "2"
+categories:
+ - html(5)
+ - wordpress
+date: "2014-02-25"
+lastmod: "2018-07-20T11:23:50+00:00"
+guid: http://juplo.de/?p=255
+parent_post_id: null
+post_id: "255"
+title: Disable automatic p and br tags in the wordpress editor - and do it as early, as you can!
+url: /disable-automatic-p-and-br-tags-in-the-wordpress-editor-and-do-it-as-early-as-you-can/
+
+---
+## Why you should disable them as early, as you can
+
+I don't like visual HTML-editors, because they always mess up your HTML. So the first thing, that I've done in my wordpress-profile, was checking the check-box `Disable the visual editor when writing`.
+But today I found out, that this is worth nothing.
+Even when in text-mode, wordpress is adding some `<p>-` and `<br>`-tags automagically and, hence, is automagically messing up my neatly hand-crafted HTML-code.
+
+**Fuck wordpress!** _(Ehem - sorry for that outburst)_...
+
+But what is even worse: after [really turning off wordpress's automagically-messup-functionality](#disable "Jump to the tech-section, if you only want to find out, how to disable wordpress's auto-messup functionality"), nearly all my handwritten `<p>`-tags were gone, too.
+So, if you want to turn of automatic `<p>-` and `<br>`-tags, you should really do it as early, as you can. Otherwise, you will have to clean up all your old posts afterwards like me. TI've lost some hours with usless HTML-editing today, because of that sh#%&\*!
+
+## <a id="disable"></a>How to disable them
+
+The [wordpress-documentation of the build-in HTML-editor](https://codex.wordpress.org/TinyMCE#Automatic_use_of_Paragraph_Tags) links to [this post](http://redrokk.com/2010/08/16/removing-p-tags-in-wordpress/), which describs how to disable autmatic use of paragraph tags.
+Simple open the file `wp-includes/default-filters.php` of you wordpress-installation and comment out the following line:
+
+```html
+addfilter('the_content', 'wpautop');
+```
+
+If you are building your own wordpress-theme - like me - you alternatively can add the following to the `functions.php`-file of your theme:
+
+```html
+remove_filter('the_content', 'wpautop');
+```
+
+## Why you should disable automatic paragraph tags
+
+For example, I was wondering a while, where all that whitespace in my posts were coming from.
+Being used to handcraft my HTML, I often wrote one sentence per line, or put some empty lines inbetween to clearly arange my code.
+There comes wordpress, messing everything up by automagically putting every sentence in its own paragraph, because it was written on its own line and putting `<br>` inbetween, to reflect my empty lines.
+
+But even worse, wordpress also puts these unwanted `<p>`-tags [arround HTML-code, that breaks because of it](http://wordpress.org/support/topic/disable-automatic-p-and-br-tags-in-html-editor "Another example is described in this forum-request. One guy puts a plugin in his post, but it does not work, because wordpress automagically messed up his HTML...").
+For example, I eventually found out about this auto-messup functionallity, because I was checking my blog-post with a [html-validator](http://validator.w3.org/) and was wondering, why the validator was grumping about a `<quote>`-tag inside [flow content](http://dev.w3.org/html5/html-author/#flow-content), which I've never put there. It turned out, that wordpress had put it there for me...
+++ /dev/null
----
-_edit_last: "2"
-categories:
- - hibernate
- - java
- - maven
-date: "2013-10-18"
-lastmod: "2014-01-15T20:12:55+00:00"
-guid: http://juplo.de/?p=114
-parent_post_id: null
-post_id: "114"
-title: hibernate4-maven-plugin 1.0.3 released!
-url: /hibernate4-maven-plugin-1-0-3-released/
-
----
-Today we released the version 1.0.3 of [hibernate4-maven-plugin](/hibernate4-maven-plugin "hibernate4-maven-plugin") to [Central](http://search.maven.org/ "Central").
-
-## Scanning dependencies
-
-This release of the plugin now supports scanning of dependencies. By default all dependencies in the scope `compile` are scanned for annotated classes. Thanks to Guido Wimmel, who pointed out, that this was really missing and supported the implementation with a little test-project for this use-case. [Learn more...](/hibernate4-maven-plugin/export-mojo.html#scanDependencies "Configuring dependency-scanning")
-
-## Support for Hibernate Envers
-
-Another new feature of this release is support for [Hibernate Envers - Easy Entity Auditing](http://docs.jboss.org/envers/docs/ "Open documentation"). Thanks a lot to Victor Tatai, how implemented this, and Erik-Berndt Scheper, who helped integrating it and who supported the testin with a little test-project, that demonstrates the new feature. You can [visit it at bitbucket](https://bitbucket.org/fbascheper/hibernate4-maven-plugin-envers-sample "Open the example project") as a starting point for your own experiments with this technique.
-
-## Less bugs!
-
-Many thanks also to Stephen Johnson and Eduard Szente, who pointed out bugs and helped eleminating them...
-
-## Get your hands on - on central!
-
-**[hibernate4-maven-plugin 1.0.3](/hibernate4-maven-plugin/ "hibernate4-maven-plugin")** is available in the [Central Maven Repository](http://search.maven.org/#artifactdetails|de.juplo|hibernate4-maven-plugin|1.0.3|maven-plugin "Central Maven Repository").
-
-- hibernate4-maven-plugin? [What's that for?!?](/hibernate4-maven-plugin/ "hibernate4-maven-plugin")
-- [Read more about the hibernate4-maven-plugin...](/hibernate4-maven-plugin-a-simple-plugin-for-generating-a-database-schema-from-hibernate-4-mapping-annotations/ "About the hibernate4-maven-plugin")
-- [Jump to the quickstart-guide!](/hibernate4-maven-plugin/configuration.html "Quickstart")
-
-## Release notes:
-
-```
-commit adb20bc4da63d4cec663ca68648db0f808e3d181
-Author: Kai Moritz
-Date: Fri Oct 18 01:52:27 2013 +0200
- Added missing documentation for skip-configuration
-commit 99a7eaddd1301df0d151f01791e3d177297670aa
-Author: Kai Moritz
-Date: Fri Oct 18 00:38:29 2013 +0200
- Added @since-Annotation to configuration-parameters
-commit 221d977368ee1897377f80bfcdd50dcbcd1d4b83
-Author: Kai Moritz
-Date: Wed Oct 16 01:18:53 2013 +0200
- The plugin now scans for annotated classes in dependencies too
-commit ef1233a6095a475d9cdded754381267c5d1e336f
-Author: Kai Moritz
-Date: Wed Oct 9 21:37:58 2013 +0200
- Project-Documentation now uses the own skin juplo-skin
-commit 84e8517be79d88d7e2bec2688a8f965f591394bf
-Author: Kai Moritz
-Date: Wed Oct 9 21:30:28 2013 +0200
- Reworked APT-Documentation: page-titles were missing
-commit f27134cdec6c38b4c8300efb0bb34fc8ed381033
-Author: Kai Moritz
-Date: Wed Oct 9 21:29:30 2013 +0200
- maven-site-plugin auf Version 3.3 aktualisiert
-commit d38b2386641c7ca00f54d69cb3f576c20b0cdccc
-Author: Kai Moritz
-Date: Wed Sep 18 23:59:13 2013 +0200
- Reverted to old behaviour: export is skipped, when maven.test.skip=true
-commit 7d935b61a3d80260b9cacf959984e14708c3a96b
-Author: Kai Moritz
-Date: Wed Sep 18 18:15:38 2013 +0200
- No configuration for hibernate.dialect might be a valid configuration too
-commit caa492b70dc1daeaef436748db38df1c19554943
-Author: Kai Moritz
-Date: Wed Sep 18 18:14:54 2013 +0200
- Improved log-messages
-commit 2b1147d5e99c764c1f6816f4d4f000abe260097c
-Author: Kai Moritz
-Date: Wed Sep 18 18:10:32 2013 +0200
- Variable "envers" should not be put into hibernate.properties
-
- "hibernate.exoprt.envers" is no Hibernate-Configuration-Parameter.
- Hence, it should not be put into the hibernate.properties-file.
-commit 0a52dca3dd6729b8b6a43cc3ef3b69eb22755b0a
-Author: Erik-Berndt Scheper
-Date: Tue Sep 10 16:18:47 2013 +0200
- Rename envers property to hibernate.export.envers
-commit 0fb85d6754939b2f30ca4fc18823c5f7da1add31
-Author: Erik-Berndt Scheper
-Date: Tue Sep 10 08:20:23 2013 +0200
- Ignore IntelliJ project files
-commit e88830c968c1aabc5c32df8a061a8b446c26505c
-Author: Victor Tatai
-Date: Mon Feb 25 16:23:29 2013 -0300
- Adding envers support (contribution from Victor Tatai)
-commit e59ac1191dda44d69dfb8f3afd0770a0253a785c
-Author: Kai Moritz
-Date: Tue Sep 10 20:46:55 2013 +0200
- Added Link to old Version 1.0.2 in documentation
-commit 97a45d03e1144d30b90f2f566517be22aca39358
-Author: Kai Moritz
-Date: Tue Sep 10 20:29:15 2013 +0200
- Execution is only skipped, if explicitly told so
-commit 8022611f93ad6f86534ddf3568766f88acf863f3
-Author: Kai Moritz
-Date: Sun Sep 8 00:25:51 2013 +0200
- Upgrade to Scannotation 1.0.3
-commit 9ab53380a87c4a1624654f654158a701cfeb0cae
-Author: Kai Moritz
-Date: Sun Sep 8 00:25:02 2013 +0200
- Upgrade to Hibernate 4.2.5.Final
-commit 5715c7e29252ed230389cfce9c1a0376fec82813
-Author: Kai Moritz
-Date: Sat Aug 31 09:01:43 2013 +0200
- Fixed failure when target/classes does not exist when runnin mvn test phase
-
- Thanks to Stephen Johnson
-
- Details from the original email:
- ---------
- The following patch stops builds failing when target/classes (or no main java exists), and target/test-classes and src/tests exist.
-
- So for example calling
-
- mvn test -> invokes compiler:compile and if you have export bound to process-classes phase in executions it will fail. Maybe better to give info and carry on. Say for example they want to leave the executions in place that deal with process-classes and also process-test-classes but they do not want it to fail if there is no java to annotate in src/classes. The other way would be to comment out the executions bound to process-classes. What about export being bound to process-class by default? Could this also cause issues?
-
- In either case I think the plugin code did checks for src/classes directory existing, in which case even call "mvn test" would fail as src/classes would not exist as no java existed in src/main only in src/test. Have a look through the patch and see if its of any use.
-commit 9414e11c9ffb27e195193f5fa53c203c6297c7a4
-Author: Kai Moritz
-Date: Sat Aug 31 11:28:51 2013 +0200
- Improved log-messages
-commit da0b3041b8fbcba6175d05a2561b38c365111ed8
-Author: Kai Moritz
-Date: Sat Aug 31 08:51:03 2013 +0200
- Fixed NPE when using nested classes in entities with @EmbeddedId/@Embeddable
-
- Patch supplied by Eduard Szente
-
- Details:
- ----------------
- Hi,
-
- when using your plugin for schema export the presence of nested classes
- in entities (e.g. when using @EmbeddedId/@Embeddable and defining the Id
- within the target entity class)
- yields to NPEs.
-
- public class Entity {
-
- @EmbeddedId
- private Id id;
-
- @Embeddable
- public static class Id implements Serializable {
- ....
- }
-
- }
-
- Entity.Id.class.getSimplename == "Id", while the compiled class is named
- "Entity$Id.class"
-
- Patch appended.
-
- Best regards,
- Eduard
-```
--- /dev/null
+---
+_edit_last: "2"
+categories:
+ - hibernate
+ - java
+ - maven
+date: "2014-11-11"
+lastmod: "2015-05-03T13:52:31+00:00"
+guid: http://juplo.de/?p=319
+parent_post_id: null
+post_id: "319"
+title: hibernate4-maven-plugin 1.0.5 released!
+url: /hibernate4-maven-plugin-1-0-5-released/
+
+---
+Today we released the version 1.0.5 of [hibernate4-maven-plugin](/hibernate4-maven-plugin "hibernate4-maven-plugin") to [Central](http://search.maven.org/#search|gav|1|g%3A%22de.juplo%22%20AND%20a%3A%22hibernate4-maven-plugin%22 "Central")!
+
+This release mainly fixes a NullPointerException-bug, that was introduced in 1.0.4.
+The NPE was triggered, if a `hibernate.properties`-file is present and the dialect is specified in that file and not in the plugin configuration.
+Thanks to Paulo Pires and and everflux, for pointing me at that bug.
+
+But there are also some minor improvements to talk about:
+
+- Package level annotations are now supported (Thanks to Joachim Van der Auwera for that)
+- `Hibernate Core` was upgraded to 4.3.7.Final
+- `Hibernate Envers` was upgraded to 4.3.7.Final
+- `Hibernate Validator` was upgrades to 5.1.3.Final
+
+The upgrade of `Hibernate Validator` is a big step, because 5.x supports Bean Validation 1.1 ( [JSR 349](https://jcp.org/en/jsr/detail?id=349 "Read the specification at jpc.org")).
+See [the FAQ of hibernate-validator](http://hibernate.org/validator/faq/ "Read the first entry for more details on the supported version of Bean Validation") for more details on this.
+
+Because `Hibernate Validator 5` requires the Unified Expression Language (EL) in version 2.2 or later, a dependency to `javax.el-api:3.0.0` was added.
+That does the trick for the integration-tests included in the source code of the plugin.
+But, because I am not using `Hibernate Validator` in any of my own projects, at the moment, the upgrade may rise some backward compatibility errors, that I am not aware of.
+_If you stumble across any problems, please let me know!_
+
+## Release notes:
+
+```
+commit ec30af2068f2d12a9acf65474ca1a4cdc1aa7122
+Author: Kai Moritz
+Date: Tue Nov 11 15:28:12 2014 +0100
+ [maven-release-plugin] prepare for next development iteration
+commit 18840e3c775584744199d8323eb681b73b98e9c4
+Author: Kai Moritz
+Date: Tue Nov 11 15:27:57 2014 +0100
+ [maven-release-plugin] prepare release hibernate4-maven-plugin-1.0.5
+commit b95416ef16bbaafecb3d40888fe97e70cdd75c77
+Author: Kai Moritz
+Date: Tue Nov 11 15:10:32 2014 +0100
+ Upgraded hibernate-validator from 4.3.2.Final to 5.1.3.Final
+
+ Hibernate Validator 5 requires the Unified Expression Language (EL) in
+ version 2.2 or later. Therefore, a dependency to javax.el-api:3.0.0 was
+ added. (Without that, the compilation of some integration-tests fails!)
+commit ad979a8a82a7701a891a59a183ea4be66672145b
+Author: Kai Moritz
+Date: Tue Nov 11 14:32:42 2014 +0100
+ Upgraded hibernate-core, hibernate-envers, hibernate-validator and maven-core
+
+ * Upgraded hibernate-core from 4.3.1.Final to 4.3.7.Final
+ * Upgraded hibernate-envers from 4.3.1.Final to 4.3.7.Final
+ * Upgraded hibernate-validator from 4.3.1.Final to 4.3.2.Final
+ * Upgraded maven-core from 3.2.1 to 3.2.3
+commit 347236c3cea0f204cefd860c605d9f086e674e8b
+Author: Kai Moritz
+Date: Tue Nov 11 14:29:23 2014 +0100
+ Added FAQ-entry for problem with whitespaces in the path under Windows
+commit 473c3ef285c19e0f0b85643b67bbd77e06c0b926
+Author: Kai Moritz
+Date: Tue Oct 28 23:37:45 2014 +0100
+ Explained how to suppress dependency-scanning in documentation
+
+ Also added a test-case to be sure, that dependency-scanning is skipped, if
+ the parameter "dependencyScanning" is set to "none".
+commit 74c0dd783b84c90e116f3e7f1c8d6109845ba71f
+Author: Kai Moritz
+Date: Mon Oct 27 09:04:48 2014 +0100
+ Fixed NullPointerException, when dialect is specified in properties-file
+
+ Also added an integration test-case, that proofed, that the error was
+ solved.
+commit d27f7af23c82167e873ce143e50ce9d9a65f5e61
+Author: Kai Moritz
+Date: Sun Oct 26 11:16:00 2014 +0100
+ Renamed an integration-test to test for whitespaces in the filename
+commit 426d18e689b89f33bf71601becfa465a00067b10
+Author: Kai Moritz
+Date: Sat Oct 25 17:29:41 2014 +0200
+ Added patch by Joachim Van der Auwera to support package level annotations
+commit 3a3aeaabdb1841faf5e1bf8d220230597fb22931
+Author: Kai Moritz
+Date: Sat Oct 25 16:52:34 2014 +0200
+ Integrated integration test provided by Claus Graf (clausgraf@gmail.com)
+commit 3dd832edbd50b1499ea6d53e4bcd0ad4c79640ed
+Author: Kai Moritz
+Date: Mon Jun 2 10:31:13 2014 +0200
+ [maven-release-plugin] prepare for next development iteration
+```
--- /dev/null
+---
+_edit_last: "2"
+categories:
+ - html(5)
+date: "2015-06-24"
+lastmod: "2020-04-10T11:53:39+00:00"
+guid: http://juplo.de/?p=357
+parent_post_id: null
+post_id: "357"
+title: A Perfect Outline
+url: /a-perfect-outline/
+
+---
+## Point Out Your Content: Utilize the HTML5 Outline-Algorithm
+
+HTML5 introduces new semantic elements accompained by the definition of [a new algorithm to calculate the document-outline](https://developer.mozilla.org/de/docs/Web/Guide/HTML/Sections_and_Outlines_of_an_HTML5_document "Read all about the new possibilities to mark up the outline of your document") from the mark up.
+There are plenty of [good explanations](http://www.smashingmagazine.com/2011/08/16/html5-and-the-document-outlining-algorithm/ "This is a very good overview, because it also pointes out, what to watch out for") of these new possibilities, to point out your content in a more controlled way.
+But the most of these explanations fall short, if it comes to how to put these new markup into use, so that it results in a sensible outline of the document, that was marked up.
+
+In this article I will try to explain, how to use the new semantic markup, to produce an outline, that is usable as a real content table of the document - not just as an partially orderd overview of all headings.
+I will do so, by showing simple examples, that will illuminate the principles behind the new markup.
+
+## All Messed Up!
+
+Although, the ideas behind the new markup seems to be simple and clear, nearly nobody accomplishes to produce a sensible outline.
+Even the big players, who [guide us through the jungle of the new specifications](http://www.html5rocks.com/de/ "Great guidance - but bad outline") and are giving [great explanations about the subject](http://www.smashingmagazine.com/2013/01/18/the-importance-of-sections/ "Great explanation - but bad outline"), either fail on there sites (see by yourself with the help of the help of [the h5o HTML5 Outline Bookmarklet](https://h5o.github.io/ "Just drag and drop the bookmarklet to your favorites.")), or produce the outline in the old way by the usage of `h1`- `h6` only, like the fabulous HTML5-bible [Dive Into HTML5](http://diveintohtml5.info/semantics.html#footer-element "A wounderful introduction to the new possibilities of HTML5 - but the tid outline is produced the old way").
+
+This is, because there is a lot to mix up in a wrong way, when trying to adopt the new features.
+Here is, what I ended up with, on my first try to combine what I have learned about [semantic elements](http://www.w3schools.com/html/html5_semantic_elements.asp "Overview of the new semantic elements, available in HTML5") and the [document outline](http://html5doctor.com/outlines/ "An explanation, of what the specs told you about the document outline"):
+
+#### Example 01: Markup
+
+```html
+<!DOCTYPE html>
+<title>Example 01</title>
+<header>
+ <h2>Header</h2>
+ <nav>Navigation</nav>
+</header>
+<main>
+ <h1>Main</h1>
+ <section>
+ <h2>Section I</h2>
+ </section>
+ <section>
+ <h2>Section II</h2>
+ <section>
+ <h3>Subsection a</h3>
+ </section>
+ <section>
+ <h3>Subsection b</h3>
+ </section>
+ </section>
+ <section>
+ <h2>Section III</h2>
+ <section>
+ <h3>Subsection a</h3>
+ </section>
+ </section>
+</main>
+<aside>
+ <h1>Aside</h1>
+</aside>
+<footer>
+ <h2>Footer</h2>
+</footer>
+```
+
+#### Example 01: Outline
+
+1. Header
+1. _Untitled section_
+1. Main
+1. Section I
+1. Section II
+ 1. Subsection a
+ 1. Subsection b
+1. Section III
+ 1. Subsection a
+1. Aside
+1. Footer
+
+[View example 01](/wp-uploads/2015/06/example-01.html)
+
+That quiet was not the outline, that I had expected.
+I planed, that _Header_, _Main_, _Aside_ and _Footer_ are ending up at the same level.
+Instead of that, _Aside_ and _Footer_ had become sections of my _Main_-content.
+And where the hell comes that _Untitled section_ from?!?
+My first thought on that was: No problem, I just forgot the `header`-tags.
+But after adding them, the only thing that cleared out, was where the _Untitled section_ was coming from:
+
+#### Example 02: Markup
+
+```html
+<!DOCTYPE html>
+<title>Example 02</title>
+<header>
+ <h2>Header</h2>
+ <nav>
+ <header><h3>Navigation</h3></header>
+ </nav>
+</header>
+<main>
+ <header><h1>Main</h1></header>
+ <section>
+ <header><h2>Section I</h2></header>
+ </section>
+ <section>
+ <header><h2>Section II</h2></header>
+ <section>
+ <header><h3>Subsection a</h3></header>
+ </section>
+ <section>
+ <header><h3>Subsection b</h3></header>
+ </section>
+ </section>
+ <section>
+ <header><h2>Section III</h2></header>
+ <section>
+ <header><h3>Subsection a</h3></header>
+ </section>
+ </section>
+</main>
+<footer>
+ <header><h2>Footer</h2></header>
+</footer>
+```
+
+#### Example 02: Outline
+
+1. Header
+1. Navigation
+1. Main
+1. Section I
+1. Section II
+ 1. Subsection a
+ 1. Subsection b
+1. Section III
+ 1. Subsection a
+1. Aside
+1. Footer
+
+[View example 02](/wp-uploads/2015/06/example-02.html)
+
+So I thought: Maybe the `main`-tag was the wrong choice.
+Perhaps it should be replaced by an `article`.
+But after that change, the outline even got worse.
+Now, _Navigation_, _Main_ and _Aside_ appeared on the same level, all as a subsection of _Header_.
+At least, _Footer_ suddenly was a sibling of _Header_ as planed:
+
+#### Example 03: Markup
+
+```html
+<!DOCTYPE html>
+<title>Example 03</title>
+<header>
+ <h2>Header</h2>
+ <nav>
+ <header><h3>Navigation</h333></header>
+ </nav>
+</header>
+<article>
+ <header><h1>Article (Main)</h1></header>
+ <section>
+ <header><h2>Section I</h2></header>
+ </section>
+ <section>
+ <header><h2>Section II</h2></header>
+ <section>
+ <header><h3>Subsection a</h3></header>
+ </section>
+ <section>
+ <header><h3>Subsection b</h3></header>
+ </section>
+ </section>
+ <section>
+ <header><h2>Section III</h2></header>
+ <section>
+ <header><h3>Subsection a</h3></header>
+ </section>
+ </section>
+</article>
+<footer>
+ <header><h2>Footer</h2></header>
+</footer>
+```
+
+#### Example 03: Outline
+
+1. Header
+1. Navigation
+1. Main
+ 1. Section I
+ 1. Section II
+ 1. Subsection a
+ 1. Subsection b
+ 1. Section III
+ 1. Subsection a
+1. Aside
+1. Footer
+
+[View example 03](/wp-uploads/2015/06/example-03.html)
+
+After that, I was totally confused and decided, to sort it out step by step.
+That procedure finally gave me the clue, I want to share with you now.
+
+## Step by Step (Uh Baby!)
+
+### <a id="step-01"></a>Step I: Investigate the Structured Part
+
+Let us start with the strictly structured part of the document: **the article and it's subsections**.
+At first a minimal example with no markup except the `article`\- and the `section`-tags:
+
+#### Example 04: Markup
+
+```html
+<!DOCTYPE html>
+<title>Example 04</title>
+<article>
+ Main
+ <section>
+ Section I
+ </section>
+ <section>
+ Section II
+ <section>
+ Subsection a
+ </section>
+ <section>
+ Subsection b
+ </section>
+ </section>
+ <section>
+ Section III
+ <section>
+ Subsection a
+ </section>
+ </section>
+</article>
+```
+
+#### Example 04: Outline
+
+1. _Untitled BODY_ 1. _Untitled ARTICLE_ 1. _Untitled SECTION_
+ 1. _Untitled SECTION_ 1. _Untitled SECTION_
+ 1. _Untitled SECTION_
+ 1. _Untitled SECTION_ 1. _Untitled SECTION_
+
+[View Example 04](/wp-uploads/2015/06/example-04.html)
+
+Nothing really unexpected here.
+The `article`\- and `section`-tags are reflected in the outline according to their nesting.
+The only thing notably here is, that the `body` itself is also reflected in the outline.
+It appears on its own level as the root-element of all tags.
+We can think of it as the title of our document.
+
+We can add headings of any kind ( `h1`- `h6`) here and will always get an identically structured outline, that reflects the text of our headings.
+If we want to give the body a title, we have to place a heading outside and before any sectioning-elements:
+
+#### <a id="example-05"></a>Example 05: Markup
+
+```html
+<!DOCTYPE html>
+<title>Example 05</title>
+<h1>Page</h1>
+<article>
+ <h1>Article</h1>
+ <section>
+ <h1>Section I</h1>
+ </section>
+ <section>
+ <h1>Section II</h1>
+ <section>
+ <h1>Subsection a</h1>
+ </section>
+ <section>
+ <h1>Subsection b</h1>
+ </section>
+ </section>
+ <section>
+ <h1>Section III</h1>
+ <section>
+ <h1>Subsection a</h1>
+ </section>
+ </section>
+</article>
+```
+
+#### Example 05: Outline
+
+1. Page
+1. Article
+ 1. Section I
+ 1. Section II
+ 1. Subsection a
+ 1. Subsection b
+ 1. Section III
+ 1. Subsection a
+
+[View Example 05](/wp-uploads/2015/06/example-05.html)
+
+This is the new part of the outline algorithm introduced in HTML5: _The nesting of elements, that define sections, defines the outline of the document._
+The rank of the heading element is ignored by this algorithm!
+
+Among the elements, that define sections in HTML5 are the `article` and the `section` tags.
+But there are more.
+[I will discuss them later](#sectioning-elemnts "Jump to the explanation of all sectioning-elements now").
+For now, you only have to know, that in HTML5, sectioning elements define the structure of the outline.
+Also, you should memorize, that the outline always has a single root without any siblings: the `body`.
+
+### <a id="step-2"></a>Step II: Investigate the Page-Elements
+
+So, let us do the same with the tags that represent the different logical sections of a web-page: **the page-elements**.
+We start with a minimal example again, that contains no markup except the `header`\- the `main` and the `footer`-tags:
+
+#### Example 06: Markup
+
+```html
+<!DOCTYPE html>
+<title>Example 06</title>
+<header>Page</header>
+<main>Main</main>
+<footer>Footer</footer>
+```
+
+#### Example 06: Outline
+
+1. _Untitled BODY_
+
+[View Example 06](/wp-uploads/2015/06/example-06.html)
+
+That is wired, ehh?
+There is only one untitled element in the outline.
+The explanation for this is, that neither the `header`\- nor the `main`\- nor the `footer`-tag belong to the elements, that define a section in HTML5!
+This is often confused, because these elements define _the logical sections_ (header – main-content – footer) of a website.
+But these logical sections do not have to do anything with the structural sectioning of the document, that defines the outline.
+
+### Step III: Investigate the Headings
+
+So, what happens, if we add the desired markup for our headings?
+We want a `h1`-heading for our main-content, because it is the important part of our page.
+The header should have a `h2`-heading and the footer a `h3`-heading, because it is rather unimportant.
+
+#### <a id="example-07"></a>Example 07: Markup
+
+```html
+<!DOCTYPE html>
+<title>Example 07</title>
+<header><h2>Page</h2></header>
+<main><h1>Main</h1></main>
+<footer><h3>Footer</h3></footer>
+```
+
+#### Example 07: Outline
+
+1. Page
+1. Main
+1. Footer
+
+[View Example 07](/wp-uploads/2015/06/example-07.html)
+
+Now, there is an outline again.
+But why?
+And why is it looking this way?
+
+What happens here, is [implicit sectioning](https://developer.mozilla.org/de/docs/Web/Guide/HTML/Sections_and_Outlines_of_an_HTML5_document#Implicit_Sectioning "Read all about implicit sectioning").
+In short, implicit sectioning is the outline algorithm of HTML4.
+HTML5 needs implicit sectioning, to keep compatible with HTML4, which still dominates the web.
+In fact, we could have used plain HTML4, with `div` instead of `header`, `main` and `footer`, and it would have yield the exact same outline:
+
+#### Example 08: Markup
+
+```html
+<!DOCTYPE HTML PUBLIC "-//W3C//DTD HTML 4.01 Transitional//EN" "http://www.w3.org/TR/html4/loose.dtd">
+<html>
+ <head><title>Example 08</title></head>
+ <body>
+ <div class="header"><h2>Page</h2></div>
+ <div class="main"><h1>Main</h1></div>
+ <div class="footer"><h3>Footer</h3></div>
+ </body>
+</html>
+```
+
+#### Example 08: Outline
+
+1. Page
+1. Main
+1. Footer
+
+[View Example 08](/wp-uploads/2015/06/example-08.html)
+
+In HTML4, solely the headings ( `h1`- `h6`) define the outline of a document.
+The enclosing elements or any nesting of them are ignored altogether.
+The level, at which a heading appears in the outline, is defined by the rank of the heading alone.
+(Strictly speaking, HTML4 does not define anything like a document outline.
+But as a result of the common usage and interpretation, this is, how people outline their documents with HTML4.)
+
+The implicit sectioning of HTML5 works in a way, that is backward compatible with this way of outlining, but closes the gaps in the resulting hierarchy:
+_Each heading implicitly opens a section – hence the name –, but if there is a gap between its rank and the rank of its ancestor – that is the last preceding heading with a higher rank – it is placed in the level directly beneath its ancestor_:
+
+#### Example 09: Markup
+
+```html
+<!DOCTYPE html>
+<title>Example 09</title>
+<h4>h4</h4>
+<h2>h2</h2>
+<h4>h4</h4>
+<h3>h3</h3>
+<h2>h2</h2>
+<h1>h1</h1>
+<h2>h2</h2>
+<h3>h3</h3>
+```
+
+#### Example 09: Outline
+
+1. h4
+1. h2
+1. h4
+1. h3
+1. h2
+1. h1
+1. h2
+ 1. h3
+
+[View Example 09](/wp-uploads/2015/06/example-09.html)
+
+See, how the first heading `h4` ends up on the same level as the second, which is a `h2`.
+Or, how the third and fourth headings are both on the same level under the `h2`, although they are of different rank.
+And note, how the `h2` and `h3` end up on different sectioning-levels as their earlier appearances, if they follow a `h1` in the natural order.
+
+### Step IV: Mixing it all together
+
+With the gathered clues in mind, we can now retry to layout our document with the desired outline.
+If we want, that _Header_, _Main_ and _Footer_ end up as top level citizens in our planed outline, we simply have to achieve, that they are all recognized as sections under the top level by the HTML5 outline algorithm.
+We can do that, by explicitly stating, that the `header` and the `footer` are section:
+
+#### Example 10: Markup
+
+```html
+<!DOCTYPE html>
+<title>Example 10</title>
+<header>
+ <section>
+ <h2>Main</h2>
+ </section>
+</header>
+<main>
+ <article>
+ <h1>Article</h1>
+ <section>
+ <h2>Section I</h2>
+ </section>
+ <section>
+ <h2>Section II</h2>
+ <section>
+ <h3>Subsection a</h3>
+ </section>
+ <section>
+ <h3>Subsection b</h3>
+ </section>
+ </section>
+ <section>
+ <h2>Section III</h2>
+ <section>
+ <h3>Subsection a</h3>
+ </section>
+ </section>
+ </article>
+</main>
+<footer>
+ <section>
+ <h3>Footer</h3>
+ </section>
+</footer>
+```
+
+#### Example 10: Outline
+
+1. _Untitled BODY_ 1. Main
+1. Article
+ 1. Section I
+ 1. Section II
+ 1. Subsection a
+ 1. Subsection b
+ 1. Section III
+ 1. Subsection a
+1. Footer
+
+[View Example 10](/wp-uploads/2015/06/example-10.html)
+
+So far, so good.
+But what about the untitled body?
+We forgot about the single root of any outline, that is defined by the body, how we learned back in [step 1](#step-01 "Jump back to step 1, if you do not remember..."). As shown in [example 05](#example-05 "Revisit example 5"), we can simply name that by putting a heading outside and before any element, that defines a section:
+
+#### Example 11: Markup
+
+```html
+<!DOCTYPE html>
+<title>Example 11</title>
+<header>
+ <h2>Page</h2>
+ <section>
+ <h3>Header</h3>
+ </section>
+</header>
+<main>
+ <article>
+ <h1>Article</h1>
+ <section>
+ <h2>Section I</h2>
+ </section>
+ <section>
+ <h2>Section II</h2>
+ <section>
+ <h3>Subsection a</h3>
+ </section>
+ <section>
+ <h3>Subsection b</h3>
+ </section>
+ </section>
+ <section>
+ <h2>Section III</h2>
+ <section>
+ <h3>Subsection a</h3>
+ </section>
+ </section>
+ </article>
+</main>
+<footer>
+ <section>
+ <h3>Footer</h3>
+ </section>
+</footer>
+```
+
+#### Example 11: Outline
+
+1. _Page_ 1. Header
+1. Main
+ 1. Section I
+ 1. Section II
+ 1. Subsection a
+ 1. Subsection b
+ 1. Section III
+ 1. Subsection a
+1. Footer
+
+[View Example 11](/wp-uploads/2015/06/example-11.html)
+
+### Step V: Be Aware, Which Elements Define Sections
+
+The eagle-eyed among you might have noticed, that I had "forgotten" the two element-types `nav` and `aside`, when we were investigating the elements, that define the logical structure of the page in [step 2](#step-2 "Revisit step 2").
+I did not forgot about these – I left them out intentionally.
+Because otherwise, the results of [example 07](#example-07 "Revisit example 07") would have been too confusing, to made my point about implicit sectioning.
+Let us look, what would have happend:
+
+#### Example 12: Markup
+
+```html
+<!DOCTYPE html>
+<title>Example 12</title>
+<header>
+ <h1>Page</h1>
+ <nav><h1>Navigation</h1></nav>
+</header>
+<main><h1>Main</h1></main>
+<aside><h1>Aside</h1></aside>
+<footer><h1>Footer</h1></footer>
+```
+
+#### Example 07: Outline
+
+1. Page
+1. Navigation
+1. Main
+1. Aside
+1. Footer
+
+[View Example 12](/wp-uploads/2015/06/example-12.html)
+
+What is wrong there?
+Why are _Navigation_ and _Aside_ showing up as children, albeit we marked up every element with headings of the same rank?
+The reason for this is, that `nav` and `aside` are sectioning elements:
+
+#### Example 12: Markup
+
+```html
+<!DOCTYPE html>
+<title>Example 13</title>
+<header>
+ Page
+ <nav>Navigation</nav>
+</header>
+<main>Main</main>
+<aside>Aside</aside>
+<footer>Footer</footer>
+```
+
+#### Example 07: Outline
+
+1. _Untitled BODY_ 1. _Untitled NAV_
+1. _Untitled ASIDE_
+
+[View Example 13](/wp-uploads/2015/06/example-13.html)
+
+<a id="sectioning-elemnts"></a>
+The HTML5 spec defines four [sectioning elements](http://www.w3.org/WAI/GL/wiki/Using_HTML5_section_elements "Read about the intended use of these sectioning elements"): `article`, `section`, `nav` and `aside`!
+Some explain the confusion about this fact with the constantly evolving standard, that leads to [structurally unclear specifications](http://www.smashingmagazine.com/2013/01/18/the-importance-of-sections/#cad-middle "Jump to this rather lame excuse in an otherwise great article").
+I will be frank:
+_I cannot imagine any good reason for this decision!_
+In my opinion, the concept would be much clearer, if `article` and `section` would be the only two sectioning elements and `nav` and `aside` would only define the logical structure of the page, like `header` and `footer`.
+
+## Putting It All Together
+
+Knowing, that `nav` and `aside` will define sections, we now can complete our outline skillfully avoiding the appearance of untitled sections:
+
+#### Example 14: Markup
+
+```html
+<!DOCTYPE html>
+<title>Example 14</title>
+<header>
+ <h2>Page</h2>
+ <section>
+ <h3>Header</h3>
+ <nav><h4>Navigation</h4></nav>
+ </section>
+</header>
+<main>
+ <article>
+ <h1>Main</h1>
+ <section>
+ <h2>Section I</h2>
+ </section>
+ <section>
+ <h2>Section II</h2>
+ <section>
+ <h3>Subsection a</h3>
+ </section>
+ <section>
+ <h3>Subsection b</h3>
+ </section>
+ </section>
+ <section>
+ <h2>Section III</h2>
+ <section>
+ <h3>Subsection a</h3>
+ </section>
+ </section>
+ </article>
+</main>
+<aside><h3>Aside</h3></aside>
+<footer>
+ <section>
+ <h3>Footer</h3>
+ </section>
+</footer>
+```
+
+#### Example 14: Outline
+
+1. _Page_ 1. Header
+ 1. Navigation
+1. Main
+ 1. Section I
+ 1. Section II
+ 1. Subsection a
+ 1. Subsection b
+ 1. Section III
+ 1. Subsection a
+1. Aside
+1. Footer
+
+[View Example 14](/wp-uploads/2015/06/example-14.html)
+
+_Et voilà: Our Perfect Outline!_
+
+If you memorize the concepts, that you have learned in this little tutorial, you should now be able to mark up your documents to generate _your perfect outline_...
+
+...but: one last word about headings:
+
+## A Word On The Ranks Of The Headings
+
+It is crucial to note, that [the new outline-algorithm still is a fiction](http://www.paciellogroup.com/blog/2013/10/html5-document-outline/ "Read, why it may be dangerous, to miss that it is not yet real"): most user agents do not implement the algorithm yet.
+Hence, you still should stick to the old [hints for keeping your content accessible](https://dequeuniversity.com/assets/html/jquery-summit/html5/slides/headings.html "Tipps, how to create a logical outline of your document the old way") and point out the most important heading to the search engines.
+
+But there is no reason, not to apply the new possibilities shown in this article to your markup: it will only make it more feature-proof.
+It is very likely, that [search engines will start to adopt the HTML5 outline algorithm](http://html5doctor.com/html5-seo-search-engine-optimisation/ "Read more about, what search engines already pick up from the new fruits, that HTML5 has to offer"), to make more sense out of your content in near feature - or are already doing so...
+So, why not be one of the first, to gain from that new technique.
+
+_I would advise you, to adopt the new possibilities to section your content and generate a sensible outline, while still keeping the old heading ranks to be backward compatible._
--- /dev/null
+---
+_edit_last: "2"
+categories:
+ - facebook
+ - java
+ - oauth2
+ - spring
+date: "2015-06-28"
+lastmod: "2016-06-26T10:40:45+00:00"
+guid: http://juplo.de/?p=462
+parent_post_id: null
+post_id: "462"
+title: Configure pac4j for a Social-Login along with a Spring-Security based Form-Login
+url: /configure-pac4j-for-a-social-login-along-with-a-spring-security-based-form-login/
+
+---
+## The Problem – What will be explained
+
+If you just want to enable your spring-based webapplication to let users log in with their social accounts, without changing anything else, [pac4j](http://www.pac4j.org/#1 "The authentication solution for java") should be your first choice.
+But the [provided example](https://github.com/pac4j/spring-security-pac4j-demo "Clone the examples on GitHub") only shows, how to define all authentication mechanisms via pac4j.
+If you already have set up your log-in via spring-security, you have to reconfigure it with the appropriate pac4j-mechanism.
+That is a lot of unnecessary work, if you just want to supplement the already configured log in with the additionally possibility, to log in via a social provider.
+
+In this short article, I will show you, how to set that up along with the normal [form-based login of Spring-Security](http://docs.spring.io/spring-security/site/docs/4.0.1.RELEASE/reference/htmlsingle/#ns-form-and-basic "Read, how to set up the form-based login of Spring-Security").
+I will show this for a Login via Facabook along the Form-Login of Spring-Security.
+The method should work as well for [other social logins, that are supported by spring-security-pac4j](https://github.com/pac4j/spring-security-pac4j#providers-supported "See a list of all login-mechanisms, supported by spring-security-pac4j"), along other login-mechanisms provided by spring-security out-of-the-box.
+
+In this article I will not explain, how to store the user-profile-data, that was retrieved during the social login.
+Also, if you need more social interaction, than just a login and access to the default data in the user-profile you probably need [spring-social](http://projects.spring.io/spring-social/ "Homepage of the spring-social project"). How to combine spring-social with spring-security for that purpose, is explained in this nice article about how to [add social sign in to a spring-mvc weba-pplication](http://www.petrikainulainen.net/programming/spring-framework/adding-social-sign-in-to-a-spring-mvc-web-application-configuration/ "Read this article about how to integrate spring-security with spring-social").
+
+## Adding the Required Maven-Artifacts
+
+In order to use spring-security-pac4j to login to facebook, you need the following maven-artifacts:
+
+```xml
+<dependency>
+ <groupId>org.pac4j</groupId>
+ <artifactId>spring-security-pac4j</artifactId>
+ <version>1.2.5</version>
+</dependency>
+<dependency>
+ <groupId>org.pac4j</groupId>
+ <artifactId>pac4j-http</artifactId>
+ <version>1.7.1</version>
+</dependency>
+<dependency>
+ <groupId>org.pac4j</groupId>
+ <artifactId>pac4j-oauth</artifactId>
+ <version>1.7.1</version>
+</dependency>
+```
+
+## Configuration of Spring-Security (Without Social Login via pac4j)
+
+This is a bare minimal configuration to get the form-login via Spring-Security working:
+
+```xml
+<?xml version="1.0" encoding="UTF-8"?>
+<beans
+ xmlns="http://www.springframework.org/schema/beans"
+ xmlns:security="http://www.springframework.org/schema/security"
+ xmlns:xsi="http://www.w3.org/2001/XMLSchema-instance"
+ xsi:schemaLocation="
+ http://www.springframework.org/schema/beans http://www.springframework.org/schema/beans/spring-beans-3.0.xsd
+ http://www.springframework.org/schema/security http://www.springframework.org/schema/security/spring-security-3.2.xsd
+ ">
+
+ <security:http use-expressions="true">
+ <security:intercept-url pattern="/**" access="permitAll"/>
+ <security:intercept-url pattern="/home.html" access="isAuthenticated()"/>
+ <security:form-login login-page="/login.html" authentication-failure-url="/login.html?failure"/>
+ <security:logout/>
+ <security:remember-me/>
+ </security:http>
+
+ <security:authentication-manager>
+ <security:authentication-provider>
+ <security:user-service>
+ <security:user name="user" password="user" authorities="ROLE_USER" />
+ </security:user-service>
+ </security:authentication-provider>
+ </security:authentication-manager>
+
+</beans>
+```
+
+The `http` defines, that the access to the url `/home.html` is restriced and must be authenticated via a form-login on url `/login.html`.
+The `authentication-manager` defines an in-memory authentication-provider for testing purposes with just one user (username: `user`, password: `user`).
+For more details, see the [documentation of spring-security](http://docs.spring.io/spring-security/site/docs/4.0.1.RELEASE/reference/htmlsingle/#ns-form-and-basic "Read more about the available configuration-parameters in the spring-security documentation").
+
+## Enabling pac4j via spring-security-pac4j alongside
+
+To enable pac4j alongside, you have to add/change the following:
+
+```xml
+<?xml version="1.0" encoding="UTF-8"?>
+<beans
+ xmlns="http://www.springframework.org/schema/beans"
+ xmlns:security="http://www.springframework.org/schema/security"
+ xmlns:xsi="http://www.w3.org/2001/XMLSchema-instance"
+ xsi:schemaLocation="
+ http://www.springframework.org/schema/beans http://www.springframework.org/schema/beans/spring-beans-3.0.xsd
+ http://www.springframework.org/schema/security http://www.springframework.org/schema/security/spring-security-3.2.xsd
+ ">
+
+ <security:http use-expressions="true">
+ <security:custom-filter position="OPENID_FILTER" ref="clientFilter"/>
+ <security:intercept-url pattern="/**" access="permitAll()"/>
+ <security:intercept-url pattern="/home.html" access="isAuthenticated()"/>
+ <security:form-login login-page="/login.html" authentication-failure-url="/login.html?failure"/>
+ <security:logout/>
+ </security:http>
+
+ <security:authentication-manager alias="authenticationManager">
+ <security:authentication-provider>
+ <security:user-service>
+ <security:user name="user" password="user" authorities="ROLE_USER" />
+ </security:user-service>
+ </security:authentication-provider>
+ <security:authentication-provider ref="clientProvider"/>
+ </security:authentication-manager>
+
+ <!-- entry points -->
+ <bean id="facebookEntryPoint" class="org.pac4j.springframework.security.web.ClientAuthenticationEntryPoint">
+ <property name="client" ref="facebookClient"/>
+ </bean>
+
+ <!-- client definitions -->
+ <bean id="facebookClient" class="org.pac4j.oauth.client.FacebookClient">
+ <property name="key" value="145278422258960"/>
+ <property name="secret" value="be21409ba8f39b5dae2a7de525484da8"/>
+ </bean>
+ <bean id="clients" class="org.pac4j.core.client.Clients">
+ <property name="callbackUrl" value="http://localhost:8080/callback"/>
+ <property name="clients">
+ <list>
+ <ref bean="facebookClient"/>
+ </list>
+ </property>
+ </bean>
+
+ <!-- common to all clients -->
+ <bean id="clientFilter" class="org.pac4j.springframework.security.web.ClientAuthenticationFilter">
+ <constructor-arg value="/callback"/>
+ <property name="clients" ref="clients"/>
+ <property name="sessionAuthenticationStrategy" ref="sas"/>
+ <property name="authenticationManager" ref="authenticationManager"/>
+ </bean>
+ <bean id="clientProvider" class="org.pac4j.springframework.security.authentication.ClientAuthenticationProvider">
+ <property name="clients" ref="clients"/>
+ </bean>
+ <bean id="httpSessionRequestCache" class="org.springframework.security.web.savedrequest.HttpSessionRequestCache"/>
+ <bean id="sas" class="org.springframework.security.web.authentication.session.SessionFixationProtectionStrategy"/>
+
+</beans>
+```
+
+In short:
+
+1. You have to add an additional filter in `http`.
+ I added this filter on position `OPENID_FILTER`, because pac4j introduces a unified way to handle OpenID and OAuth and so on.
+ If you are using the OpenID-mechanism of spring-security, you have to use another position in the filter-chain (for example `CAS_FILTER`) or reconfigure OpenID to use the pac4j-mechanism, which should be fairly straight-forward.
+
+
+ The new Filter has the ID `clientFilter` and needs a reference to the `authenticationManager`.
+ Also, the callback-URL (here: `/callback`) must be mapped to your web-application!
+
+1. You have to add an additional `authentication-provider` to the `authentication-manager`, that references your newly defined pac4j-ClientProvider ( `clientProvider`).
+
+1. You have to configure your entry-points as pac4j-clients.
+ In the example above, only one pac4j-client, that authenticats the user via Facebook, is configured.
+ You easily can add more clients: just copy the definitions from the [spring-security-pac4j example](https://github.com/pac4j/spring-security-pac4j-demo "Browse the source of that example on GitHub").
+
+That should be all, that is necessary, to enable a Facebook-Login in your Spring-Security web-application.
+
+## Do Not Forget To Use Your Own APP-ID!
+
+The App-ID `145278422258960` and the accompanying secret `be21409ba8f39b5dae2a7de525484da8` were taken from the [spring-security-pac4j example](https://github.com/pac4j/spring-security-pac4j-demo "Browse the source of that example on GitHub") for simplicity.
+That works for a first test-run on `localhost`.
+_But you have to replace that with your own App-ID and -scecret, that you have to generate using [your App Dashboard on Facebook](https://developers.facebook.com/apps "You can generate your own apps on your App Dashboard")!_
+
+## More to come...
+
+This short article does not show, how to save the retrieved user-profiles in your user-database, if you need that.
+I hope, I will write a follow-up on that soon.
+In short:
+pac4j creates a Spring-Security `UserDetails`-Instance for every user, that was authenticated against it.
+You can use this, to access the data in the retrieved user-profile (for example to write out the name of the user in a greeting or contact him via e-mail).
--- /dev/null
+---
+_edit_last: "3"
+categories:
+ - java
+ - spring
+ - spring-boot
+ - thymeleaf
+date: "2015-10-26"
+lastmod: "2020-05-01T14:06:13+00:00"
+guid: http://juplo.de/?p=543
+parent_post_id: null
+post_id: "543"
+title: Fix Hot Reload of Thymeleaf-Templates In spring-boot:run
+url: /fix-hot-reload-of-thymeleaf-templates-in-spring-bootrun/
+
+---
+## The Problem: Hot-Reload Of Thymeleaf-Templates Does Not Work, When The Application Is Run With `spring-boot:run`
+
+A lot of people seem to have problems with hot reloading of static HTML-ressources when developing a [Spring-Boot](http://projects.spring.io/spring-boot/#quick-start "Learn more about Spring-Boot") application that uses [Thymeleaf](http://www.thymeleaf.org/ "Learn more about Thymeleaf") as templateing engine with [`spring-boot:run`](http://docs.spring.io/spring-boot/docs/current/reference/html/build-tool-plugins-maven-plugin.html "Learn more about the spring-boot-maven-plugin").
+There are a lot of tips out there, how to fix that problem:
+
+- [The official Hot-Swapping-Guide](http://docs.spring.io/spring-boot/docs/current/reference/html/howto-hotswapping.html "Read the official guide") says, that you just have to add `spring.thymeleaf.cache=false` in your application-configuration in `src/main/resources/application.properties`.
+- [Some say](http://stackoverflow.com/a/26562302/247276 "Read the whole suggestion"), that you have to disable caching by setting `spring.template.cache=false` **and** `spring.thymeleaf.cache=false` and/or run the application in debugging mode.
+- [Others say](http://stackoverflow.com/a/31641587/247276 "Read the suggestion"), that you have to add a dependency to `org.springframework:springloaded` to the configuration of the `spring-boot-maven-plugin`.
+- There is even a [bug-report on GitHub](https://github.com/spring-projects/spring-boot/issues/34 "Read the whole bug-report on GitHub"), that says, that you have to run the application from your favored IDE.
+
+But none of that fixes worked for me.
+Some may work, if I would switch my IDE (I am using Netbeans), but I have not tested that, because I am not willing to switch my beloved IDE because of that issue.
+
+## The Solution: Move Your Thymeleaf-Templates Back To `src/main/webapp`
+
+Fortunatly, I found a simple solution, to fix the issue without all the above stuff.
+**You simply have to move your Thymeleaf-Templates back to where they belong (IMHO): `src/main/webapp` and turn of the caching.**
+It is not necessary to run the application in debugging mode and/or from your IDE, nor is it necessary to add the dependency to `springloaded` or more configuration-switches.
+
+To move the templates and disable caching, just add the following to your application configuration in `src/main/application.properties`:
+
+```properties
+spring.thymeleaf.prefix=/thymeleaf/
+spring.thymeleaf.cache=false
+
+```
+
+Of course, you also have to move your Thymeaf-Templates from `src/main/resources/templates/` to `src/main/webapp/thymeleaf/`.
+In my opinion, the templates belong there anyway, in order to have them accessible as normal static HTML(5)-files.
+If they are locked away in the classpath you cannot access them, which foils the approach of Thymeleaf, that you can view your templates in a browser as thy are.
+++ /dev/null
----
-_edit_last: "2"
-categories:
- - hibernate
- - java
- - maven
-date: "2014-11-11"
-lastmod: "2015-05-03T13:52:31+00:00"
-guid: http://juplo.de/?p=319
-parent_post_id: null
-post_id: "319"
-title: hibernate4-maven-plugin 1.0.5 released!
-url: /hibernate4-maven-plugin-1-0-5-released/
-
----
-Today we released the version 1.0.5 of [hibernate4-maven-plugin](/hibernate4-maven-plugin "hibernate4-maven-plugin") to [Central](http://search.maven.org/#search|gav|1|g%3A%22de.juplo%22%20AND%20a%3A%22hibernate4-maven-plugin%22 "Central")!
-
-This release mainly fixes a NullPointerException-bug, that was introduced in 1.0.4.
-The NPE was triggered, if a `hibernate.properties`-file is present and the dialect is specified in that file and not in the plugin configuration.
-Thanks to Paulo Pires and and everflux, for pointing me at that bug.
-
-But there are also some minor improvements to talk about:
-
-- Package level annotations are now supported (Thanks to Joachim Van der Auwera for that)
-- `Hibernate Core` was upgraded to 4.3.7.Final
-- `Hibernate Envers` was upgraded to 4.3.7.Final
-- `Hibernate Validator` was upgrades to 5.1.3.Final
-
-The upgrade of `Hibernate Validator` is a big step, because 5.x supports Bean Validation 1.1 ( [JSR 349](https://jcp.org/en/jsr/detail?id=349 "Read the specification at jpc.org")).
-See [the FAQ of hibernate-validator](http://hibernate.org/validator/faq/ "Read the first entry for more details on the supported version of Bean Validation") for more details on this.
-
-Because `Hibernate Validator 5` requires the Unified Expression Language (EL) in version 2.2 or later, a dependency to `javax.el-api:3.0.0` was added.
-That does the trick for the integration-tests included in the source code of the plugin.
-But, because I am not using `Hibernate Validator` in any of my own projects, at the moment, the upgrade may rise some backward compatibility errors, that I am not aware of.
-_If you stumble across any problems, please let me know!_
-
-## Release notes:
-
-```
-commit ec30af2068f2d12a9acf65474ca1a4cdc1aa7122
-Author: Kai Moritz
-Date: Tue Nov 11 15:28:12 2014 +0100
- [maven-release-plugin] prepare for next development iteration
-commit 18840e3c775584744199d8323eb681b73b98e9c4
-Author: Kai Moritz
-Date: Tue Nov 11 15:27:57 2014 +0100
- [maven-release-plugin] prepare release hibernate4-maven-plugin-1.0.5
-commit b95416ef16bbaafecb3d40888fe97e70cdd75c77
-Author: Kai Moritz
-Date: Tue Nov 11 15:10:32 2014 +0100
- Upgraded hibernate-validator from 4.3.2.Final to 5.1.3.Final
-
- Hibernate Validator 5 requires the Unified Expression Language (EL) in
- version 2.2 or later. Therefore, a dependency to javax.el-api:3.0.0 was
- added. (Without that, the compilation of some integration-tests fails!)
-commit ad979a8a82a7701a891a59a183ea4be66672145b
-Author: Kai Moritz
-Date: Tue Nov 11 14:32:42 2014 +0100
- Upgraded hibernate-core, hibernate-envers, hibernate-validator and maven-core
-
- * Upgraded hibernate-core from 4.3.1.Final to 4.3.7.Final
- * Upgraded hibernate-envers from 4.3.1.Final to 4.3.7.Final
- * Upgraded hibernate-validator from 4.3.1.Final to 4.3.2.Final
- * Upgraded maven-core from 3.2.1 to 3.2.3
-commit 347236c3cea0f204cefd860c605d9f086e674e8b
-Author: Kai Moritz
-Date: Tue Nov 11 14:29:23 2014 +0100
- Added FAQ-entry for problem with whitespaces in the path under Windows
-commit 473c3ef285c19e0f0b85643b67bbd77e06c0b926
-Author: Kai Moritz
-Date: Tue Oct 28 23:37:45 2014 +0100
- Explained how to suppress dependency-scanning in documentation
-
- Also added a test-case to be sure, that dependency-scanning is skipped, if
- the parameter "dependencyScanning" is set to "none".
-commit 74c0dd783b84c90e116f3e7f1c8d6109845ba71f
-Author: Kai Moritz
-Date: Mon Oct 27 09:04:48 2014 +0100
- Fixed NullPointerException, when dialect is specified in properties-file
-
- Also added an integration test-case, that proofed, that the error was
- solved.
-commit d27f7af23c82167e873ce143e50ce9d9a65f5e61
-Author: Kai Moritz
-Date: Sun Oct 26 11:16:00 2014 +0100
- Renamed an integration-test to test for whitespaces in the filename
-commit 426d18e689b89f33bf71601becfa465a00067b10
-Author: Kai Moritz
-Date: Sat Oct 25 17:29:41 2014 +0200
- Added patch by Joachim Van der Auwera to support package level annotations
-commit 3a3aeaabdb1841faf5e1bf8d220230597fb22931
-Author: Kai Moritz
-Date: Sat Oct 25 16:52:34 2014 +0200
- Integrated integration test provided by Claus Graf (clausgraf@gmail.com)
-commit 3dd832edbd50b1499ea6d53e4bcd0ad4c79640ed
-Author: Kai Moritz
-Date: Mon Jun 2 10:31:13 2014 +0200
- [maven-release-plugin] prepare for next development iteration
-```
--- /dev/null
+---
+_edit_last: "3"
+categories:
+ - java
+ - jmockit
+ - junit
+ - maven
+date: "2015-10-11"
+lastmod: "2016-10-09T10:29:40+00:00"
+guid: http://juplo.de/?p=535
+parent_post_id: null
+post_id: "535"
+title: 'java.lang.Exception: Method XZY should have no parameters'
+url: /java-lang-exception-method-xzy-should-have-no-parameters/
+
+---
+Did you ever stumbled across the following error during developing test-cases with [JUnit](http://junit.org/ "Visit the homepage of the JUnit-Project") and [JMockit](http://jmockit.org/ "Visit the homepage of the JMockit-Project")?
+
+```bash
+java.lang.Exception: Method XZY should have no parameters
+
+```
+
+Here is the quick and easy fix for it:
+**Fix the ordering of the dependencies in your pom.xml.**
+The dependency for JMockit has to come first!
+++ /dev/null
----
-_edit_last: "2"
-categories:
- - facebook
- - java
- - oauth2
- - spring
-date: "2015-06-28"
-lastmod: "2016-06-26T10:40:45+00:00"
-guid: http://juplo.de/?p=462
-parent_post_id: null
-post_id: "462"
-title: Configure pac4j for a Social-Login along with a Spring-Security based Form-Login
-url: /configure-pac4j-for-a-social-login-along-with-a-spring-security-based-form-login/
-
----
-## The Problem – What will be explained
-
-If you just want to enable your spring-based webapplication to let users log in with their social accounts, without changing anything else, [pac4j](http://www.pac4j.org/#1 "The authentication solution for java") should be your first choice.
-But the [provided example](https://github.com/pac4j/spring-security-pac4j-demo "Clone the examples on GitHub") only shows, how to define all authentication mechanisms via pac4j.
-If you already have set up your log-in via spring-security, you have to reconfigure it with the appropriate pac4j-mechanism.
-That is a lot of unnecessary work, if you just want to supplement the already configured log in with the additionally possibility, to log in via a social provider.
-
-In this short article, I will show you, how to set that up along with the normal [form-based login of Spring-Security](http://docs.spring.io/spring-security/site/docs/4.0.1.RELEASE/reference/htmlsingle/#ns-form-and-basic "Read, how to set up the form-based login of Spring-Security").
-I will show this for a Login via Facabook along the Form-Login of Spring-Security.
-The method should work as well for [other social logins, that are supported by spring-security-pac4j](https://github.com/pac4j/spring-security-pac4j#providers-supported "See a list of all login-mechanisms, supported by spring-security-pac4j"), along other login-mechanisms provided by spring-security out-of-the-box.
-
-In this article I will not explain, how to store the user-profile-data, that was retrieved during the social login.
-Also, if you need more social interaction, than just a login and access to the default data in the user-profile you probably need [spring-social](http://projects.spring.io/spring-social/ "Homepage of the spring-social project"). How to combine spring-social with spring-security for that purpose, is explained in this nice article about how to [add social sign in to a spring-mvc weba-pplication](http://www.petrikainulainen.net/programming/spring-framework/adding-social-sign-in-to-a-spring-mvc-web-application-configuration/ "Read this article about how to integrate spring-security with spring-social").
-
-## Adding the Required Maven-Artifacts
-
-In order to use spring-security-pac4j to login to facebook, you need the following maven-artifacts:
-
-```xml
-<dependency>
- <groupId>org.pac4j</groupId>
- <artifactId>spring-security-pac4j</artifactId>
- <version>1.2.5</version>
-</dependency>
-<dependency>
- <groupId>org.pac4j</groupId>
- <artifactId>pac4j-http</artifactId>
- <version>1.7.1</version>
-</dependency>
-<dependency>
- <groupId>org.pac4j</groupId>
- <artifactId>pac4j-oauth</artifactId>
- <version>1.7.1</version>
-</dependency>
-```
-
-## Configuration of Spring-Security (Without Social Login via pac4j)
-
-This is a bare minimal configuration to get the form-login via Spring-Security working:
-
-```xml
-<?xml version="1.0" encoding="UTF-8"?>
-<beans
- xmlns="http://www.springframework.org/schema/beans"
- xmlns:security="http://www.springframework.org/schema/security"
- xmlns:xsi="http://www.w3.org/2001/XMLSchema-instance"
- xsi:schemaLocation="
- http://www.springframework.org/schema/beans http://www.springframework.org/schema/beans/spring-beans-3.0.xsd
- http://www.springframework.org/schema/security http://www.springframework.org/schema/security/spring-security-3.2.xsd
- ">
-
- <security:http use-expressions="true">
- <security:intercept-url pattern="/**" access="permitAll"/>
- <security:intercept-url pattern="/home.html" access="isAuthenticated()"/>
- <security:form-login login-page="/login.html" authentication-failure-url="/login.html?failure"/>
- <security:logout/>
- <security:remember-me/>
- </security:http>
-
- <security:authentication-manager>
- <security:authentication-provider>
- <security:user-service>
- <security:user name="user" password="user" authorities="ROLE_USER" />
- </security:user-service>
- </security:authentication-provider>
- </security:authentication-manager>
-
-</beans>
-```
-
-The `http` defines, that the access to the url `/home.html` is restriced and must be authenticated via a form-login on url `/login.html`.
-The `authentication-manager` defines an in-memory authentication-provider for testing purposes with just one user (username: `user`, password: `user`).
-For more details, see the [documentation of spring-security](http://docs.spring.io/spring-security/site/docs/4.0.1.RELEASE/reference/htmlsingle/#ns-form-and-basic "Read more about the available configuration-parameters in the spring-security documentation").
-
-## Enabling pac4j via spring-security-pac4j alongside
-
-To enable pac4j alongside, you have to add/change the following:
-
-```xml
-<?xml version="1.0" encoding="UTF-8"?>
-<beans
- xmlns="http://www.springframework.org/schema/beans"
- xmlns:security="http://www.springframework.org/schema/security"
- xmlns:xsi="http://www.w3.org/2001/XMLSchema-instance"
- xsi:schemaLocation="
- http://www.springframework.org/schema/beans http://www.springframework.org/schema/beans/spring-beans-3.0.xsd
- http://www.springframework.org/schema/security http://www.springframework.org/schema/security/spring-security-3.2.xsd
- ">
-
- <security:http use-expressions="true">
- <security:custom-filter position="OPENID_FILTER" ref="clientFilter"/>
- <security:intercept-url pattern="/**" access="permitAll()"/>
- <security:intercept-url pattern="/home.html" access="isAuthenticated()"/>
- <security:form-login login-page="/login.html" authentication-failure-url="/login.html?failure"/>
- <security:logout/>
- </security:http>
-
- <security:authentication-manager alias="authenticationManager">
- <security:authentication-provider>
- <security:user-service>
- <security:user name="user" password="user" authorities="ROLE_USER" />
- </security:user-service>
- </security:authentication-provider>
- <security:authentication-provider ref="clientProvider"/>
- </security:authentication-manager>
-
- <!-- entry points -->
- <bean id="facebookEntryPoint" class="org.pac4j.springframework.security.web.ClientAuthenticationEntryPoint">
- <property name="client" ref="facebookClient"/>
- </bean>
-
- <!-- client definitions -->
- <bean id="facebookClient" class="org.pac4j.oauth.client.FacebookClient">
- <property name="key" value="145278422258960"/>
- <property name="secret" value="be21409ba8f39b5dae2a7de525484da8"/>
- </bean>
- <bean id="clients" class="org.pac4j.core.client.Clients">
- <property name="callbackUrl" value="http://localhost:8080/callback"/>
- <property name="clients">
- <list>
- <ref bean="facebookClient"/>
- </list>
- </property>
- </bean>
-
- <!-- common to all clients -->
- <bean id="clientFilter" class="org.pac4j.springframework.security.web.ClientAuthenticationFilter">
- <constructor-arg value="/callback"/>
- <property name="clients" ref="clients"/>
- <property name="sessionAuthenticationStrategy" ref="sas"/>
- <property name="authenticationManager" ref="authenticationManager"/>
- </bean>
- <bean id="clientProvider" class="org.pac4j.springframework.security.authentication.ClientAuthenticationProvider">
- <property name="clients" ref="clients"/>
- </bean>
- <bean id="httpSessionRequestCache" class="org.springframework.security.web.savedrequest.HttpSessionRequestCache"/>
- <bean id="sas" class="org.springframework.security.web.authentication.session.SessionFixationProtectionStrategy"/>
-
-</beans>
-```
-
-In short:
-
-1. You have to add an additional filter in `http`.
- I added this filter on position `OPENID_FILTER`, because pac4j introduces a unified way to handle OpenID and OAuth and so on.
- If you are using the OpenID-mechanism of spring-security, you have to use another position in the filter-chain (for example `CAS_FILTER`) or reconfigure OpenID to use the pac4j-mechanism, which should be fairly straight-forward.
-
-
- The new Filter has the ID `clientFilter` and needs a reference to the `authenticationManager`.
- Also, the callback-URL (here: `/callback`) must be mapped to your web-application!
-
-1. You have to add an additional `authentication-provider` to the `authentication-manager`, that references your newly defined pac4j-ClientProvider ( `clientProvider`).
-
-1. You have to configure your entry-points as pac4j-clients.
- In the example above, only one pac4j-client, that authenticats the user via Facebook, is configured.
- You easily can add more clients: just copy the definitions from the [spring-security-pac4j example](https://github.com/pac4j/spring-security-pac4j-demo "Browse the source of that example on GitHub").
-
-That should be all, that is necessary, to enable a Facebook-Login in your Spring-Security web-application.
-
-## Do Not Forget To Use Your Own APP-ID!
-
-The App-ID `145278422258960` and the accompanying secret `be21409ba8f39b5dae2a7de525484da8` were taken from the [spring-security-pac4j example](https://github.com/pac4j/spring-security-pac4j-demo "Browse the source of that example on GitHub") for simplicity.
-That works for a first test-run on `localhost`.
-_But you have to replace that with your own App-ID and -scecret, that you have to generate using [your App Dashboard on Facebook](https://developers.facebook.com/apps "You can generate your own apps on your App Dashboard")!_
-
-## More to come...
-
-This short article does not show, how to save the retrieved user-profiles in your user-database, if you need that.
-I hope, I will write a follow-up on that soon.
-In short:
-pac4j creates a Spring-Security `UserDetails`-Instance for every user, that was authenticated against it.
-You can use this, to access the data in the retrieved user-profile (for example to write out the name of the user in a greeting or contact him via e-mail).
--- /dev/null
+---
+_edit_last: "2"
+categories:
+ - projects
+date: "2016-03-09"
+lastmod: "2020-06-24T11:32:38+00:00"
+guid: http://juplo.de/?p=721
+parent_post_id: null
+post_id: "721"
+tags:
+ - createmedia.nrw
+ - hibernate
+ - java
+ - jpa
+ - maven
+title: hibernate-maven-plugin 2.0.0 released!
+url: /hibernate-maven-plugin-2-0-0-released/
+
+---
+Today we released the version 2.0.0 of [hibernate-maven-plugin](/hibernate-maven-plugin "hibernate-maven-plugin") to [Central](http://search.maven.org/#search|gav|1|g%3A%22de.juplo%22%20AND%20a%3A%22hibernate-maven-plugin%22 "Central")!
+
+## Why Now?
+
+During one of our other projects ‐ the development of [a vertical search-engine for events and locations](http://yourshouter.com/projekte/crowdgest%C3%BCtzte-veranstaltungs-suchmaschine.html "Read more about our project"), which is [funded by the mistery of economy of NRW](http://yourshouter.com/partner/mweimh-nrw.html "Read more about the support by the ministery") ‐, we realized, that we were in the need of Hibernate 5 and some of the more sophisticated JPA-configuration-options.
+
+Unfortunatly ‐ _for us_ ‐ the old releases of this plugin neither support Hibernate 5 nor all configuration options, that are available for use in the `META-INF/persistence.xml`.
+
+Fortunatly ‐ _for you_ ‐ we decided, that we really need all that and have to integrate it in our little plugin.
+
+## Nearly Complete Rewrite
+
+Due to [changes in the way Hibernate has to be configured internally](http://docs.jboss.org/hibernate/orm/5.0/integrationsGuide/en-US/html_single/ "Read more about this changes in the official Integrations Guide for Hibernate 5"), this release is a nearly complete rewrite.
+It was no longer possible, to just use the [SchemaExport](https://docs.jboss.org/hibernate/orm/3.5/reference/en/html/toolsetguide.html#toolsetguide-s1-3)-Tool to build up the configuration and support all possible configuration-approaches.
+Hence, the plugin now builds up the configuration using [Services and Registries](http://docs.jboss.org/hibernate/orm/5.0/integrationsGuide/en-US/html_single/#services "Read more about services and registries"), like described in the Integration Guide.
+
+## Simplified Configuration: No Drop-In-Replacement!
+
+We also took the opportunity, to simplify the configuration.
+Beforehand, the plugin had just used the configuration, that was set up in the class [SchemaExport](https://docs.jboss.org/hibernate/orm/4.3/javadocs/org/hibernate/tool/hbm2ddl/SchemaExport.html).
+This reliefed us from the burden, to understand the configuration internals, but brought up some oddities of the internal implementation of the tool.
+It also turned out to be a bad decision in the long run, because some configuration options are hard coded in that class and cannot be changed.
+
+By building up the whole configuration by hand, it is now possible to implement separate goals for creating and dropping the schema.
+Also, it enables us to add a goal `update` in one of the next releases.
+Because of all this improvements, you have to revise your configuration, if you want to switch from 1.x to 2.x.
+
+**Be warned: this release is _no drop-in replacement_ of the previous releases!**
+
+## Not Only For 4, But For Any Version
+
+While rewirting the plugin, we focused on Hibernate 5, which was not supported by the older releases, because of some of the oddities of the internal implementation of the SchemaExport-tool.
+We tried to maintain backward compatibility.
+
+You should be able to use the new plugin with Hibernate 5 and also with older versions of Hibernate (we only tested that for Hibernate 4).
+Because of that, we dropped the 4 in the name of the plugin!
+
+## Extended Support For JPA-Configurations
+
+We tried to support all possible configuration-approaches, that Hibernate 5 understands.
+Including hard coded XML-mapping-files in the `META-INF/persistence.xml`, that do not seem to be used very often, but which we needed in one of our own projects.
+
+Therefore, the plugin now understands all (or most of?) the relevant configuration options, that one can specify through a standard JPA-configuration.
+The plugin now should work with any configuration, that you drop in from your existing JPA- or Hibernate-projects.
+All recognized configuration from the different possible configuration-sources are merged together, considering the [configuration-method-precedence](/hibernate-maven-plugin/configuration.html#precedence "Jump to the documentation to read more about the configuration-method-precedence"), described in the documentation.
+
+We hope, we did not make any unhandy assumptions, while designing the merge-process.
+_Please let us know, if something wents wrong in your projects and you think it is, because we messed it up!_
+
+## Release notes:
+
+```
+commit 64b7446c958efc15daf520c1ca929c6b8d3b8af5
+Author: Kai Moritz
+Date: Tue Mar 8 00:25:50 2016 +0100
+
+ javadoc hat to be configured multiple times for release:prepare
+
+commit 1730d92a6da63bdcc81f7a1c9020e73cdc0adc13
+Author: Kai Moritz
+Date: Tue Mar 8 00:13:10 2016 +0100
+
+ Added the special javadoc-tags for maven-plugins to the configuration
+
+commit 0611db682bc69b80d8567bf9316668a1b6161725
+Author: Kai Moritz
+Date: Mon Mar 7 16:01:59 2016 +0100
+
+ Updated documentation
+
+commit a275df25c52fdb7b5b4275fcf9a359194f7b9116
+Author: Kai Moritz
+Date: Mon Mar 7 17:56:16 2016 +0100
+
+ Fixed missing menu on generated site: moved template from skin to project
+
+commit e8263ad80b1651b812618c964fb02f7e5ddf3d7e
+Author: Kai Moritz
+Date: Mon Mar 7 14:44:53 2016 +0100
+
+ Turned of doclint, that was introduced in Java 8
+
+ See: http://blog.joda.org/2014/02/turning-off-doclint-in-jdk-8-javadoc.html
+
+commit 62ec2b1b98d5ce144f1ac41815b94293a52e91e6
+Author: Kai Moritz
+Date: Tue Dec 22 19:56:41 2015 +0100
+
+ Fixed ConcurrentModificationException
+
+commit 9d6e06c972ddda45bf0cd2e6a5e11d8fa319c290
+Author: Kai Moritz
+Date: Mon Dec 21 17:01:42 2015 +0100
+
+ Fixed bug regarding the skipping of unmodified builds
+
+ If a property or class was removed, its value or md5sum stayed in the set
+ of md5sums, so that each following build (without a clean) was juged as
+ modified.
+
+commit dc652540d007799fb23fc11d06186aa5325058db
+Author: Kai Moritz
+Date: Sun Dec 20 21:06:37 2015 +0100
+
+ All packages up to the root are checked for annotations
+
+commit 851ced4e14fefba16b690155b698e7a39670e196
+Author: Kai Moritz
+Date: Sun Dec 20 13:32:48 2015 +0100
+
+ Fixed bug: the execution is no more skipped after a failed build
+
+ After a failed build, further executions of the plugin were skipped, because
+ the MD5-summs suggested, that nothing is to do because nothing has changed.
+ Because of that, the MD5-summs are now removed in case of a failure.
+
+commit 08649780d2cd70f2861298d683aa6b1945d43cda
+Author: Kai Moritz
+Date: Sat Dec 19 18:02:02 2015 +0100
+
+ Mappings from JPA-mapping-files are considered
+
+commit bb8b638714db7fc02acdc1a9032cc43210fe5c0e
+Author: Kai Moritz
+Date: Sat Dec 19 03:46:49 2015 +0100
+
+ Fixed minor misconfiguration in integration-test dependency test
+
+ Error because of multiple persistence-units by repeated execution
+
+commit 3a7590b8862c3be691b05110f423865f6674f6f6
+Author: Kai Moritz
+Date: Thu Dec 17 03:10:33 2015 +0100
+
+ Considering mapping-configuration from persistence.xml and hibernate.cfg.xml
+
+commit 23668ccaa93bfbc583c1697214bae116bd9f4ef6
+Author: Kai Moritz
+Date: Thu Dec 17 02:53:38 2015 +0100
+
+ Sidestepped bug in Hibernate 5
+
+commit 8e5921c9e76b4540f1d4b75e05e338001145ff6d
+Author: Kai Moritz
+Date: Wed Dec 16 22:09:00 2015 +0100
+
+ Introduced the goal "drop"
+
+ * Fixed integration-test hibernate4-maven-plugin-envers-sample by adapting
+ it to the new drop-goal
+ * Adapted the other integration-tests to the new naming schema for the
+ create-script
+
+commit 6dff3bfb0f9ea7a1d0cc56398aaad29e31a17b91
+Author: Kai Moritz
+Date: Wed Dec 16 18:08:56 2015 +0100
+
+ Reworked configuration and the tracking thereof
+
+ * Moved common parameters from CreateMojo to AbstractSchemaMojo
+ * Reordered parameters into sensible groups
+ * Renamed the maven-property-names of the parameters
+ * All configuration-parameters are tracked, not only hibernate-parameters
+ * Introduced special treatment for some of the plugin-parameters (export
+ and show)
+
+commit b316a5b4122c3490047b68e1e4a6df205645aad5
+Author: Kai Moritz
+Date: Wed Oct 21 11:49:56 2015 +0200
+
+ Reworked plugin-configuration: worshipped the DRY-principle
+
+commit 4940080670944a15916c68fb294e18a6bfef12d5
+Author: Kai Moritz
+Date: Fri Oct 16 12:16:30 2015 +0200
+
+ Refined reimplementation of the plugin for Hibernate 5.x
+
+ Renamed the plugin from hibernate4-maven-plugin to hibernate-maven-plugin,
+ because the goal is, to support all recent older versions with the new
+ plugin.
+
+commit fdda82a6f76deefd10f83da89d7e82054e3c3ecd
+Author: Kai Moritz
+Date: Wed Oct 21 12:18:29 2015 +0200
+
+ Integration-Tests are skiped, if "maven.test.skip" is set to true
+
+commit b971570e28cbdc3b27eca15a7395586bee787446
+Author: Kai Moritz
+Date: Tue Sep 8 13:55:43 2015 +0200
+
+ Updated version of juplo-skin for generation of documentation
+
+commit 3541cf3742dd066b94365d351a3ca39a35e3d3c8
+Author: Kai Moritz
+Date: Tue May 19 21:41:50 2015 +0200
+
+ Added new configuration sources in documentation about precedence
+
+```
+++ /dev/null
----
-_edit_last: "3"
-categories:
- - java
- - jmockit
- - junit
- - maven
-date: "2015-10-11"
-lastmod: "2016-10-09T10:29:40+00:00"
-guid: http://juplo.de/?p=535
-parent_post_id: null
-post_id: "535"
-title: 'java.lang.Exception: Method XZY should have no parameters'
-url: /java-lang-exception-method-xzy-should-have-no-parameters/
-
----
-Did you ever stumbled across the following error during developing test-cases with [JUnit](http://junit.org/ "Visit the homepage of the JUnit-Project") and [JMockit](http://jmockit.org/ "Visit the homepage of the JMockit-Project")?
-
-```bash
-java.lang.Exception: Method XZY should have no parameters
-
-```
-
-Here is the quick and easy fix for it:
-**Fix the ordering of the dependencies in your pom.xml.**
-The dependency for JMockit has to come first!
+++ /dev/null
----
-_edit_last: "2"
-_wp_old_slug: logout-from-wrong-account-with-maven-appengine-plugin
-categories:
- - appengine
- - java
- - maven
- - oauth2
-date: "2013-10-03"
-lastmod: "2016-01-12T12:50:07+00:00"
-guid: http://juplo.de/?p=97
-parent_post_id: null
-post_id: "97"
-title: Log out from wrong Account with maven-appengine-plugin
-url: /log-out-from-wrong-account-with-maven-appengine-plugin/
-
----
-Do you work with the [maven-appengine-plugin](https://developers.google.com/appengine/docs/java/tools/maven "Open documentation") and several google-accounts? If you do, or if you ever were logged in to the wrong google-account while executing `mvn appengine:update`, like me yesterday, you surely wondering, **how to logout from maven-appengine-plugin**.
-
-maven-appengine-plugin somehow miracolously stores your credentials for you, when you attemp to upload an app for the first time. This comes in very handy, if you work with just one google-account. But it might get a "pain-in-the-ass", if you work with several accounts. Because, if you once logged in into an account, there is no way (I mean: no goal of the maven-appengine-plugin) to log out, in order to change the account!
-
-## The solution: clear the credentials, that the maven-appengine-plugin stored on your behalf
-
-Only after hard googling, i found a solution to this problem in a [blog-post](http://www.radomirml.com/blog/2009/09/20/delete-cached-google-app-engine-credentials/ "Open the blog-post"): maven-appengine-plugin stores its oauth2-credentials in the file `.appcfg_oauth2_tokens_java` in your home directory (on Linux - sorry Windows-folks, you have to figure out yourself, where the plugin stores the credentials on Windows).
-
-**Just delete the file `.appcfg_oauth2_tokens_java` and your logged out!** The next time you call `mvn appengine:upload` you will be asked again to accept the request and, hence, can switch accounts. _If you are not using oauth2, just look for `.appcfg*`-files in your home directory. I am sure, you will find another file with stored credentials, that you can delet to logout, like Radomir, who [deleted `.appcfg_cookiesy` to log out](http://www.radomirml.com/blog/2009/09/20/delete-cached-google-app-engine-credentials/ "Open Radomir's Blog-Post to read more...")_.
--- /dev/null
+---
+_edit_last: "2"
+categories:
+ - explained
+date: "2016-11-08"
+lastmod: "2018-09-28T08:38:10+00:00"
+guid: http://juplo.de/?p=762
+parent_post_id: null
+post_id: "762"
+title: XPath 2.0 deep-equal Does Not Match Like Expected - The Problem With Whitespace
+url: /xpath-2-0-deep-equal-does-not-match-like-expected-the-problem-with-whitespace/
+
+---
+I just stumbled accros a problem with the `deep-equal()`-method introduced by `XPath 2.0`.
+It costs me two hours at minimum to find out, what was going on.
+So I want to share this with you, in case your are wasting time on the same problem and try to find a solution via google ;)
+
+If you never heard of `deep-equal()` and just wonder how to compare XML-nodes in the right way, you should probably read this [exelent article about equality in XSLT](http://www.xml.com/lpt/a/1589 "Read more about the posibilities to compare nodes in XSLT") as a starter.
+
+## My Problem
+
+My problem was, that I wanted to parse/output a node only, if there exists no node on the `ancestor`-axis, that has a exact duplicate of that node as a direct child.
+
+## The Difference Between A Comparison With `=` And With `deep-equal()`
+
+If you just use simple equality (with `=` or `eq`), the two compared nodes are converted into strings implicitly.
+That is no problem, if you are comparing attributes, or nodes, that only contain text.
+But in all other cases, you will only compare the text-contents of the two nodes and their children.
+Hence, if they differ only in an attribute, your test will report that they are equal, which might not be what you are expecting.
+
+For example, the XPath-expression
+
+```XPath
+//child/ref[ancestor::parent/ref=.]
+```
+
+will match the `<ref>`-node with `@id='bar'`, that is nested insiede the `<child>`-node in this example-XML, what I was not expecting:
+
+```Java
+<root>
+ <parent>
+ <ref id="foo"><content>Same Text-Content</content></ref>
+ <child>
+ <ref id="bar"><content>Same Text-Content</content></ref>
+ </child>
+ <parent>
+<list>
+```
+
+So, what I tried, after I found out about `deep-equal()` was the following `Xpath`-expression, which solves the problem in the above example:
+
+```XPath
+//child/ref[deep-equal(ancestor::parent/ref,.)]
+```
+
+## The Unexpected Behaviour Of `deep-equal()`
+
+But, moving on I stumbled accross cases, where I was expecting a match, but `deep-equal()` does not match the nodes.
+For example:
+
+```Java
+<root>
+ <parent>
+ <ref id="same">
+ <content>Same Text-Content</content>
+ </ref>
+ <child>
+ <ref id="same">
+ <content>Same Text-Content</content>
+ </ref>
+ </child>
+ <parent>
+<list>
+```
+
+You probably catch the diffrenece at first glance, since I laid out the examples accordingly and gave you a hint in the heading of this post - but it really took me a long time to get that:
+
+## It is all about whitespace!
+
+`deep-equal()` compares _all_ child-nodes and only yields a match, if the compared nodes have exactly the same child-nodes.
+But in the second example, the compared `<ref>`-nodes contain whitespace befor and after their child-node `<content>`.
+And these whitespace are in fact implicite child-nodes of type text.
+Hence, the two nodes in the second example differe, because the indentation on the second one has two more spaces.
+
+## The solution...?
+
+Unfortunatly, I do not really know a good solution.
+(If you come up with one, feel free to note or link it in the comments!)
+
+The best solution would be an option additional argument for `deep-equal()`, that can be selected to tell the function to ignore such whitespace.
+In fact, some XSLT-parsers do provide such an argument.
+
+The only other solution, I can think of, is, to write another XSLT-script to remove all the whitespaces between tags to circumvent this at the first glance unexpected behaviour of `deep-equal()`
+++ /dev/null
----
-title: Archiv - 2018
-linkTitle: 2018
-layout: year
----
+++ /dev/null
----
-_edit_last: "2"
-categories:
- - java
- - jetty
-date: "2014-02-23"
-lastmod: "2018-08-17T10:29:23+00:00"
-guid: http://juplo.de/?p=209
-parent_post_id: null
-post_id: "209"
-title: Configure HTTPS for jetty-maven-plugin 9.0.x
-url: /configure-https-for-jetty-maven-plugin-9-0-x/
-
----
-## For the impatient
-
-If you do not want to know why it does not work and how I fixed it, just [jump to the quick fix](#quick-fix)!
-
-## jetty-maven-plugin 9.0.x breaks the HTTPS-Connector
-
-With Jetty 9.0.x the configuration of the `jetty-maven-plugin` (formaly known as `maven-jetty-plugin`) has changed dramatically. Since then, it is no more possible to configure a HTTPS-Connector in the plugin easily. Normally, connecting your development-container via HTTPS was not often necessary. But since [Snowden](http://en.wikipedia.org/wiki/Edward_Snowden "Read more about Edward Snowden"), encryption is on everybodys mind. And so, testing the encrypted part of your webapp becomes more and more important.
-
-## Why it is "broken" in `jetty-maven-plugin` 9.0.x
-
-[A bug-report](https://bugs.eclipse.org/bugs/show_bug.cgi?id=408962 "Read the bug-report") stats, that
-
-Since the constructor signature changed for Connectors in jetty-9 to require the Server instance to be passed into it, it is no longer possible to configure Connectors directly with the plugin (because maven requires no-arg constructor for any <configuration> elements).
-
-[The documentation](http://www.eclipse.org/jetty/documentation/current/jetty-maven-plugin.html "Jump to the documentation of the jetty-maven-plugin") includes an example, [how to configure a HTTPS Connector with the help of a `jetty.xml`-file](http://www.eclipse.org/jetty/documentation/current/jetty-maven-plugin.html#maven-config-https "Jump to the example in the documentation of the jetty-maven-plugin"). But unfortunatly, this example is broken. Jetty refuses to start with the following error: `[ERROR] Failed to execute goal org.eclipse.jetty:jetty-maven-plugin:9.0.5.v20130815:run (default-cli) on project FOOBAR: Failure: Unknown configuration type: New in org.eclipse.jetty.xml.XmlConfiguration@4809f93a -> [Help 1]`.
-
-## Get HTTPS running again
-
-So, here is, what you have to do to fix this [broken example](http://www.eclipse.org/jetty/documentation/current/jetty-maven-plugin.html#maven-config-https "Jump to the example in the documentation of the jetty-maven-plugin"): the content shown for the file `jetty.xml` in the example is wrong. It has to look like the other example-files. That is, ith has to start with a `<Configure>`-tag. The corrected content of the file looks like this:
-
-<a id="jetty-xml"></a>
-```html
-<?xml version="1.0"?>
-<!DOCTYPE Configure PUBLIC "-//Jetty//Configure//EN" "http://www.eclipse.org/jetty/configure_9_0.dtd">
-
-<!-- ============================================================= -->
-<!-- Configure the Http Configuration -->
-<!-- ============================================================= -->
-<Configure id="httpConfig" class="org.eclipse.jetty.server.HttpConfiguration">
- <Set name="secureScheme">https</Set>
- <Set name="securePort"><Property name="jetty.secure.port" default="8443" /></Set>
- <Set name="outputBufferSize">32768</Set>
- <Set name="requestHeaderSize">8192</Set>
- <Set name="responseHeaderSize">8192</Set>
- <Set name="sendServerVersion">true</Set>
- <Set name="sendDateHeader">false</Set>
- <Set name="headerCacheSize">512</Set>
-
- <!-- Uncomment to enable handling of X-Forwarded- style headers
- <Call name="addCustomizer">
- <Arg><New class="org.eclipse.jetty.server.ForwardedRequestCustomizer"/></Arg>
- </Call>
- -->
-</Configure>
-```
-
-## But it's not running!
-
-If you are getting the error `[ERROR] Failed to execute goal org.eclipse.jetty:jetty-maven-plugin:9.0.5.v20130815:run (default-cli) on project FOOBAR: Failure: etc/jetty.keystore (file or directory not found) -> [Help 1]` now, this is because you have to create/get a certificate for your HTTPS-Connector. For development, a selfsigned certificate is sufficient. You can easily create one like back in the [good old `maven-jetty-plugin`-times](http://mrhaki.blogspot.de/2009/05/configure-maven-jetty-plugin-for-ssl.html "Example for configuring the HTTPS-Connector of the old maven-jetty-plugin"), with this command:
-
-<a id="keytool"></a>
-```bash
-keytool -genkey \
- -alias jetty \
- -keyalg RSA \
- -keystore src/test/resources/jetty.keystore \
- -storepass secret \
- -keypass secret \
- -dname "CN=localhost"
-```
-
-Just be sure, to change the example file `jetty-ssl.xml`, to reflect the path to your new keystore file and password. Your `jetty-ssl.xml` should look like:
-
-<a id="jetty-ssl-xml"></a>
-```html
-<?xml version="1.0"?>
-<!DOCTYPE Configure PUBLIC "-//Jetty//Configure//EN" "http://www.eclipse.org/jetty/configure_9_0.dtd">
-
-<!-- ============================================================= -->
-<!-- Configure a TLS (SSL) Context Factory -->
-<!-- This configuration must be used in conjunction with jetty.xml -->
-<!-- and either jetty-https.xml or jetty-spdy.xml (but not both) -->
-<!-- ============================================================= -->
-<Configure id="sslContextFactory" class="org.eclipse.jetty.util.ssl.SslContextFactory">
- <Set name="KeyStorePath"><Property name="jetty.base" default="." />/<Property name="jetty.keystore" default="src/test/resources/jetty.keystore"/></Set>
- <Set name="KeyStorePassword"><Property name="jetty.keystore.password" default="secret"/></Set>
- <Set name="KeyManagerPassword"><Property name="jetty.keymanager.password" default="secret"/></Set>
- <Set name="TrustStorePath"><Property name="jetty.base" default="." />/<Property name="jetty.truststore" default="src/test/resources/jetty.keystore"/></Set>
- <Set name="TrustStorePassword"><Property name="jetty.truststore.password" default="secret"/></Set>
- <Set name="EndpointIdentificationAlgorithm"></Set>
- <Set name="ExcludeCipherSuites">
- <Array type="String">
- <Item>SSL_RSA_WITH_DES_CBC_SHA</Item>
- <Item>SSL_DHE_RSA_WITH_DES_CBC_SHA</Item>
- <Item>SSL_DHE_DSS_WITH_DES_CBC_SHA</Item>
- <Item>SSL_RSA_EXPORT_WITH_RC4_40_MD5</Item>
- <Item>SSL_RSA_EXPORT_WITH_DES40_CBC_SHA</Item>
- <Item>SSL_DHE_RSA_EXPORT_WITH_DES40_CBC_SHA</Item>
- <Item>SSL_DHE_DSS_EXPORT_WITH_DES40_CBC_SHA</Item>
- </Array>
- </Set>
-
- <!-- =========================================================== -->
- <!-- Create a TLS specific HttpConfiguration based on the -->
- <!-- common HttpConfiguration defined in jetty.xml -->
- <!-- Add a SecureRequestCustomizer to extract certificate and -->
- <!-- session information -->
- <!-- =========================================================== -->
- <New id="sslHttpConfig" class="org.eclipse.jetty.server.HttpConfiguration">
- <Arg><Ref refid="httpConfig"/></Arg>
- <Call name="addCustomizer">
- <Arg><New class="org.eclipse.jetty.server.SecureRequestCustomizer"/></Arg>
- </Call>
- </New>
-
-</Configure>
-```
-
-## But it's still not running!
-
-Unless you are running `mvn jetty:run` as `root`, you should see another error now: `[ERROR] Failed to execute goal org.eclipse.jetty:jetty-maven-plugin:9.0.5.v20130815:run (default-cli) on project FOOBAR: Failure: Permission denied -> [Help 1]`. This is, because the ports are set to the numbers `80` and `443` of the privileged port-range.
-
-<a id="jetty-http-xml"></a>
-You have to change `jetty-http.xml` like this:
-
-```html
-<?xml version="1.0"?>
-<!DOCTYPE Configure PUBLIC "-//Jetty//Configure//EN" "http://www.eclipse.org/jetty/configure_9_0.dtd">
-
-<!-- ============================================================= -->
-<!-- Configure the Jetty Server instance with an ID "Server" -->
-<!-- by adding a HTTP connector. -->
-<!-- This configuration must be used in conjunction with jetty.xml -->
-<!-- ============================================================= -->
-<Configure id="Server" class="org.eclipse.jetty.server.Server">
-
- <!-- =========================================================== -->
- <!-- Add a HTTP Connector. -->
- <!-- Configure an o.e.j.server.ServerConnector with a single -->
- <!-- HttpConnectionFactory instance using the common httpConfig -->
- <!-- instance defined in jetty.xml -->
- <!-- -->
- <!-- Consult the javadoc of o.e.j.server.ServerConnector and -->
- <!-- o.e.j.server.HttpConnectionFactory for all configuration -->
- <!-- that may be set here. -->
- <!-- =========================================================== -->
- <Call name="addConnector">
- <Arg>
- <New class="org.eclipse.jetty.server.ServerConnector">
- <Arg name="server"><Ref refid="Server" /></Arg>
- <Arg name="factories">
- <Array type="org.eclipse.jetty.server.ConnectionFactory">
- <Item>
- <New class="org.eclipse.jetty.server.HttpConnectionFactory">
- <Arg name="config"><Ref refid="httpConfig" /></Arg>
- </New>
- </Item>
- </Array>
- </Arg>
- <Set name="host"><Property name="jetty.host" /></Set>
- <Set name="port"><Property name="jetty.port" default="8080" /></Set>
- <Set name="idleTimeout"><Property name="http.timeout" default="30000"/></Set>
- </New>
- </Arg>
- </Call>
-
-</Configure>
-```
-
-<a id="jetty-https-xml"></a>
-... and `jetty-https.xml` like this:
-
-```html
-<?xml version="1.0"?>
-<!DOCTYPE Configure PUBLIC "-//Jetty//Configure//EN" "http://www.eclipse.org/jetty/configure_9_0.dtd">
-
-<!-- ============================================================= -->
-<!-- Configure a HTTPS connector. -->
-<!-- This configuration must be used in conjunction with jetty.xml -->
-<!-- and jetty-ssl.xml. -->
-<!-- ============================================================= -->
-<Configure id="Server" class="org.eclipse.jetty.server.Server">
-
- <!-- =========================================================== -->
- <!-- Add a HTTPS Connector. -->
- <!-- Configure an o.e.j.server.ServerConnector with connection -->
- <!-- factories for TLS (aka SSL) and HTTP to provide HTTPS. -->
- <!-- All accepted TLS connections are wired to a HTTP connection.-->
- <!-- -->
- <!-- Consult the javadoc of o.e.j.server.ServerConnector, -->
- <!-- o.e.j.server.SslConnectionFactory and -->
- <!-- o.e.j.server.HttpConnectionFactory for all configuration -->
- <!-- that may be set here. -->
- <!-- =========================================================== -->
- <Call id="httpsConnector" name="addConnector">
- <Arg>
- <New class="org.eclipse.jetty.server.ServerConnector">
- <Arg name="server"><Ref refid="Server" /></Arg>
- <Arg name="factories">
- <Array type="org.eclipse.jetty.server.ConnectionFactory">
- <Item>
- <New class="org.eclipse.jetty.server.SslConnectionFactory">
- <Arg name="next">http/1.1</Arg>
- <Arg name="sslContextFactory"><Ref refid="sslContextFactory"/></Arg>
- </New>
- </Item>
- <Item>
- <New class="org.eclipse.jetty.server.HttpConnectionFactory">
- <Arg name="config"><Ref refid="sslHttpConfig"/></Arg>
- </New>
- </Item>
- </Array>
- </Arg>
- <Set name="host"><Property name="jetty.host" /></Set>
- <Set name="port"><Property name="https.port" default="8443" /></Set>
- <Set name="idleTimeout"><Property name="https.timeout" default="30000"/></Set>
- </New>
- </Arg>
- </Call>
-</Configure>
-```
-
-Now, it should be running, _but..._
-
-## That is all much to complex. I just want a quick fix to get it running!
-
-So, now it is working. But you still have to clutter your project with several files and avoid some pitfalls (belive me or not: if you put the filenames in the `<jettyXml>`-tag of your `pom.xml` on separate lines, jetty won't start!). Last but not least, the HTTP-Connector will stop working, if you forget to add the `jetty-http.xml`, that is mentioned at the end of the example.
-
-Because of that, I've created a simple 6-step quick-fix-guide to get the HTTPS-Connector of the `jetty-maven-plugin` running.
-
-## <a id="quick-fix"></a>Quick Fix
-
-1. Download [jetty.xml](/wp-uploads/2014/02/jetty.xml) or copy it [from above](#jetty-xml) and place it in `src/test/resources/jetty.xml`
-1. Download [jetty-http.xml](/wp-uploads/2014/02/jetty-http.xml) or copy it [from above](#jetty-http-xml) and place it in `src/test/resources/jetty-http.xml`
-1. Download [jetty-ssl.xml](/wp-uploads/2014/02/jetty-ssl.xml) or copy it [from above](#jetty-ssl-xml) and place it in `src/test/resources/jetty-ssl.xml`
-1. Download [jetty-https.xml](/wp-uploads/2014/02/jetty-https.xml) or copy it [from above](#jetty-https-xml) and place it in `src/test/resources/jetty-https.xml`
-1. Download [jetty.keystore](/wp-uploads/2014/02/jetty.keystore) or generate it with the command [keytool-command from above](#keytool) and place it in `src/test/resources/jetty.keystore`
-1. Update the configuration of the `jetty-maven-plugin` in your `pom.xml` to include the XML-configurationfiles. But be aware, the ordering of the files is important and there should be no newlines inbetween. You have been warned! It should look like:
-
- ```html
-
- <plugin>
- <groupId>org.eclipse.jetty</groupId>
- <artifactId>jetty-maven-plugin</artifactId>
- <configuration>
- <jettyXml>
- ${project.basedir}/src/test/resources/jetty.xml,${project.basedir}/src/test/resources/jetty-http.xml,${project.basedir}/src/test/resources/jetty-ssl.xml,${project.basedir}/src/test/resources/jetty-https.xml
- </jettyXml>
- </configuration>
- </plugin>
-
- ```
-
-That's it. You should be done!
+++ /dev/null
----
-_edit_last: "2"
-categories:
- - html(5)
- - wordpress
-date: "2014-02-25"
-lastmod: "2018-07-20T11:23:50+00:00"
-guid: http://juplo.de/?p=255
-parent_post_id: null
-post_id: "255"
-title: Disable automatic p and br tags in the wordpress editor - and do it as early, as you can!
-url: /disable-automatic-p-and-br-tags-in-the-wordpress-editor-and-do-it-as-early-as-you-can/
-
----
-## Why you should disable them as early, as you can
-
-I don't like visual HTML-editors, because they always mess up your HTML. So the first thing, that I've done in my wordpress-profile, was checking the check-box `Disable the visual editor when writing`.
-But today I found out, that this is worth nothing.
-Even when in text-mode, wordpress is adding some `<p>-` and `<br>`-tags automagically and, hence, is automagically messing up my neatly hand-crafted HTML-code.
-
-**Fuck wordpress!** _(Ehem - sorry for that outburst)_...
-
-But what is even worse: after [really turning off wordpress's automagically-messup-functionality](#disable "Jump to the tech-section, if you only want to find out, how to disable wordpress's auto-messup functionality"), nearly all my handwritten `<p>`-tags were gone, too.
-So, if you want to turn of automatic `<p>-` and `<br>`-tags, you should really do it as early, as you can. Otherwise, you will have to clean up all your old posts afterwards like me. TI've lost some hours with usless HTML-editing today, because of that sh#%&\*!
-
-## <a id="disable"></a>How to disable them
-
-The [wordpress-documentation of the build-in HTML-editor](https://codex.wordpress.org/TinyMCE#Automatic_use_of_Paragraph_Tags) links to [this post](http://redrokk.com/2010/08/16/removing-p-tags-in-wordpress/), which describs how to disable autmatic use of paragraph tags.
-Simple open the file `wp-includes/default-filters.php` of you wordpress-installation and comment out the following line:
-
-```html
-addfilter('the_content', 'wpautop');
-```
-
-If you are building your own wordpress-theme - like me - you alternatively can add the following to the `functions.php`-file of your theme:
-
-```html
-remove_filter('the_content', 'wpautop');
-```
-
-## Why you should disable automatic paragraph tags
-
-For example, I was wondering a while, where all that whitespace in my posts were coming from.
-Being used to handcraft my HTML, I often wrote one sentence per line, or put some empty lines inbetween to clearly arange my code.
-There comes wordpress, messing everything up by automagically putting every sentence in its own paragraph, because it was written on its own line and putting `<br>` inbetween, to reflect my empty lines.
-
-But even worse, wordpress also puts these unwanted `<p>`-tags [arround HTML-code, that breaks because of it](http://wordpress.org/support/topic/disable-automatic-p-and-br-tags-in-html-editor "Another example is described in this forum-request. One guy puts a plugin in his post, but it does not work, because wordpress automagically messed up his HTML...").
-For example, I eventually found out about this auto-messup functionallity, because I was checking my blog-post with a [html-validator](http://validator.w3.org/) and was wondering, why the validator was grumping about a `<quote>`-tag inside [flow content](http://dev.w3.org/html5/html-author/#flow-content), which I've never put there. It turned out, that wordpress had put it there for me...
+++ /dev/null
----
-_edit_last: "2"
-categories:
- - explained
-date: "2016-11-08"
-lastmod: "2018-09-28T08:38:10+00:00"
-guid: http://juplo.de/?p=762
-parent_post_id: null
-post_id: "762"
-title: XPath 2.0 deep-equal Does Not Match Like Expected - The Problem With Whitespace
-url: /xpath-2-0-deep-equal-does-not-match-like-expected-the-problem-with-whitespace/
-
----
-I just stumbled accros a problem with the `deep-equal()`-method introduced by `XPath 2.0`.
-It costs me two hours at minimum to find out, what was going on.
-So I want to share this with you, in case your are wasting time on the same problem and try to find a solution via google ;)
-
-If you never heard of `deep-equal()` and just wonder how to compare XML-nodes in the right way, you should probably read this [exelent article about equality in XSLT](http://www.xml.com/lpt/a/1589 "Read more about the posibilities to compare nodes in XSLT") as a starter.
-
-## My Problem
-
-My problem was, that I wanted to parse/output a node only, if there exists no node on the `ancestor`-axis, that has a exact duplicate of that node as a direct child.
-
-## The Difference Between A Comparison With `=` And With `deep-equal()`
-
-If you just use simple equality (with `=` or `eq`), the two compared nodes are converted into strings implicitly.
-That is no problem, if you are comparing attributes, or nodes, that only contain text.
-But in all other cases, you will only compare the text-contents of the two nodes and their children.
-Hence, if they differ only in an attribute, your test will report that they are equal, which might not be what you are expecting.
-
-For example, the XPath-expression
-
-```XPath
-//child/ref[ancestor::parent/ref=.]
-```
-
-will match the `<ref>`-node with `@id='bar'`, that is nested insiede the `<child>`-node in this example-XML, what I was not expecting:
-
-```Java
-<root>
- <parent>
- <ref id="foo"><content>Same Text-Content</content></ref>
- <child>
- <ref id="bar"><content>Same Text-Content</content></ref>
- </child>
- <parent>
-<list>
-```
-
-So, what I tried, after I found out about `deep-equal()` was the following `Xpath`-expression, which solves the problem in the above example:
-
-```XPath
-//child/ref[deep-equal(ancestor::parent/ref,.)]
-```
-
-## The Unexpected Behaviour Of `deep-equal()`
-
-But, moving on I stumbled accross cases, where I was expecting a match, but `deep-equal()` does not match the nodes.
-For example:
-
-```Java
-<root>
- <parent>
- <ref id="same">
- <content>Same Text-Content</content>
- </ref>
- <child>
- <ref id="same">
- <content>Same Text-Content</content>
- </ref>
- </child>
- <parent>
-<list>
-```
-
-You probably catch the diffrenece at first glance, since I laid out the examples accordingly and gave you a hint in the heading of this post - but it really took me a long time to get that:
-
-## It is all about whitespace!
-
-`deep-equal()` compares _all_ child-nodes and only yields a match, if the compared nodes have exactly the same child-nodes.
-But in the second example, the compared `<ref>`-nodes contain whitespace befor and after their child-node `<content>`.
-And these whitespace are in fact implicite child-nodes of type text.
-Hence, the two nodes in the second example differe, because the indentation on the second one has two more spaces.
-
-## The solution...?
-
-Unfortunatly, I do not really know a good solution.
-(If you come up with one, feel free to note or link it in the comments!)
-
-The best solution would be an option additional argument for `deep-equal()`, that can be selected to tell the function to ignore such whitespace.
-In fact, some XSLT-parsers do provide such an argument.
-
-The only other solution, I can think of, is, to write another XSLT-script to remove all the whitespaces between tags to circumvent this at the first glance unexpected behaviour of `deep-equal()`
--- /dev/null
+---
+_edit_last: "2"
+_oembed_0a2776cf844d7b8b543bf000729407fe: '{{unknown}}'
+_oembed_8a143b8145082a48cc586f0fdb19f9b5: '{{unknown}}'
+_oembed_4484ca19961800dfe51ad98d0b1fcfef: '{{unknown}}'
+_oembed_b0575eccf8471857f8e25e8d0f179f68: '{{unknown}}'
+categories:
+ - explained
+ - java
+ - spring-boot
+classic-editor-remember: classic-editor
+date: "2019-12-25"
+lastmod: "2020-07-02T13:24:07+00:00"
+guid: http://juplo.de/?p=970
+parent_post_id: null
+post_id: "970"
+title: Actuator HTTP Trace Does Not Work With Spring Boot 2.2.x
+linkTitle: Fixing Actuator HTTP Trace
+url: /actuator-httptrace-does-not-work-with-spring-boot-2-2/
+
+---
+## TL;DR
+
+In Spring Boot 2.2.x, you have to instanciate a **`@Bean`** of type **`InMemoryHttpTraceRepository`** to enable the HTTP Trace Actuator.
+
+Jump to the [explanation](#explanation) of and [example code for the fix](#fix)
+
+## `Enabling HTTP Trace — Before 2.2.x...`
+
+Spring Boot comes with a very handy feature called [Actuator](https://docs.spring.io/spring-boot/docs/current/reference/htmlsingle/#production-ready "Show the Spring Boot Documentation for the Actuator Feature").
+Actuator provides a build-in production-ready REST-API, that can be used to monitor / menage / debug your bootified App.
+To enable it — _prior to 2.2.x_ —, one only had to:
+
+1. Specifiy the dependency for Spring Boot Actuator:
+
+ ```
+ <dependency>
+ <groupId>org.springframework.boot
+ <artifactId>spring-boot-starter-actuator
+ </dependency>
+
+ ```
+
+1. Expose the needed endpoints via HTTP:
+
+ ```properties
+ management.endpoints.web.exposure.include=*
+
+ ```
+
+ - This exposes **all available endpoints** via HTTP.
+ - _**Advise:** Do not copy this into a production config_
+
+ (Without thinking about it twice and — at least — [enable some security measures](https://docs.spring.io/spring-boot/docs/current/reference/htmlsingle/#production-ready-endpoints-security "Read, how to secure HTTP-endpoints in the documentation of Spring Boot") to protect the exposed endpoints!)
+
+## The problem: _It simply does not work any more in 2.2 :(_
+
+_But..._
+
+- If you upgrade your existing app with a working `httptrace`-actuator to Spring Boot 2.2.x, or
+- If you start with a fresh app in Spring Boot 2.2.x and try to enable the `httptrace`-actuator [as described in the documentation](https://docs.spring.io/spring-boot/docs/current/reference/htmlsingle/#production-ready-endpoints-exposing-endpoints "Read, how to expose HTTP-endpoints in the documentation of Spring Boot")
+
+**...it simply does not work at all!**
+
+## <a id="fix"></a>The Fix
+
+The simple fix for this problem is, to add a `@Bean` of type `InMemoryHttpTraceRepository` to your **`@Configuration`**-class:
+
+```
+@Bean
+public HttpTraceRepository htttpTraceRepository()
+{
+ return new InMemoryHttpTraceRepository();
+}
+
+```
+
+## <a id="explanation"></a>The Explanation
+
+The cause of this problem is not a bug, but a legitimate change in the default configuration.
+Unfortunately, this change is not noted in the according section of the documentation.
+Instead it is burried in the [Upgrade Notes for Spring Boot 2.2](https://github.com/spring-projects/spring-boot/wiki/Spring-Boot-2.2.0-M3-Release-Notes#actuator-http-trace-and-auditing-are-disabled-by-default)
+
+The default-implementation stores the captured data in memory.
+Hence, it consumes much memory, without the user knowing, or even worse: needing it.
+This is especially undesirable in cluster environments, where memory is a precious good.
+_And remember:_ Spring Boot was invented to simplify cluster deployments!
+
+**That is, why this feature is now turned of by default and has to be turned on by the user explicitly, if needed.**
--- /dev/null
+---
+_edit_last: "2"
+categories:
+ - howto
+classic-editor-remember: classic-editor
+date: "2019-06-25"
+lastmod: "2020-09-25T23:23:17+00:00"
+guid: http://juplo.de/?p=881
+parent_post_id: null
+post_id: "881"
+tags:
+ - encryption
+ - java
+ - kafka
+ - security
+ - tls
+ - zookeeper
+title: Encrypt Communication Between Kafka And ZooKeeper With TLS
+url: /encrypt-communication-between-kafka-and-zookeeper-with-tls/
+
+---
+## TL;DR
+
+1. Download and unpack [zookeeper+tls.tgz](/wp-uploads/zookeeper+tls.tgz).
+1. Run [README.sh](/wp-uploads/zookeeper+tls/README.sh) for a fully automated example of the presented setup.
+
+Copy and paste to execute the two steps on Linux:
+
+```bash
+curl -sc - /wp-uploads/zookeeper+tls.tgz | tar -xzv && cd zookeeper+tls && ./README.sh
+
+```
+
+A [german translation](https://www.trion.de/news/2019/06/28/kafka-zookeeper-tls.html "Hier findest du eine deutsche Übersetzung dieses Artikels") of this article can be found on [http://trion.de](https://www.trion.de/news/ "A lot of intresting posts about Java, Docker, Kubernetes, Spring Boot and so on can be found @trion").
+
+## Current Kafka Cannot Encrypt ZooKeeper-Communication
+
+Up until now ( [Version 2.3.0 of Apache Kafka](https://kafka.apache.org/documentation/#security_overview "Read more about the supported options in the original documentation of version 2.3.0")) it is not possible, to encrypt the communication between the Kafka-Brokers and their ZooKeeper-ensemble.
+This is not possiible, because ZooKeeper 3.4.13, which is shipped with Apache Kafka 2.3.0, lacks support for TLS-encryption.
+
+The documentation deemphasizes this, with the observation, that usually only non-sensitive data (configuration-data and status information) is stored in ZooKeeper and that it would not matter, if this data is world-readable, as long as it can be protected against manipulation, which can be done through proper authentication and ACL's for zNodes:
+
+> _The rationale behind this decision is that the data stored in ZooKeeper is not sensitive, but inappropriate manipulation of znodes can cause cluster disruption._ ( [Kafka-Documentation](https://kafka.apache.org/documentation/#zk_authz "Read the documentation about how to secure ZooKeeper"))
+
+This quote obfuscates the [elsewhere mentioned fact](https://kafka.apache.org/documentation/#security_sasl_scram_security "The security considerations for SASL/SCRAM are clearly stating, that ZooKeeper must be protected, because it stores sensitive authentication data in this case"), that there are use-cases that store sensible data in ZooKeeper.
+For example, if authentication via [SASL/SCRAM](https://kafka.apache.org/documentation/#security_sasl_scram_clientconfig "Read more about authentication via SASL/SCRAM") or [Delegation Tokens](https://kafka.apache.org/documentation/#security_delegation_token) is used.
+Accordingly, the documentation often stresses, that usually there is no need to make ZooKeeper accessible to normal clients.
+Nowadays, only admin-tools need direct access to the ZooKeeper-ensemble.
+Hence, it is stated as a best practice, to make the ensemble only available on a local network, hidden behind a firewall or such.
+
+**In cleartext: One must not run a Kafka-Cluster, that spans more than one data-center — or at least make sure, that all communication is tunneled through a virtual private network.**
+
+## ZooKeeper 3.5.5 To The Rescue
+
+On may the 20th 2019, [version 3.5.5 of ZooKeeper](http://zookeeper.apache.org/releases.html#releasenotes "Read the release notes") has been released.
+Version 3.5.5 is the first stable release of the 3.5.x branch, that introduces the support for TLS-encryption, the community has yearned for so long.
+It supports the encryption of all communication between the nodes of a ZooKeeper-ensemble and between ZooKeeper-Servers and -Clients.
+
+Part of ZooKeeper is a sophisticated client-API, that provide a convenient abstraction for the communication between clients and servers over the _Atomic Broadcast Protocol_.
+The TLS-encryption is applied by this API transparently.
+Because of that, all client-implementations can profit from this new feature through a simple library-upgrade from 3.4.13 to 3.5.5.
+**This article will walk you through an example, that shows how to carry out such a library-upgrade for Apache Kafka 2.3.0 and configure a cluster to use TLS-encryption, when communicating with a standalone ZooKeeper.**
+
+## Disclaimer
+
+**The presented setup is ment for evaluation only!**
+
+It fiddles with the libraries, used by Kafka, which might cause unforseen issues.
+Furthermore, using TLS-encryption in ZooKeeper requires one to switch from the battle-tested `NIOServerCnxnFactory`, which uses the [NIO-API](https://en.wikipedia.org/wiki/Non-blocking_I/O_(Java) "Learn more about non-blocking I/O in Java") directly, to the newly introduced `NettyServerCnxnFactory`, which is build on top of [Netty](https://netty.io/ "Learn more about Netty").
+
+## Recipe To Enable TLS Between Broker And ZooKeeper
+
+The article will walk you step by step through the setup now.
+If you just want to evaluate the example, you can [jump to the download-links](#scripts "I am so inpatient, just get me to the fully automated example").
+
+All commands must be executed in the same directory.
+We recommend, to create a new directory for that purpose.
+
+### Download Kafka and ZooKeeper
+
+First of all: Download version 2.3.0 of Apache Kafka and version 3.5.5 of Apache ZooKeeper:
+
+```bash
+curl -sc - http://ftp.fau.de/apache/zookeeper/zookeeper-3.5.5/apache-zookeeper-3.5.5-bin.tar.gz | tar -xzv
+curl -sc - http://ftp.fau.de/apache/kafka/2.3.0/kafka_2.12-2.3.0.tgz | tar -xzv
+
+```
+
+### Switch Kafka 2.3.0 from ZooKeeper 3.4.13 to ZooKeeper 3.5.5
+
+Remove the 3.4.13-version from the `libs`-directory of Apache Kafka:
+
+```bash
+rm -v kafka_2.12-2.3.0/libs/zookeeper-3.4.14.jar
+
+```
+
+Then copy the JAR's of the new version of Apache ZooKeeper into that directory. (The last JAR is only needed for CLI-clients, like for example `zookeeper-shell.sh`.)
+
+```bash
+cp -av apache-zookeeper-3.5.5-bin/lib/zookeeper-3.5.5.jar kafka_2.12-2.3.0/libs/
+cp -av apache-zookeeper-3.5.5-bin/lib/zookeeper-jute-3.5.5.jar kafka_2.12-2.3.0/libs/
+cp -av apache-zookeeper-3.5.5-bin/lib/netty-all-4.1.29.Final.jar kafka_2.12-2.3.0/libs/
+cp -av apache-zookeeper-3.5.5-bin/lib/commons-cli-1.2.jar kafka_2.12-2.3.0/libs/
+
+```
+
+That is all there is to do to upgrade ZooKeeper.
+If you run one of the Kafka-commands, it will use ZooKeeper 3.5.5. from now on.
+
+### Create A Private CA And The Needed Certificates
+
+_You can [read more about setting up a private CA in this post](/create-self-signed-multi-domain-san-certificates/ "Lern how to set up a private CA and create self-signed certificates")..._
+
+Create the root-certificate for the CA and store it in a Java-truststore:
+
+```bash
+openssl req -new -x509 -days 365 -keyout ca-key -out ca-cert -subj "/C=DE/ST=NRW/L=MS/O=juplo/OU=kafka/CN=Root-CA" -passout pass:superconfidential
+keytool -keystore truststore.jks -storepass confidential -import -alias ca-root -file ca-cert -noprompt
+
+```
+
+The following commands will create a self-signed certificate in **`zookeeper.jks`**.
+What happens is:
+
+1. Create a new key-pair and certificate for `zookeeper`
+1. Generate a certificate-signing-request for that certificate
+1. Sign the request with the key of private CA and also add a SAN-extension, so that the signed certificate is also valid for `localhost`
+1. Import the root-certificate of the private CA into the keystore `zookeeper.jks`
+1. Import the signed certificate for `zookeeper` into the keystore `zookeeper.jks`
+
+_You can [read more about creating self-signed certificates with multiple domains and building a Chain-of-Trust here](/create-self-signed-multi-domain-san-certificates/#sign-with-san "Lern how to sign certificates with SAN-extension")..._
+
+```bash
+NAME=zookeeper
+keytool -keystore $NAME.jks -storepass confidential -alias $NAME -validity 365 -genkey -keypass confidential -dname "CN=$NAME,OU=kafka,O=juplo,L=MS,ST=NRW,C=DE"
+keytool -keystore $NAME.jks -storepass confidential -alias $NAME -certreq -file cert-file
+openssl x509 -req -CA ca-cert -CAkey ca-key -in cert-file -out $NAME.pem -days 365 -CAcreateserial -passin pass:superconfidential -extensions SAN -extfile <(printf "\n[SAN]\nsubjectAltName=DNS:$NAME,DNS:localhost")
+keytool -keystore $NAME.jks -storepass confidential -import -alias ca-root -file ca-cert -noprompt
+keytool -keystore $NAME.jks -storepass confidential -import -alias $NAME -file $NAME.pem
+
+```
+
+Repeat this with:
+
+- **`NAME=kafka-1`**
+- **`NAME=kafka-2`**
+- **`NAME=client`**
+
+Now we have signed certificates for all participants in our small example, that are stored in separate keystores, each with a Chain-of-Trust set up, that is rooting in our private CA.
+We also have a truststore, that will validate all these certificates, because it contains the root-certificate of the Chain-of-Trust: the certificate of our private CA.
+
+### Configure And Start ZooKeeper
+
+_We hightlight/explain only the configuration-options here, that are needed for TLS-encryption!_
+
+In our setup, the standalone ZooKeeper essentially needs two specially tweaked configuration files, to use encryption.
+
+Create the file **`java.env`**:
+
+```bash
+SERVER_JVMFLAGS="-Xms512m -Xmx512m -Dzookeeper.serverCnxnFactory=org.apache.zookeeper.server.NettyServerCnxnFactory"
+ZOO_LOG_DIR=.
+
+```
+
+- The Java-Environmentvariable **`zookeeper.serverCnxnFactory`** switches the connection-factory to use the Netty-Framework.
+**Without this, TLS is not possible!**
+
+Create the file **`zoo.cfg`**:
+
+```bash
+dataDir=/tmp/zookeeper
+secureClientPort=2182
+maxClientCnxns=0
+authProvider.1=org.apache.zookeeper.server.auth.X509AuthenticationProvider
+ssl.keyStore.location=zookeeper.jks
+ssl.keyStore.password=confidential
+ssl.trustStore.location=truststore.jks
+ssl.trustStore.password=confidential
+
+```
+
+- **`secureClientPort`**: We only allow encrypted connections!
+(If we want to allow unencrypted connections too, we can just specify `clientPort` additionally.)
+- **`authProvider.1`**: Selects authentification through client certificates
+- **`ssl.keyStore.*`**: Specifies the path to and password of the keystore, with the `zookeeper`-certificate
+- **`ssl.trustStore.*`**: Specifies the path to and password of the common truststore with the root-certificate of our private CA
+
+Copy the file **`log4j.properties`** into the current working directory, to enable logging for ZooKeeper (see also `java.env`):
+
+```bash
+cp -av apache-zookeeper-3.5.5-bin/conf/log4j.properties .
+
+```
+
+Start the ZooKeeper-Server:
+
+```bash
+apache-zookeeper-3.5.5-bin/bin/zkServer.sh --config . start
+
+```
+
+- **`--config .`**: The script should search in the current directory for the configration data and certificates.
+
+### Konfigure And Start The Brokers
+
+_We hightlight/explain only the configuration-options and start-parameters here, that are needed to encrypt the communication between the Kafka-Brokers and the ZooKeeper-Server!_
+
+The other parameters shown here, that are concerned with SSL are only needed for securing the communication between the Brokers itself and between Brokers and Clients.
+You can read all about them in the [standard documentation](https://kafka.apache.org/documentation/#security).
+In short: This example is set up, to use SSL for authentication between the brokers and SASL/PLAIN for client-authentification — both channels are encrypted with TLS.
+
+TLS for the ZooKeeper Client-API is configured through Java-Environmentvariables.
+Hence, most of the SSL-configuration for connecting to ZooKeeper has to be specified, when starting the broker.
+Only the address and port for the connction itself is specified in the configuration-file.
+
+Create the file **`kafka-1.properties`**:
+
+```bash
+broker.id=1
+zookeeper.connect=zookeeper:2182
+listeners=SSL://kafka-1:9193,SASL_SSL://kafka-1:9194
+security.inter.broker.protocol=SSL
+ssl.client.auth=required
+ssl.keystore.location=kafka-1.jks
+ssl.keystore.password=confidential
+ssl.key.password=confidential
+ssl.truststore.location=truststore.jks
+ssl.truststore.password=confidential
+listener.name.sasl_ssl.plain.sasl.jaas.config=org.apache.kafka.common.security.plain.PlainLoginModule required user_consumer="pw4consumer" user_producer="pw4producer";
+sasl.enabled.mechanisms=PLAIN
+log.dirs=/tmp/kafka-1-logs
+offsets.topic.replication.factor=2
+transaction.state.log.replication.factor=2
+transaction.state.log.min.isr=2
+
+```
+
+- **`zookeeper.connect`**: If you allow unsecure connections too, be sure to specify the right port here!
+- _All other options are not relevant for encrypting the connections to ZooKeeper_
+
+Start the broker in the background and remember its PID in the file **`KAFKA-1`**:
+
+```bash
+(
+ export KAFKA_OPTS="
+ -Dzookeeper.clientCnxnSocket=org.apache.zookeeper.ClientCnxnSocketNetty
+ -Dzookeeper.client.secure=true
+ -Dzookeeper.ssl.keyStore.location=kafka-1.jks
+ -Dzookeeper.ssl.keyStore.password=confidential
+ -Dzookeeper.ssl.trustStore.location=truststore.jks
+ -Dzookeeper.ssl.trustStore.password=confidential
+ "
+ kafka_2.12-2.3.0/bin/kafka-server-start.sh kafka-1.properties & echo $! > KAFKA-1
+) > kafka-1.log &
+
+```
+
+Check the logfile **`kafka-1.log`** to confirm that the broker starts without errors!
+
+- **`zookeeper.clientCnxnSocket`**: Switches from NIO to the Netty-Framework.
+**Without this, the ZooKeeper Client-API (just like the ZooKeeper-Server) cannot use TLS!**
+- **`zookeeper.client.secure=true`**: Switches on TLS-encryption, for all connections to any ZooKeeper-Server
+- **`zookeeper.ssl.keyStore.*`**: Specifies the path to and password of the keystore, with the `kafka-1`-certificate
+- **`zookeeper.ssl.trustStore.*`**: Specifies the path to and password of the common truststore with the root-certificate of our private CA
+
+_Do the same for **`kafka-2`**!_
+_And do not forget, to adapt the config-file accordingly — or better: just [download a copy](/wp-uploads/zookeeper+tls/kafka-2.properties)..._
+
+### Configure And Execute The CLI-Clients
+
+All scripts from the Apache-Kafka-Distribution that connect to ZooKeeper are configured in the same way as seen for `kafka-server-start.sh`.
+For example, to create a topic, you will run:
+
+```bash
+export KAFKA_OPTS="
+ -Dzookeeper.clientCnxnSocket=org.apache.zookeeper.ClientCnxnSocketNetty
+ -Dzookeeper.client.secure=true
+ -Dzookeeper.ssl.keyStore.location=client.jks
+ -Dzookeeper.ssl.keyStore.password=confidential
+ -Dzookeeper.ssl.trustStore.location=truststore.jks
+ -Dzookeeper.ssl.trustStore.password=confidential
+"
+kafka_2.12-2.3.0/bin/kafka-topics.sh \
+ --zookeeper zookeeper:2182 \
+ --create --topic test \
+ --partitions 1 --replication-factor 2
+
+```
+
+_Note:_ A different keystore is used here ( `client.jks`)!
+
+CLI-clients, that connect to the brokers, can be called as usual.
+
+In this example, they use an encrypted listener on port 9194 (for `kafka-1`) and are authenticated using SASL/PLAIN.
+The client-configuration is kept in the files `consumer.config` and `producer.config`.
+Take a look at that files and compare them with the broker-configuration above.
+If you want to lern more about securing broker/client-communication, we refere you to the [official documentation](https://kafka.apache.org/documentation/#security "The official documentation does a good job on this topic!").
+
+_If you have trouble to start these clients, download the scripts and take a look at the examples in [README.sh](/wp-uploads/zookeeper+tls/README.sh)_
+
+### TBD: Further Steps To Take...
+
+This recipe only activates TLS-encryption between Kafka-Brokers and a Standalone ZooKeeper.
+It does not show, how to enable TLS between ZooKeeper-Nodes (which should be easy) or if it is possible to authenticate Kafka-Brokers via TLS-certificates. These topics will be covered in future articles...
+
+## Fully Automated Example Of The Presented Setup
+
+Download and unpack [zookeeper+tls.tgz](/wp-uploads/zookeeper+tls.tgz) for an evaluation of the presented setup:
+
+```bash
+curl -sc - /wp-uploads/zookeeper+tls.tgz | tar -xzv
+
+```
+
+The archive contains a fully automated example.
+Just run [README.sh](/wp-uploads/zookeeper+tls/README.sh) in the unpacked directory.
+
+It downloads the required software, carries out the library-upgrade, creates the required certificates and starts a standalone ZooKeeper and two Kafka-Brokers, that use TLS to encrypt all communication.
+It also executes a console-consumer and a console-producer, that read and write to a topic, and a zookeeper-shell, that communicates directly with the ZooKeeper-node, to proof, that the setup is working.
+The ZooKeeper and the Brokers-instances are left running, to enable the evaluation of the fully encrypted cluster.
+
+### Usage
+
+- Run **`README.sh`**, to execute the automated example
+- After running `README.sh`, the Kafka-Cluster will be still running, so that one can experiment with commands from `README.sh` by hand
+- `README.sh` can be executed repeatedly: it will skip all setup-steps, that are already done automatically
+- Run **`README.sh stop`**, to stop the Kafka-Cluster (it can be restarted by re-running `README.sh`)
+- Run **`README.sh cleanup`**, to stop the Cluster and remove all created files and data (only the downloaded packages will be left untouched)
+
+### Separate Downloads For The Packaged Files
+
+- [README.sh](/wp-uploads/zookeeper+tls/README.sh)
+- [create-certs.sh](/wp-uploads/zookeeper+tls/create-certs.sh)
+- [gencert.sh](/wp-uploads/zookeeper+tls/gencert.sh)
+- [zoo.cfg](/wp-uploads/zookeeper+tls/zoo.cfg)
+- [java.env](/wp-uploads/zookeeper+tls/java.env)
+- [kafka-1.properties](/wp-uploads/zookeeper+tls/kafka-1.properties)
+- [kafka-2.properties](/wp-uploads/zookeeper+tls/kafka-2.properties)
+- [consumer.config](/wp-uploads/zookeeper+tls/consumer.config)
+- [producer.config](/wp-uploads/zookeeper+tls/producer.config)
+++ /dev/null
----
-_edit_last: "2"
-categories:
- - html(5)
-date: "2015-06-24"
-lastmod: "2020-04-10T11:53:39+00:00"
-guid: http://juplo.de/?p=357
-parent_post_id: null
-post_id: "357"
-title: A Perfect Outline
-url: /a-perfect-outline/
-
----
-## Point Out Your Content: Utilize the HTML5 Outline-Algorithm
-
-HTML5 introduces new semantic elements accompained by the definition of [a new algorithm to calculate the document-outline](https://developer.mozilla.org/de/docs/Web/Guide/HTML/Sections_and_Outlines_of_an_HTML5_document "Read all about the new possibilities to mark up the outline of your document") from the mark up.
-There are plenty of [good explanations](http://www.smashingmagazine.com/2011/08/16/html5-and-the-document-outlining-algorithm/ "This is a very good overview, because it also pointes out, what to watch out for") of these new possibilities, to point out your content in a more controlled way.
-But the most of these explanations fall short, if it comes to how to put these new markup into use, so that it results in a sensible outline of the document, that was marked up.
-
-In this article I will try to explain, how to use the new semantic markup, to produce an outline, that is usable as a real content table of the document - not just as an partially orderd overview of all headings.
-I will do so, by showing simple examples, that will illuminate the principles behind the new markup.
-
-## All Messed Up!
-
-Although, the ideas behind the new markup seems to be simple and clear, nearly nobody accomplishes to produce a sensible outline.
-Even the big players, who [guide us through the jungle of the new specifications](http://www.html5rocks.com/de/ "Great guidance - but bad outline") and are giving [great explanations about the subject](http://www.smashingmagazine.com/2013/01/18/the-importance-of-sections/ "Great explanation - but bad outline"), either fail on there sites (see by yourself with the help of the help of [the h5o HTML5 Outline Bookmarklet](https://h5o.github.io/ "Just drag and drop the bookmarklet to your favorites.")), or produce the outline in the old way by the usage of `h1`- `h6` only, like the fabulous HTML5-bible [Dive Into HTML5](http://diveintohtml5.info/semantics.html#footer-element "A wounderful introduction to the new possibilities of HTML5 - but the tid outline is produced the old way").
-
-This is, because there is a lot to mix up in a wrong way, when trying to adopt the new features.
-Here is, what I ended up with, on my first try to combine what I have learned about [semantic elements](http://www.w3schools.com/html/html5_semantic_elements.asp "Overview of the new semantic elements, available in HTML5") and the [document outline](http://html5doctor.com/outlines/ "An explanation, of what the specs told you about the document outline"):
-
-#### Example 01: Markup
-
-```html
-<!DOCTYPE html>
-<title>Example 01</title>
-<header>
- <h2>Header</h2>
- <nav>Navigation</nav>
-</header>
-<main>
- <h1>Main</h1>
- <section>
- <h2>Section I</h2>
- </section>
- <section>
- <h2>Section II</h2>
- <section>
- <h3>Subsection a</h3>
- </section>
- <section>
- <h3>Subsection b</h3>
- </section>
- </section>
- <section>
- <h2>Section III</h2>
- <section>
- <h3>Subsection a</h3>
- </section>
- </section>
-</main>
-<aside>
- <h1>Aside</h1>
-</aside>
-<footer>
- <h2>Footer</h2>
-</footer>
-```
-
-#### Example 01: Outline
-
-1. Header
-1. _Untitled section_
-1. Main
-1. Section I
-1. Section II
- 1. Subsection a
- 1. Subsection b
-1. Section III
- 1. Subsection a
-1. Aside
-1. Footer
-
-[View example 01](/wp-uploads/2015/06/example-01.html)
-
-That quiet was not the outline, that I had expected.
-I planed, that _Header_, _Main_, _Aside_ and _Footer_ are ending up at the same level.
-Instead of that, _Aside_ and _Footer_ had become sections of my _Main_-content.
-And where the hell comes that _Untitled section_ from?!?
-My first thought on that was: No problem, I just forgot the `header`-tags.
-But after adding them, the only thing that cleared out, was where the _Untitled section_ was coming from:
-
-#### Example 02: Markup
-
-```html
-<!DOCTYPE html>
-<title>Example 02</title>
-<header>
- <h2>Header</h2>
- <nav>
- <header><h3>Navigation</h3></header>
- </nav>
-</header>
-<main>
- <header><h1>Main</h1></header>
- <section>
- <header><h2>Section I</h2></header>
- </section>
- <section>
- <header><h2>Section II</h2></header>
- <section>
- <header><h3>Subsection a</h3></header>
- </section>
- <section>
- <header><h3>Subsection b</h3></header>
- </section>
- </section>
- <section>
- <header><h2>Section III</h2></header>
- <section>
- <header><h3>Subsection a</h3></header>
- </section>
- </section>
-</main>
-<footer>
- <header><h2>Footer</h2></header>
-</footer>
-```
-
-#### Example 02: Outline
-
-1. Header
-1. Navigation
-1. Main
-1. Section I
-1. Section II
- 1. Subsection a
- 1. Subsection b
-1. Section III
- 1. Subsection a
-1. Aside
-1. Footer
-
-[View example 02](/wp-uploads/2015/06/example-02.html)
-
-So I thought: Maybe the `main`-tag was the wrong choice.
-Perhaps it should be replaced by an `article`.
-But after that change, the outline even got worse.
-Now, _Navigation_, _Main_ and _Aside_ appeared on the same level, all as a subsection of _Header_.
-At least, _Footer_ suddenly was a sibling of _Header_ as planed:
-
-#### Example 03: Markup
-
-```html
-<!DOCTYPE html>
-<title>Example 03</title>
-<header>
- <h2>Header</h2>
- <nav>
- <header><h3>Navigation</h333></header>
- </nav>
-</header>
-<article>
- <header><h1>Article (Main)</h1></header>
- <section>
- <header><h2>Section I</h2></header>
- </section>
- <section>
- <header><h2>Section II</h2></header>
- <section>
- <header><h3>Subsection a</h3></header>
- </section>
- <section>
- <header><h3>Subsection b</h3></header>
- </section>
- </section>
- <section>
- <header><h2>Section III</h2></header>
- <section>
- <header><h3>Subsection a</h3></header>
- </section>
- </section>
-</article>
-<footer>
- <header><h2>Footer</h2></header>
-</footer>
-```
-
-#### Example 03: Outline
-
-1. Header
-1. Navigation
-1. Main
- 1. Section I
- 1. Section II
- 1. Subsection a
- 1. Subsection b
- 1. Section III
- 1. Subsection a
-1. Aside
-1. Footer
-
-[View example 03](/wp-uploads/2015/06/example-03.html)
-
-After that, I was totally confused and decided, to sort it out step by step.
-That procedure finally gave me the clue, I want to share with you now.
-
-## Step by Step (Uh Baby!)
-
-### <a id="step-01"></a>Step I: Investigate the Structured Part
-
-Let us start with the strictly structured part of the document: **the article and it's subsections**.
-At first a minimal example with no markup except the `article`\- and the `section`-tags:
-
-#### Example 04: Markup
-
-```html
-<!DOCTYPE html>
-<title>Example 04</title>
-<article>
- Main
- <section>
- Section I
- </section>
- <section>
- Section II
- <section>
- Subsection a
- </section>
- <section>
- Subsection b
- </section>
- </section>
- <section>
- Section III
- <section>
- Subsection a
- </section>
- </section>
-</article>
-```
-
-#### Example 04: Outline
-
-1. _Untitled BODY_ 1. _Untitled ARTICLE_ 1. _Untitled SECTION_
- 1. _Untitled SECTION_ 1. _Untitled SECTION_
- 1. _Untitled SECTION_
- 1. _Untitled SECTION_ 1. _Untitled SECTION_
-
-[View Example 04](/wp-uploads/2015/06/example-04.html)
-
-Nothing really unexpected here.
-The `article`\- and `section`-tags are reflected in the outline according to their nesting.
-The only thing notably here is, that the `body` itself is also reflected in the outline.
-It appears on its own level as the root-element of all tags.
-We can think of it as the title of our document.
-
-We can add headings of any kind ( `h1`- `h6`) here and will always get an identically structured outline, that reflects the text of our headings.
-If we want to give the body a title, we have to place a heading outside and before any sectioning-elements:
-
-#### <a id="example-05"></a>Example 05: Markup
-
-```html
-<!DOCTYPE html>
-<title>Example 05</title>
-<h1>Page</h1>
-<article>
- <h1>Article</h1>
- <section>
- <h1>Section I</h1>
- </section>
- <section>
- <h1>Section II</h1>
- <section>
- <h1>Subsection a</h1>
- </section>
- <section>
- <h1>Subsection b</h1>
- </section>
- </section>
- <section>
- <h1>Section III</h1>
- <section>
- <h1>Subsection a</h1>
- </section>
- </section>
-</article>
-```
-
-#### Example 05: Outline
-
-1. Page
-1. Article
- 1. Section I
- 1. Section II
- 1. Subsection a
- 1. Subsection b
- 1. Section III
- 1. Subsection a
-
-[View Example 05](/wp-uploads/2015/06/example-05.html)
-
-This is the new part of the outline algorithm introduced in HTML5: _The nesting of elements, that define sections, defines the outline of the document._
-The rank of the heading element is ignored by this algorithm!
-
-Among the elements, that define sections in HTML5 are the `article` and the `section` tags.
-But there are more.
-[I will discuss them later](#sectioning-elemnts "Jump to the explanation of all sectioning-elements now").
-For now, you only have to know, that in HTML5, sectioning elements define the structure of the outline.
-Also, you should memorize, that the outline always has a single root without any siblings: the `body`.
-
-### <a id="step-2"></a>Step II: Investigate the Page-Elements
-
-So, let us do the same with the tags that represent the different logical sections of a web-page: **the page-elements**.
-We start with a minimal example again, that contains no markup except the `header`\- the `main` and the `footer`-tags:
-
-#### Example 06: Markup
-
-```html
-<!DOCTYPE html>
-<title>Example 06</title>
-<header>Page</header>
-<main>Main</main>
-<footer>Footer</footer>
-```
-
-#### Example 06: Outline
-
-1. _Untitled BODY_
-
-[View Example 06](/wp-uploads/2015/06/example-06.html)
-
-That is wired, ehh?
-There is only one untitled element in the outline.
-The explanation for this is, that neither the `header`\- nor the `main`\- nor the `footer`-tag belong to the elements, that define a section in HTML5!
-This is often confused, because these elements define _the logical sections_ (header – main-content – footer) of a website.
-But these logical sections do not have to do anything with the structural sectioning of the document, that defines the outline.
-
-### Step III: Investigate the Headings
-
-So, what happens, if we add the desired markup for our headings?
-We want a `h1`-heading for our main-content, because it is the important part of our page.
-The header should have a `h2`-heading and the footer a `h3`-heading, because it is rather unimportant.
-
-#### <a id="example-07"></a>Example 07: Markup
-
-```html
-<!DOCTYPE html>
-<title>Example 07</title>
-<header><h2>Page</h2></header>
-<main><h1>Main</h1></main>
-<footer><h3>Footer</h3></footer>
-```
-
-#### Example 07: Outline
-
-1. Page
-1. Main
-1. Footer
-
-[View Example 07](/wp-uploads/2015/06/example-07.html)
-
-Now, there is an outline again.
-But why?
-And why is it looking this way?
-
-What happens here, is [implicit sectioning](https://developer.mozilla.org/de/docs/Web/Guide/HTML/Sections_and_Outlines_of_an_HTML5_document#Implicit_Sectioning "Read all about implicit sectioning").
-In short, implicit sectioning is the outline algorithm of HTML4.
-HTML5 needs implicit sectioning, to keep compatible with HTML4, which still dominates the web.
-In fact, we could have used plain HTML4, with `div` instead of `header`, `main` and `footer`, and it would have yield the exact same outline:
-
-#### Example 08: Markup
-
-```html
-<!DOCTYPE HTML PUBLIC "-//W3C//DTD HTML 4.01 Transitional//EN" "http://www.w3.org/TR/html4/loose.dtd">
-<html>
- <head><title>Example 08</title></head>
- <body>
- <div class="header"><h2>Page</h2></div>
- <div class="main"><h1>Main</h1></div>
- <div class="footer"><h3>Footer</h3></div>
- </body>
-</html>
-```
-
-#### Example 08: Outline
-
-1. Page
-1. Main
-1. Footer
-
-[View Example 08](/wp-uploads/2015/06/example-08.html)
-
-In HTML4, solely the headings ( `h1`- `h6`) define the outline of a document.
-The enclosing elements or any nesting of them are ignored altogether.
-The level, at which a heading appears in the outline, is defined by the rank of the heading alone.
-(Strictly speaking, HTML4 does not define anything like a document outline.
-But as a result of the common usage and interpretation, this is, how people outline their documents with HTML4.)
-
-The implicit sectioning of HTML5 works in a way, that is backward compatible with this way of outlining, but closes the gaps in the resulting hierarchy:
-_Each heading implicitly opens a section – hence the name –, but if there is a gap between its rank and the rank of its ancestor – that is the last preceding heading with a higher rank – it is placed in the level directly beneath its ancestor_:
-
-#### Example 09: Markup
-
-```html
-<!DOCTYPE html>
-<title>Example 09</title>
-<h4>h4</h4>
-<h2>h2</h2>
-<h4>h4</h4>
-<h3>h3</h3>
-<h2>h2</h2>
-<h1>h1</h1>
-<h2>h2</h2>
-<h3>h3</h3>
-```
-
-#### Example 09: Outline
-
-1. h4
-1. h2
-1. h4
-1. h3
-1. h2
-1. h1
-1. h2
- 1. h3
-
-[View Example 09](/wp-uploads/2015/06/example-09.html)
-
-See, how the first heading `h4` ends up on the same level as the second, which is a `h2`.
-Or, how the third and fourth headings are both on the same level under the `h2`, although they are of different rank.
-And note, how the `h2` and `h3` end up on different sectioning-levels as their earlier appearances, if they follow a `h1` in the natural order.
-
-### Step IV: Mixing it all together
-
-With the gathered clues in mind, we can now retry to layout our document with the desired outline.
-If we want, that _Header_, _Main_ and _Footer_ end up as top level citizens in our planed outline, we simply have to achieve, that they are all recognized as sections under the top level by the HTML5 outline algorithm.
-We can do that, by explicitly stating, that the `header` and the `footer` are section:
-
-#### Example 10: Markup
-
-```html
-<!DOCTYPE html>
-<title>Example 10</title>
-<header>
- <section>
- <h2>Main</h2>
- </section>
-</header>
-<main>
- <article>
- <h1>Article</h1>
- <section>
- <h2>Section I</h2>
- </section>
- <section>
- <h2>Section II</h2>
- <section>
- <h3>Subsection a</h3>
- </section>
- <section>
- <h3>Subsection b</h3>
- </section>
- </section>
- <section>
- <h2>Section III</h2>
- <section>
- <h3>Subsection a</h3>
- </section>
- </section>
- </article>
-</main>
-<footer>
- <section>
- <h3>Footer</h3>
- </section>
-</footer>
-```
-
-#### Example 10: Outline
-
-1. _Untitled BODY_ 1. Main
-1. Article
- 1. Section I
- 1. Section II
- 1. Subsection a
- 1. Subsection b
- 1. Section III
- 1. Subsection a
-1. Footer
-
-[View Example 10](/wp-uploads/2015/06/example-10.html)
-
-So far, so good.
-But what about the untitled body?
-We forgot about the single root of any outline, that is defined by the body, how we learned back in [step 1](#step-01 "Jump back to step 1, if you do not remember..."). As shown in [example 05](#example-05 "Revisit example 5"), we can simply name that by putting a heading outside and before any element, that defines a section:
-
-#### Example 11: Markup
-
-```html
-<!DOCTYPE html>
-<title>Example 11</title>
-<header>
- <h2>Page</h2>
- <section>
- <h3>Header</h3>
- </section>
-</header>
-<main>
- <article>
- <h1>Article</h1>
- <section>
- <h2>Section I</h2>
- </section>
- <section>
- <h2>Section II</h2>
- <section>
- <h3>Subsection a</h3>
- </section>
- <section>
- <h3>Subsection b</h3>
- </section>
- </section>
- <section>
- <h2>Section III</h2>
- <section>
- <h3>Subsection a</h3>
- </section>
- </section>
- </article>
-</main>
-<footer>
- <section>
- <h3>Footer</h3>
- </section>
-</footer>
-```
-
-#### Example 11: Outline
-
-1. _Page_ 1. Header
-1. Main
- 1. Section I
- 1. Section II
- 1. Subsection a
- 1. Subsection b
- 1. Section III
- 1. Subsection a
-1. Footer
-
-[View Example 11](/wp-uploads/2015/06/example-11.html)
-
-### Step V: Be Aware, Which Elements Define Sections
-
-The eagle-eyed among you might have noticed, that I had "forgotten" the two element-types `nav` and `aside`, when we were investigating the elements, that define the logical structure of the page in [step 2](#step-2 "Revisit step 2").
-I did not forgot about these – I left them out intentionally.
-Because otherwise, the results of [example 07](#example-07 "Revisit example 07") would have been too confusing, to made my point about implicit sectioning.
-Let us look, what would have happend:
-
-#### Example 12: Markup
-
-```html
-<!DOCTYPE html>
-<title>Example 12</title>
-<header>
- <h1>Page</h1>
- <nav><h1>Navigation</h1></nav>
-</header>
-<main><h1>Main</h1></main>
-<aside><h1>Aside</h1></aside>
-<footer><h1>Footer</h1></footer>
-```
-
-#### Example 07: Outline
-
-1. Page
-1. Navigation
-1. Main
-1. Aside
-1. Footer
-
-[View Example 12](/wp-uploads/2015/06/example-12.html)
-
-What is wrong there?
-Why are _Navigation_ and _Aside_ showing up as children, albeit we marked up every element with headings of the same rank?
-The reason for this is, that `nav` and `aside` are sectioning elements:
-
-#### Example 12: Markup
-
-```html
-<!DOCTYPE html>
-<title>Example 13</title>
-<header>
- Page
- <nav>Navigation</nav>
-</header>
-<main>Main</main>
-<aside>Aside</aside>
-<footer>Footer</footer>
-```
-
-#### Example 07: Outline
-
-1. _Untitled BODY_ 1. _Untitled NAV_
-1. _Untitled ASIDE_
-
-[View Example 13](/wp-uploads/2015/06/example-13.html)
-
-<a id="sectioning-elemnts"></a>
-The HTML5 spec defines four [sectioning elements](http://www.w3.org/WAI/GL/wiki/Using_HTML5_section_elements "Read about the intended use of these sectioning elements"): `article`, `section`, `nav` and `aside`!
-Some explain the confusion about this fact with the constantly evolving standard, that leads to [structurally unclear specifications](http://www.smashingmagazine.com/2013/01/18/the-importance-of-sections/#cad-middle "Jump to this rather lame excuse in an otherwise great article").
-I will be frank:
-_I cannot imagine any good reason for this decision!_
-In my opinion, the concept would be much clearer, if `article` and `section` would be the only two sectioning elements and `nav` and `aside` would only define the logical structure of the page, like `header` and `footer`.
-
-## Putting It All Together
-
-Knowing, that `nav` and `aside` will define sections, we now can complete our outline skillfully avoiding the appearance of untitled sections:
-
-#### Example 14: Markup
-
-```html
-<!DOCTYPE html>
-<title>Example 14</title>
-<header>
- <h2>Page</h2>
- <section>
- <h3>Header</h3>
- <nav><h4>Navigation</h4></nav>
- </section>
-</header>
-<main>
- <article>
- <h1>Main</h1>
- <section>
- <h2>Section I</h2>
- </section>
- <section>
- <h2>Section II</h2>
- <section>
- <h3>Subsection a</h3>
- </section>
- <section>
- <h3>Subsection b</h3>
- </section>
- </section>
- <section>
- <h2>Section III</h2>
- <section>
- <h3>Subsection a</h3>
- </section>
- </section>
- </article>
-</main>
-<aside><h3>Aside</h3></aside>
-<footer>
- <section>
- <h3>Footer</h3>
- </section>
-</footer>
-```
-
-#### Example 14: Outline
-
-1. _Page_ 1. Header
- 1. Navigation
-1. Main
- 1. Section I
- 1. Section II
- 1. Subsection a
- 1. Subsection b
- 1. Section III
- 1. Subsection a
-1. Aside
-1. Footer
-
-[View Example 14](/wp-uploads/2015/06/example-14.html)
-
-_Et voilà: Our Perfect Outline!_
-
-If you memorize the concepts, that you have learned in this little tutorial, you should now be able to mark up your documents to generate _your perfect outline_...
-
-...but: one last word about headings:
-
-## A Word On The Ranks Of The Headings
-
-It is crucial to note, that [the new outline-algorithm still is a fiction](http://www.paciellogroup.com/blog/2013/10/html5-document-outline/ "Read, why it may be dangerous, to miss that it is not yet real"): most user agents do not implement the algorithm yet.
-Hence, you still should stick to the old [hints for keeping your content accessible](https://dequeuniversity.com/assets/html/jquery-summit/html5/slides/headings.html "Tipps, how to create a logical outline of your document the old way") and point out the most important heading to the search engines.
-
-But there is no reason, not to apply the new possibilities shown in this article to your markup: it will only make it more feature-proof.
-It is very likely, that [search engines will start to adopt the HTML5 outline algorithm](http://html5doctor.com/html5-seo-search-engine-optimisation/ "Read more about, what search engines already pick up from the new fruits, that HTML5 has to offer"), to make more sense out of your content in near feature - or are already doing so...
-So, why not be one of the first, to gain from that new technique.
-
-_I would advise you, to adopt the new possibilities to section your content and generate a sensible outline, while still keeping the old heading ranks to be backward compatible._
+++ /dev/null
----
-_edit_last: "2"
-_oembed_0a2776cf844d7b8b543bf000729407fe: '{{unknown}}'
-_oembed_8a143b8145082a48cc586f0fdb19f9b5: '{{unknown}}'
-_oembed_4484ca19961800dfe51ad98d0b1fcfef: '{{unknown}}'
-_oembed_b0575eccf8471857f8e25e8d0f179f68: '{{unknown}}'
-categories:
- - explained
- - java
- - spring-boot
-classic-editor-remember: classic-editor
-date: "2019-12-25"
-lastmod: "2020-07-02T13:24:07+00:00"
-guid: http://juplo.de/?p=970
-parent_post_id: null
-post_id: "970"
-title: Actuator HTTP Trace Does Not Work With Spring Boot 2.2.x
-linkTitle: Fixing Actuator HTTP Trace
-url: /actuator-httptrace-does-not-work-with-spring-boot-2-2/
-
----
-## TL;DR
-
-In Spring Boot 2.2.x, you have to instanciate a **`@Bean`** of type **`InMemoryHttpTraceRepository`** to enable the HTTP Trace Actuator.
-
-Jump to the [explanation](#explanation) of and [example code for the fix](#fix)
-
-## `Enabling HTTP Trace — Before 2.2.x...`
-
-Spring Boot comes with a very handy feature called [Actuator](https://docs.spring.io/spring-boot/docs/current/reference/htmlsingle/#production-ready "Show the Spring Boot Documentation for the Actuator Feature").
-Actuator provides a build-in production-ready REST-API, that can be used to monitor / menage / debug your bootified App.
-To enable it — _prior to 2.2.x_ —, one only had to:
-
-1. Specifiy the dependency for Spring Boot Actuator:
-
- ```
- <dependency>
- <groupId>org.springframework.boot
- <artifactId>spring-boot-starter-actuator
- </dependency>
-
- ```
-
-1. Expose the needed endpoints via HTTP:
-
- ```properties
- management.endpoints.web.exposure.include=*
-
- ```
-
- - This exposes **all available endpoints** via HTTP.
- - _**Advise:** Do not copy this into a production config_
-
- (Without thinking about it twice and — at least — [enable some security measures](https://docs.spring.io/spring-boot/docs/current/reference/htmlsingle/#production-ready-endpoints-security "Read, how to secure HTTP-endpoints in the documentation of Spring Boot") to protect the exposed endpoints!)
-
-## The problem: _It simply does not work any more in 2.2 :(_
-
-_But..._
-
-- If you upgrade your existing app with a working `httptrace`-actuator to Spring Boot 2.2.x, or
-- If you start with a fresh app in Spring Boot 2.2.x and try to enable the `httptrace`-actuator [as described in the documentation](https://docs.spring.io/spring-boot/docs/current/reference/htmlsingle/#production-ready-endpoints-exposing-endpoints "Read, how to expose HTTP-endpoints in the documentation of Spring Boot")
-
-**...it simply does not work at all!**
-
-## <a id="fix"></a>The Fix
-
-The simple fix for this problem is, to add a `@Bean` of type `InMemoryHttpTraceRepository` to your **`@Configuration`**-class:
-
-```
-@Bean
-public HttpTraceRepository htttpTraceRepository()
-{
- return new InMemoryHttpTraceRepository();
-}
-
-```
-
-## <a id="explanation"></a>The Explanation
-
-The cause of this problem is not a bug, but a legitimate change in the default configuration.
-Unfortunately, this change is not noted in the according section of the documentation.
-Instead it is burried in the [Upgrade Notes for Spring Boot 2.2](https://github.com/spring-projects/spring-boot/wiki/Spring-Boot-2.2.0-M3-Release-Notes#actuator-http-trace-and-auditing-are-disabled-by-default)
-
-The default-implementation stores the captured data in memory.
-Hence, it consumes much memory, without the user knowing, or even worse: needing it.
-This is especially undesirable in cluster environments, where memory is a precious good.
-_And remember:_ Spring Boot was invented to simplify cluster deployments!
-
-**That is, why this feature is now turned of by default and has to be turned on by the user explicitly, if needed.**
+++ /dev/null
----
-_edit_last: "2"
-categories:
- - uncategorized
-classic-editor-remember: classic-editor
-date: "2014-03-16"
-lastmod: "2020-04-22T17:45:06+00:00"
-guid: http://juplo.de/?p=275
-parent_post_id: null
-post_id: "275"
-title: Der Benutzer ist nicht dazu berechtigt, diese Anwendung zu sehen
-url: /der-benutzer-ist-nicht-dazu-berechtigt-diese-anwendung-zu-sehen/
-
----
-Du bist gerade bei Facebook über die folgende Fehlermeldung gestolpert:
-
-**Fehler**
-
-Der Nutzer ist nicht dazu berechtigt, diese Anwendung zu sehen.:
-
-Der Benutzer ist nicht berrechtigt diese Applikation an zusehen. Der Entwickler hat dies so eingestellt.
-
-
-
-Da dazu nichts bei Googel zu finden war, hier die einfache Erklärung, was da schief läuft:
-
-**Du hast die bei Facebook als Testbenutzer einer deiner Apps eingeloggt und das beim Zugriff auf eine andere App vergessen!**
-
-Die Testbenutzer einer App dürfen offensichtlich nur auf diese App und sonst auf keine Seiten/Apps in Facebook zugreifen - macht ja auch Sinn.
-Verwirrend nur, dass Facebook behauptet, man hättte da etwas selber von Hand eingestellt...
+++ /dev/null
----
-_edit_last: "2"
-categories:
- - howto
-classic-editor-remember: classic-editor
-date: "2019-06-25"
-lastmod: "2020-09-25T23:23:17+00:00"
-guid: http://juplo.de/?p=881
-parent_post_id: null
-post_id: "881"
-tags:
- - encryption
- - java
- - kafka
- - security
- - tls
- - zookeeper
-title: Encrypt Communication Between Kafka And ZooKeeper With TLS
-url: /encrypt-communication-between-kafka-and-zookeeper-with-tls/
-
----
-## TL;DR
-
-1. Download and unpack [zookeeper+tls.tgz](/wp-uploads/zookeeper+tls.tgz).
-1. Run [README.sh](/wp-uploads/zookeeper+tls/README.sh) for a fully automated example of the presented setup.
-
-Copy and paste to execute the two steps on Linux:
-
-```bash
-curl -sc - /wp-uploads/zookeeper+tls.tgz | tar -xzv && cd zookeeper+tls && ./README.sh
-
-```
-
-A [german translation](https://www.trion.de/news/2019/06/28/kafka-zookeeper-tls.html "Hier findest du eine deutsche Übersetzung dieses Artikels") of this article can be found on [http://trion.de](https://www.trion.de/news/ "A lot of intresting posts about Java, Docker, Kubernetes, Spring Boot and so on can be found @trion").
-
-## Current Kafka Cannot Encrypt ZooKeeper-Communication
-
-Up until now ( [Version 2.3.0 of Apache Kafka](https://kafka.apache.org/documentation/#security_overview "Read more about the supported options in the original documentation of version 2.3.0")) it is not possible, to encrypt the communication between the Kafka-Brokers and their ZooKeeper-ensemble.
-This is not possiible, because ZooKeeper 3.4.13, which is shipped with Apache Kafka 2.3.0, lacks support for TLS-encryption.
-
-The documentation deemphasizes this, with the observation, that usually only non-sensitive data (configuration-data and status information) is stored in ZooKeeper and that it would not matter, if this data is world-readable, as long as it can be protected against manipulation, which can be done through proper authentication and ACL's for zNodes:
-
-> _The rationale behind this decision is that the data stored in ZooKeeper is not sensitive, but inappropriate manipulation of znodes can cause cluster disruption._ ( [Kafka-Documentation](https://kafka.apache.org/documentation/#zk_authz "Read the documentation about how to secure ZooKeeper"))
-
-This quote obfuscates the [elsewhere mentioned fact](https://kafka.apache.org/documentation/#security_sasl_scram_security "The security considerations for SASL/SCRAM are clearly stating, that ZooKeeper must be protected, because it stores sensitive authentication data in this case"), that there are use-cases that store sensible data in ZooKeeper.
-For example, if authentication via [SASL/SCRAM](https://kafka.apache.org/documentation/#security_sasl_scram_clientconfig "Read more about authentication via SASL/SCRAM") or [Delegation Tokens](https://kafka.apache.org/documentation/#security_delegation_token) is used.
-Accordingly, the documentation often stresses, that usually there is no need to make ZooKeeper accessible to normal clients.
-Nowadays, only admin-tools need direct access to the ZooKeeper-ensemble.
-Hence, it is stated as a best practice, to make the ensemble only available on a local network, hidden behind a firewall or such.
-
-**In cleartext: One must not run a Kafka-Cluster, that spans more than one data-center — or at least make sure, that all communication is tunneled through a virtual private network.**
-
-## ZooKeeper 3.5.5 To The Rescue
-
-On may the 20th 2019, [version 3.5.5 of ZooKeeper](http://zookeeper.apache.org/releases.html#releasenotes "Read the release notes") has been released.
-Version 3.5.5 is the first stable release of the 3.5.x branch, that introduces the support for TLS-encryption, the community has yearned for so long.
-It supports the encryption of all communication between the nodes of a ZooKeeper-ensemble and between ZooKeeper-Servers and -Clients.
-
-Part of ZooKeeper is a sophisticated client-API, that provide a convenient abstraction for the communication between clients and servers over the _Atomic Broadcast Protocol_.
-The TLS-encryption is applied by this API transparently.
-Because of that, all client-implementations can profit from this new feature through a simple library-upgrade from 3.4.13 to 3.5.5.
-**This article will walk you through an example, that shows how to carry out such a library-upgrade for Apache Kafka 2.3.0 and configure a cluster to use TLS-encryption, when communicating with a standalone ZooKeeper.**
-
-## Disclaimer
-
-**The presented setup is ment for evaluation only!**
-
-It fiddles with the libraries, used by Kafka, which might cause unforseen issues.
-Furthermore, using TLS-encryption in ZooKeeper requires one to switch from the battle-tested `NIOServerCnxnFactory`, which uses the [NIO-API](https://en.wikipedia.org/wiki/Non-blocking_I/O_(Java) "Learn more about non-blocking I/O in Java") directly, to the newly introduced `NettyServerCnxnFactory`, which is build on top of [Netty](https://netty.io/ "Learn more about Netty").
-
-## Recipe To Enable TLS Between Broker And ZooKeeper
-
-The article will walk you step by step through the setup now.
-If you just want to evaluate the example, you can [jump to the download-links](#scripts "I am so inpatient, just get me to the fully automated example").
-
-All commands must be executed in the same directory.
-We recommend, to create a new directory for that purpose.
-
-### Download Kafka and ZooKeeper
-
-First of all: Download version 2.3.0 of Apache Kafka and version 3.5.5 of Apache ZooKeeper:
-
-```bash
-curl -sc - http://ftp.fau.de/apache/zookeeper/zookeeper-3.5.5/apache-zookeeper-3.5.5-bin.tar.gz | tar -xzv
-curl -sc - http://ftp.fau.de/apache/kafka/2.3.0/kafka_2.12-2.3.0.tgz | tar -xzv
-
-```
-
-### Switch Kafka 2.3.0 from ZooKeeper 3.4.13 to ZooKeeper 3.5.5
-
-Remove the 3.4.13-version from the `libs`-directory of Apache Kafka:
-
-```bash
-rm -v kafka_2.12-2.3.0/libs/zookeeper-3.4.14.jar
-
-```
-
-Then copy the JAR's of the new version of Apache ZooKeeper into that directory. (The last JAR is only needed for CLI-clients, like for example `zookeeper-shell.sh`.)
-
-```bash
-cp -av apache-zookeeper-3.5.5-bin/lib/zookeeper-3.5.5.jar kafka_2.12-2.3.0/libs/
-cp -av apache-zookeeper-3.5.5-bin/lib/zookeeper-jute-3.5.5.jar kafka_2.12-2.3.0/libs/
-cp -av apache-zookeeper-3.5.5-bin/lib/netty-all-4.1.29.Final.jar kafka_2.12-2.3.0/libs/
-cp -av apache-zookeeper-3.5.5-bin/lib/commons-cli-1.2.jar kafka_2.12-2.3.0/libs/
-
-```
-
-That is all there is to do to upgrade ZooKeeper.
-If you run one of the Kafka-commands, it will use ZooKeeper 3.5.5. from now on.
-
-### Create A Private CA And The Needed Certificates
-
-_You can [read more about setting up a private CA in this post](/create-self-signed-multi-domain-san-certificates/ "Lern how to set up a private CA and create self-signed certificates")..._
-
-Create the root-certificate for the CA and store it in a Java-truststore:
-
-```bash
-openssl req -new -x509 -days 365 -keyout ca-key -out ca-cert -subj "/C=DE/ST=NRW/L=MS/O=juplo/OU=kafka/CN=Root-CA" -passout pass:superconfidential
-keytool -keystore truststore.jks -storepass confidential -import -alias ca-root -file ca-cert -noprompt
-
-```
-
-The following commands will create a self-signed certificate in **`zookeeper.jks`**.
-What happens is:
-
-1. Create a new key-pair and certificate for `zookeeper`
-1. Generate a certificate-signing-request for that certificate
-1. Sign the request with the key of private CA and also add a SAN-extension, so that the signed certificate is also valid for `localhost`
-1. Import the root-certificate of the private CA into the keystore `zookeeper.jks`
-1. Import the signed certificate for `zookeeper` into the keystore `zookeeper.jks`
-
-_You can [read more about creating self-signed certificates with multiple domains and building a Chain-of-Trust here](/create-self-signed-multi-domain-san-certificates/#sign-with-san "Lern how to sign certificates with SAN-extension")..._
-
-```bash
-NAME=zookeeper
-keytool -keystore $NAME.jks -storepass confidential -alias $NAME -validity 365 -genkey -keypass confidential -dname "CN=$NAME,OU=kafka,O=juplo,L=MS,ST=NRW,C=DE"
-keytool -keystore $NAME.jks -storepass confidential -alias $NAME -certreq -file cert-file
-openssl x509 -req -CA ca-cert -CAkey ca-key -in cert-file -out $NAME.pem -days 365 -CAcreateserial -passin pass:superconfidential -extensions SAN -extfile <(printf "\n[SAN]\nsubjectAltName=DNS:$NAME,DNS:localhost")
-keytool -keystore $NAME.jks -storepass confidential -import -alias ca-root -file ca-cert -noprompt
-keytool -keystore $NAME.jks -storepass confidential -import -alias $NAME -file $NAME.pem
-
-```
-
-Repeat this with:
-
-- **`NAME=kafka-1`**
-- **`NAME=kafka-2`**
-- **`NAME=client`**
-
-Now we have signed certificates for all participants in our small example, that are stored in separate keystores, each with a Chain-of-Trust set up, that is rooting in our private CA.
-We also have a truststore, that will validate all these certificates, because it contains the root-certificate of the Chain-of-Trust: the certificate of our private CA.
-
-### Configure And Start ZooKeeper
-
-_We hightlight/explain only the configuration-options here, that are needed for TLS-encryption!_
-
-In our setup, the standalone ZooKeeper essentially needs two specially tweaked configuration files, to use encryption.
-
-Create the file **`java.env`**:
-
-```bash
-SERVER_JVMFLAGS="-Xms512m -Xmx512m -Dzookeeper.serverCnxnFactory=org.apache.zookeeper.server.NettyServerCnxnFactory"
-ZOO_LOG_DIR=.
-
-```
-
-- The Java-Environmentvariable **`zookeeper.serverCnxnFactory`** switches the connection-factory to use the Netty-Framework.
-**Without this, TLS is not possible!**
-
-Create the file **`zoo.cfg`**:
-
-```bash
-dataDir=/tmp/zookeeper
-secureClientPort=2182
-maxClientCnxns=0
-authProvider.1=org.apache.zookeeper.server.auth.X509AuthenticationProvider
-ssl.keyStore.location=zookeeper.jks
-ssl.keyStore.password=confidential
-ssl.trustStore.location=truststore.jks
-ssl.trustStore.password=confidential
-
-```
-
-- **`secureClientPort`**: We only allow encrypted connections!
-(If we want to allow unencrypted connections too, we can just specify `clientPort` additionally.)
-- **`authProvider.1`**: Selects authentification through client certificates
-- **`ssl.keyStore.*`**: Specifies the path to and password of the keystore, with the `zookeeper`-certificate
-- **`ssl.trustStore.*`**: Specifies the path to and password of the common truststore with the root-certificate of our private CA
-
-Copy the file **`log4j.properties`** into the current working directory, to enable logging for ZooKeeper (see also `java.env`):
-
-```bash
-cp -av apache-zookeeper-3.5.5-bin/conf/log4j.properties .
-
-```
-
-Start the ZooKeeper-Server:
-
-```bash
-apache-zookeeper-3.5.5-bin/bin/zkServer.sh --config . start
-
-```
-
-- **`--config .`**: The script should search in the current directory for the configration data and certificates.
-
-### Konfigure And Start The Brokers
-
-_We hightlight/explain only the configuration-options and start-parameters here, that are needed to encrypt the communication between the Kafka-Brokers and the ZooKeeper-Server!_
-
-The other parameters shown here, that are concerned with SSL are only needed for securing the communication between the Brokers itself and between Brokers and Clients.
-You can read all about them in the [standard documentation](https://kafka.apache.org/documentation/#security).
-In short: This example is set up, to use SSL for authentication between the brokers and SASL/PLAIN for client-authentification — both channels are encrypted with TLS.
-
-TLS for the ZooKeeper Client-API is configured through Java-Environmentvariables.
-Hence, most of the SSL-configuration for connecting to ZooKeeper has to be specified, when starting the broker.
-Only the address and port for the connction itself is specified in the configuration-file.
-
-Create the file **`kafka-1.properties`**:
-
-```bash
-broker.id=1
-zookeeper.connect=zookeeper:2182
-listeners=SSL://kafka-1:9193,SASL_SSL://kafka-1:9194
-security.inter.broker.protocol=SSL
-ssl.client.auth=required
-ssl.keystore.location=kafka-1.jks
-ssl.keystore.password=confidential
-ssl.key.password=confidential
-ssl.truststore.location=truststore.jks
-ssl.truststore.password=confidential
-listener.name.sasl_ssl.plain.sasl.jaas.config=org.apache.kafka.common.security.plain.PlainLoginModule required user_consumer="pw4consumer" user_producer="pw4producer";
-sasl.enabled.mechanisms=PLAIN
-log.dirs=/tmp/kafka-1-logs
-offsets.topic.replication.factor=2
-transaction.state.log.replication.factor=2
-transaction.state.log.min.isr=2
-
-```
-
-- **`zookeeper.connect`**: If you allow unsecure connections too, be sure to specify the right port here!
-- _All other options are not relevant for encrypting the connections to ZooKeeper_
-
-Start the broker in the background and remember its PID in the file **`KAFKA-1`**:
-
-```bash
-(
- export KAFKA_OPTS="
- -Dzookeeper.clientCnxnSocket=org.apache.zookeeper.ClientCnxnSocketNetty
- -Dzookeeper.client.secure=true
- -Dzookeeper.ssl.keyStore.location=kafka-1.jks
- -Dzookeeper.ssl.keyStore.password=confidential
- -Dzookeeper.ssl.trustStore.location=truststore.jks
- -Dzookeeper.ssl.trustStore.password=confidential
- "
- kafka_2.12-2.3.0/bin/kafka-server-start.sh kafka-1.properties & echo $! > KAFKA-1
-) > kafka-1.log &
-
-```
-
-Check the logfile **`kafka-1.log`** to confirm that the broker starts without errors!
-
-- **`zookeeper.clientCnxnSocket`**: Switches from NIO to the Netty-Framework.
-**Without this, the ZooKeeper Client-API (just like the ZooKeeper-Server) cannot use TLS!**
-- **`zookeeper.client.secure=true`**: Switches on TLS-encryption, for all connections to any ZooKeeper-Server
-- **`zookeeper.ssl.keyStore.*`**: Specifies the path to and password of the keystore, with the `kafka-1`-certificate
-- **`zookeeper.ssl.trustStore.*`**: Specifies the path to and password of the common truststore with the root-certificate of our private CA
-
-_Do the same for **`kafka-2`**!_
-_And do not forget, to adapt the config-file accordingly — or better: just [download a copy](/wp-uploads/zookeeper+tls/kafka-2.properties)..._
-
-### Configure And Execute The CLI-Clients
-
-All scripts from the Apache-Kafka-Distribution that connect to ZooKeeper are configured in the same way as seen for `kafka-server-start.sh`.
-For example, to create a topic, you will run:
-
-```bash
-export KAFKA_OPTS="
- -Dzookeeper.clientCnxnSocket=org.apache.zookeeper.ClientCnxnSocketNetty
- -Dzookeeper.client.secure=true
- -Dzookeeper.ssl.keyStore.location=client.jks
- -Dzookeeper.ssl.keyStore.password=confidential
- -Dzookeeper.ssl.trustStore.location=truststore.jks
- -Dzookeeper.ssl.trustStore.password=confidential
-"
-kafka_2.12-2.3.0/bin/kafka-topics.sh \
- --zookeeper zookeeper:2182 \
- --create --topic test \
- --partitions 1 --replication-factor 2
-
-```
-
-_Note:_ A different keystore is used here ( `client.jks`)!
-
-CLI-clients, that connect to the brokers, can be called as usual.
-
-In this example, they use an encrypted listener on port 9194 (for `kafka-1`) and are authenticated using SASL/PLAIN.
-The client-configuration is kept in the files `consumer.config` and `producer.config`.
-Take a look at that files and compare them with the broker-configuration above.
-If you want to lern more about securing broker/client-communication, we refere you to the [official documentation](https://kafka.apache.org/documentation/#security "The official documentation does a good job on this topic!").
-
-_If you have trouble to start these clients, download the scripts and take a look at the examples in [README.sh](/wp-uploads/zookeeper+tls/README.sh)_
-
-### TBD: Further Steps To Take...
-
-This recipe only activates TLS-encryption between Kafka-Brokers and a Standalone ZooKeeper.
-It does not show, how to enable TLS between ZooKeeper-Nodes (which should be easy) or if it is possible to authenticate Kafka-Brokers via TLS-certificates. These topics will be covered in future articles...
-
-## Fully Automated Example Of The Presented Setup
-
-Download and unpack [zookeeper+tls.tgz](/wp-uploads/zookeeper+tls.tgz) for an evaluation of the presented setup:
-
-```bash
-curl -sc - /wp-uploads/zookeeper+tls.tgz | tar -xzv
-
-```
-
-The archive contains a fully automated example.
-Just run [README.sh](/wp-uploads/zookeeper+tls/README.sh) in the unpacked directory.
-
-It downloads the required software, carries out the library-upgrade, creates the required certificates and starts a standalone ZooKeeper and two Kafka-Brokers, that use TLS to encrypt all communication.
-It also executes a console-consumer and a console-producer, that read and write to a topic, and a zookeeper-shell, that communicates directly with the ZooKeeper-node, to proof, that the setup is working.
-The ZooKeeper and the Brokers-instances are left running, to enable the evaluation of the fully encrypted cluster.
-
-### Usage
-
-- Run **`README.sh`**, to execute the automated example
-- After running `README.sh`, the Kafka-Cluster will be still running, so that one can experiment with commands from `README.sh` by hand
-- `README.sh` can be executed repeatedly: it will skip all setup-steps, that are already done automatically
-- Run **`README.sh stop`**, to stop the Kafka-Cluster (it can be restarted by re-running `README.sh`)
-- Run **`README.sh cleanup`**, to stop the Cluster and remove all created files and data (only the downloaded packages will be left untouched)
-
-### Separate Downloads For The Packaged Files
-
-- [README.sh](/wp-uploads/zookeeper+tls/README.sh)
-- [create-certs.sh](/wp-uploads/zookeeper+tls/create-certs.sh)
-- [gencert.sh](/wp-uploads/zookeeper+tls/gencert.sh)
-- [zoo.cfg](/wp-uploads/zookeeper+tls/zoo.cfg)
-- [java.env](/wp-uploads/zookeeper+tls/java.env)
-- [kafka-1.properties](/wp-uploads/zookeeper+tls/kafka-1.properties)
-- [kafka-2.properties](/wp-uploads/zookeeper+tls/kafka-2.properties)
-- [consumer.config](/wp-uploads/zookeeper+tls/consumer.config)
-- [producer.config](/wp-uploads/zookeeper+tls/producer.config)
+++ /dev/null
----
-_edit_last: "3"
-categories:
- - java
- - spring
- - spring-boot
- - thymeleaf
-date: "2015-10-26"
-lastmod: "2020-05-01T14:06:13+00:00"
-guid: http://juplo.de/?p=543
-parent_post_id: null
-post_id: "543"
-title: Fix Hot Reload of Thymeleaf-Templates In spring-boot:run
-url: /fix-hot-reload-of-thymeleaf-templates-in-spring-bootrun/
-
----
-## The Problem: Hot-Reload Of Thymeleaf-Templates Does Not Work, When The Application Is Run With `spring-boot:run`
-
-A lot of people seem to have problems with hot reloading of static HTML-ressources when developing a [Spring-Boot](http://projects.spring.io/spring-boot/#quick-start "Learn more about Spring-Boot") application that uses [Thymeleaf](http://www.thymeleaf.org/ "Learn more about Thymeleaf") as templateing engine with [`spring-boot:run`](http://docs.spring.io/spring-boot/docs/current/reference/html/build-tool-plugins-maven-plugin.html "Learn more about the spring-boot-maven-plugin").
-There are a lot of tips out there, how to fix that problem:
-
-- [The official Hot-Swapping-Guide](http://docs.spring.io/spring-boot/docs/current/reference/html/howto-hotswapping.html "Read the official guide") says, that you just have to add `spring.thymeleaf.cache=false` in your application-configuration in `src/main/resources/application.properties`.
-- [Some say](http://stackoverflow.com/a/26562302/247276 "Read the whole suggestion"), that you have to disable caching by setting `spring.template.cache=false` **and** `spring.thymeleaf.cache=false` and/or run the application in debugging mode.
-- [Others say](http://stackoverflow.com/a/31641587/247276 "Read the suggestion"), that you have to add a dependency to `org.springframework:springloaded` to the configuration of the `spring-boot-maven-plugin`.
-- There is even a [bug-report on GitHub](https://github.com/spring-projects/spring-boot/issues/34 "Read the whole bug-report on GitHub"), that says, that you have to run the application from your favored IDE.
-
-But none of that fixes worked for me.
-Some may work, if I would switch my IDE (I am using Netbeans), but I have not tested that, because I am not willing to switch my beloved IDE because of that issue.
-
-## The Solution: Move Your Thymeleaf-Templates Back To `src/main/webapp`
-
-Fortunatly, I found a simple solution, to fix the issue without all the above stuff.
-**You simply have to move your Thymeleaf-Templates back to where they belong (IMHO): `src/main/webapp` and turn of the caching.**
-It is not necessary to run the application in debugging mode and/or from your IDE, nor is it necessary to add the dependency to `springloaded` or more configuration-switches.
-
-To move the templates and disable caching, just add the following to your application configuration in `src/main/application.properties`:
-
-```properties
-spring.thymeleaf.prefix=/thymeleaf/
-spring.thymeleaf.cache=false
-
-```
-
-Of course, you also have to move your Thymeaf-Templates from `src/main/resources/templates/` to `src/main/webapp/thymeleaf/`.
-In my opinion, the templates belong there anyway, in order to have them accessible as normal static HTML(5)-files.
-If they are locked away in the classpath you cannot access them, which foils the approach of Thymeleaf, that you can view your templates in a browser as thy are.
+++ /dev/null
----
-_edit_last: "2"
-categories:
- - projects
-date: "2016-03-09"
-lastmod: "2020-06-24T11:32:38+00:00"
-guid: http://juplo.de/?p=721
-parent_post_id: null
-post_id: "721"
-tags:
- - createmedia.nrw
- - hibernate
- - java
- - jpa
- - maven
-title: hibernate-maven-plugin 2.0.0 released!
-url: /hibernate-maven-plugin-2-0-0-released/
-
----
-Today we released the version 2.0.0 of [hibernate-maven-plugin](/hibernate-maven-plugin "hibernate-maven-plugin") to [Central](http://search.maven.org/#search|gav|1|g%3A%22de.juplo%22%20AND%20a%3A%22hibernate-maven-plugin%22 "Central")!
-
-## Why Now?
-
-During one of our other projects ‐ the development of [a vertical search-engine for events and locations](http://yourshouter.com/projekte/crowdgest%C3%BCtzte-veranstaltungs-suchmaschine.html "Read more about our project"), which is [funded by the mistery of economy of NRW](http://yourshouter.com/partner/mweimh-nrw.html "Read more about the support by the ministery") ‐, we realized, that we were in the need of Hibernate 5 and some of the more sophisticated JPA-configuration-options.
-
-Unfortunatly ‐ _for us_ ‐ the old releases of this plugin neither support Hibernate 5 nor all configuration options, that are available for use in the `META-INF/persistence.xml`.
-
-Fortunatly ‐ _for you_ ‐ we decided, that we really need all that and have to integrate it in our little plugin.
-
-## Nearly Complete Rewrite
-
-Due to [changes in the way Hibernate has to be configured internally](http://docs.jboss.org/hibernate/orm/5.0/integrationsGuide/en-US/html_single/ "Read more about this changes in the official Integrations Guide for Hibernate 5"), this release is a nearly complete rewrite.
-It was no longer possible, to just use the [SchemaExport](https://docs.jboss.org/hibernate/orm/3.5/reference/en/html/toolsetguide.html#toolsetguide-s1-3)-Tool to build up the configuration and support all possible configuration-approaches.
-Hence, the plugin now builds up the configuration using [Services and Registries](http://docs.jboss.org/hibernate/orm/5.0/integrationsGuide/en-US/html_single/#services "Read more about services and registries"), like described in the Integration Guide.
-
-## Simplified Configuration: No Drop-In-Replacement!
-
-We also took the opportunity, to simplify the configuration.
-Beforehand, the plugin had just used the configuration, that was set up in the class [SchemaExport](https://docs.jboss.org/hibernate/orm/4.3/javadocs/org/hibernate/tool/hbm2ddl/SchemaExport.html).
-This reliefed us from the burden, to understand the configuration internals, but brought up some oddities of the internal implementation of the tool.
-It also turned out to be a bad decision in the long run, because some configuration options are hard coded in that class and cannot be changed.
-
-By building up the whole configuration by hand, it is now possible to implement separate goals for creating and dropping the schema.
-Also, it enables us to add a goal `update` in one of the next releases.
-Because of all this improvements, you have to revise your configuration, if you want to switch from 1.x to 2.x.
-
-**Be warned: this release is _no drop-in replacement_ of the previous releases!**
-
-## Not Only For 4, But For Any Version
-
-While rewirting the plugin, we focused on Hibernate 5, which was not supported by the older releases, because of some of the oddities of the internal implementation of the SchemaExport-tool.
-We tried to maintain backward compatibility.
-
-You should be able to use the new plugin with Hibernate 5 and also with older versions of Hibernate (we only tested that for Hibernate 4).
-Because of that, we dropped the 4 in the name of the plugin!
-
-## Extended Support For JPA-Configurations
-
-We tried to support all possible configuration-approaches, that Hibernate 5 understands.
-Including hard coded XML-mapping-files in the `META-INF/persistence.xml`, that do not seem to be used very often, but which we needed in one of our own projects.
-
-Therefore, the plugin now understands all (or most of?) the relevant configuration options, that one can specify through a standard JPA-configuration.
-The plugin now should work with any configuration, that you drop in from your existing JPA- or Hibernate-projects.
-All recognized configuration from the different possible configuration-sources are merged together, considering the [configuration-method-precedence](/hibernate-maven-plugin/configuration.html#precedence "Jump to the documentation to read more about the configuration-method-precedence"), described in the documentation.
-
-We hope, we did not make any unhandy assumptions, while designing the merge-process.
-_Please let us know, if something wents wrong in your projects and you think it is, because we messed it up!_
-
-## Release notes:
-
-```
-commit 64b7446c958efc15daf520c1ca929c6b8d3b8af5
-Author: Kai Moritz
-Date: Tue Mar 8 00:25:50 2016 +0100
-
- javadoc hat to be configured multiple times for release:prepare
-
-commit 1730d92a6da63bdcc81f7a1c9020e73cdc0adc13
-Author: Kai Moritz
-Date: Tue Mar 8 00:13:10 2016 +0100
-
- Added the special javadoc-tags for maven-plugins to the configuration
-
-commit 0611db682bc69b80d8567bf9316668a1b6161725
-Author: Kai Moritz
-Date: Mon Mar 7 16:01:59 2016 +0100
-
- Updated documentation
-
-commit a275df25c52fdb7b5b4275fcf9a359194f7b9116
-Author: Kai Moritz
-Date: Mon Mar 7 17:56:16 2016 +0100
-
- Fixed missing menu on generated site: moved template from skin to project
-
-commit e8263ad80b1651b812618c964fb02f7e5ddf3d7e
-Author: Kai Moritz
-Date: Mon Mar 7 14:44:53 2016 +0100
-
- Turned of doclint, that was introduced in Java 8
-
- See: http://blog.joda.org/2014/02/turning-off-doclint-in-jdk-8-javadoc.html
-
-commit 62ec2b1b98d5ce144f1ac41815b94293a52e91e6
-Author: Kai Moritz
-Date: Tue Dec 22 19:56:41 2015 +0100
-
- Fixed ConcurrentModificationException
-
-commit 9d6e06c972ddda45bf0cd2e6a5e11d8fa319c290
-Author: Kai Moritz
-Date: Mon Dec 21 17:01:42 2015 +0100
-
- Fixed bug regarding the skipping of unmodified builds
-
- If a property or class was removed, its value or md5sum stayed in the set
- of md5sums, so that each following build (without a clean) was juged as
- modified.
-
-commit dc652540d007799fb23fc11d06186aa5325058db
-Author: Kai Moritz
-Date: Sun Dec 20 21:06:37 2015 +0100
-
- All packages up to the root are checked for annotations
-
-commit 851ced4e14fefba16b690155b698e7a39670e196
-Author: Kai Moritz
-Date: Sun Dec 20 13:32:48 2015 +0100
-
- Fixed bug: the execution is no more skipped after a failed build
-
- After a failed build, further executions of the plugin were skipped, because
- the MD5-summs suggested, that nothing is to do because nothing has changed.
- Because of that, the MD5-summs are now removed in case of a failure.
-
-commit 08649780d2cd70f2861298d683aa6b1945d43cda
-Author: Kai Moritz
-Date: Sat Dec 19 18:02:02 2015 +0100
-
- Mappings from JPA-mapping-files are considered
-
-commit bb8b638714db7fc02acdc1a9032cc43210fe5c0e
-Author: Kai Moritz
-Date: Sat Dec 19 03:46:49 2015 +0100
-
- Fixed minor misconfiguration in integration-test dependency test
-
- Error because of multiple persistence-units by repeated execution
-
-commit 3a7590b8862c3be691b05110f423865f6674f6f6
-Author: Kai Moritz
-Date: Thu Dec 17 03:10:33 2015 +0100
-
- Considering mapping-configuration from persistence.xml and hibernate.cfg.xml
-
-commit 23668ccaa93bfbc583c1697214bae116bd9f4ef6
-Author: Kai Moritz
-Date: Thu Dec 17 02:53:38 2015 +0100
-
- Sidestepped bug in Hibernate 5
-
-commit 8e5921c9e76b4540f1d4b75e05e338001145ff6d
-Author: Kai Moritz
-Date: Wed Dec 16 22:09:00 2015 +0100
-
- Introduced the goal "drop"
-
- * Fixed integration-test hibernate4-maven-plugin-envers-sample by adapting
- it to the new drop-goal
- * Adapted the other integration-tests to the new naming schema for the
- create-script
-
-commit 6dff3bfb0f9ea7a1d0cc56398aaad29e31a17b91
-Author: Kai Moritz
-Date: Wed Dec 16 18:08:56 2015 +0100
-
- Reworked configuration and the tracking thereof
-
- * Moved common parameters from CreateMojo to AbstractSchemaMojo
- * Reordered parameters into sensible groups
- * Renamed the maven-property-names of the parameters
- * All configuration-parameters are tracked, not only hibernate-parameters
- * Introduced special treatment for some of the plugin-parameters (export
- and show)
-
-commit b316a5b4122c3490047b68e1e4a6df205645aad5
-Author: Kai Moritz
-Date: Wed Oct 21 11:49:56 2015 +0200
-
- Reworked plugin-configuration: worshipped the DRY-principle
-
-commit 4940080670944a15916c68fb294e18a6bfef12d5
-Author: Kai Moritz
-Date: Fri Oct 16 12:16:30 2015 +0200
-
- Refined reimplementation of the plugin for Hibernate 5.x
-
- Renamed the plugin from hibernate4-maven-plugin to hibernate-maven-plugin,
- because the goal is, to support all recent older versions with the new
- plugin.
-
-commit fdda82a6f76deefd10f83da89d7e82054e3c3ecd
-Author: Kai Moritz
-Date: Wed Oct 21 12:18:29 2015 +0200
-
- Integration-Tests are skiped, if "maven.test.skip" is set to true
-
-commit b971570e28cbdc3b27eca15a7395586bee787446
-Author: Kai Moritz
-Date: Tue Sep 8 13:55:43 2015 +0200
-
- Updated version of juplo-skin for generation of documentation
-
-commit 3541cf3742dd066b94365d351a3ca39a35e3d3c8
-Author: Kai Moritz
-Date: Tue May 19 21:41:50 2015 +0200
-
- Added new configuration sources in documentation about precedence
-
-```
+++ /dev/null
----
-_edit_last: "1"
-categories:
- - hibernate
- - java
- - maven
-date: "2012-11-28"
-lastmod: "2020-06-15T19:15:58+00:00"
-guid: http://juplo.de/?p=34
-parent_post_id: null
-post_id: "34"
-title: hibernate4-maven-plugin
-url: /hibernate4-maven-plugin-a-simple-plugin-for-generating-a-database-schema-from-hibernate-4-mapping-annotations/
-
----
-## A simple Plugin for generating a Database-Schema from Hibernate 4 Mapping-Annotations
-
-Hibernate comes with the buildin functionality, to automatically create or update the database schema. This functionality is configured in the session-configuraton via the parameter `hbm2ddl.auto` (see [Hibernate Reference Documentation - Chapter 3.4. Optional configuration properties](http://docs.jboss.org/hibernate/orm/4.1/manual/en-US/html_single/#configuration-optional)). But doing so [is not very wise](http://stackoverflow.com/questions/221379/hibernate-hbm2ddl-auto-update-in-production), because you can easily corrupt or erase your production database, if this configuration parameter slips through to your production environment.
-
-Alternatively, you can [run the tools **SchemaExport** or **SchemaUpdate** by hand](http://stackoverflow.com/questions/835961/how-to-creata-database-schema-using-hibernate). But that is not very comfortable and being used to maven you will quickly long for a plugin, that does that job automatically for you, when you fire up your test cases.
-
-In the good old times, there was the [Maven Hibernate3 Plugin](http://mojo.codehaus.org/maven-hibernate3/hibernate3-maven-plugin/), that does this for you. But unfortunatly, this plugin is not compatible with Hibernate 4.x. Since there does not seem to be any successor for the Maven Hibernate3 Plugin and [googeling](http://www.google.de/search?q=hibernate4+maven+plugin) does not help, I decided to write up this simple plugin (inspired by these two articles I found: [Schema Export with Hibernate 4 and Maven](http://www.tikalk.com/alm/blog/schema-export-hibernate-4-and-maven) and [Schema generation with Hibernate 4, JPA and Maven](http://doingenterprise.blogspot.de/2012/05/schema-generation-with-hibernate-4-jpa.html)).
-
-I hope, the resulting simple to use buletproof [hibernate4-maven-plugin](/hibernate4-maven-plugin/) is usefull!
-
-**[Try it out now!](/hibernate4-maven-plugin/)**