No Play Store – No Fun
Recently, I bought myself the Hama 00054807 Internet TV Stick. This stick is a low-budget option, to pimp your TV, if it has a HDMI-port, but no built in smart-tv functionality (or a crapy one). You just plug in the stick and connect its dc-port to a USB-port of the TV (or the included adapter) and there you go.
But one big drawback of the Hama 00054807 is, that there are nearly no usefull apps preinstalled and Google forbidds Hama to install the originalGoogle Play Store on the device. Hence, you are locked out of any easy access to all the apps, that constitute the usability of android.
Because of that, I decided to root my Hama00054807 as a first step on the way to fully utilize this neat little toy of mine.
I began with opening the device and found the device-ID B.AML8726.6B 12122. But there seems to be no one else, who ever tried it. But as it turned out, it is fairly easy, because stock recovery is not locked and so you can just install everything you want.
Boot Into Recovery

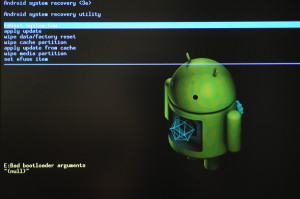
I found out, that you can boot into recovery, by pressing the reset-button, while the stick is booting. You can reach the reset-button without the need to open the case through a little hole in the back of the device. Just hold the button pressed, until recovery shows up (see screenshot).
Unfortunatly, the keyboard does not work, while you are in recovery-mode. So at first glance, you can do nothing, expect looking at the nice picture of the android-bot being repaired.
Installing Updates Without Keyboard-Interaction
But I found out, that you can control stock recovery with the help of a file called factory_update_param.aml, which is read from the external sd-card and interpreted by stock recovery on startup. Just create a text-file with the following content (I think it should use unix stle newlines, aka LF):
--update_package=/sdcard/update.zip
Place this file on the sd-card and name it factory_update_param.aml. Now you can place any suitable correctly signed android-update on the sd-card and rename it to update.zip and stock recovery will install it upon boot, if you boot into recovery with the sd-card inserted.
If you want to wipe all data as well and factory reset your device, you can extend factory_update_param.aml like this:
--update_package=/sdcard/update.zip
--wipe_data
--wipe_cache
--wipe_media
But be carefull to remove these extra-lines later, because they are executed every time you boot into recovery with the sd-card inserted! You have been warned :)
Let’s root
So, actually rooting the device is fairly easy now. You just have to download any correclty signed Superuser-Update. For example this one from the superuser homepage: Superuser-3.1.3-arm-signed.zip. Then, put it on the sd-card, rename it to update.zip, boot into recovery with the sd-card inserted and that’s it, you’r root!
If you reboot your device, you should now find the superuser-app among your apps. To verify, that everything went right, you could install any app that requires root-privileges. If the app requests root-privileges, you should see a dialog from the superuser-app, that asks you if the privileges should be granted, or not. For example, you can install a terminal-app and type su and hit return to request root-privileges.
What’s next…
So now your device is rooted and you are prepared to install custom updates on it. But still the Google Play Store is missing. I hope I will find some time to accomplish that, too. Stay tuned!
Hello,
I tried to update the old android version with android 4.2.1 and 4.2.2 using c5ea6e959840.update_mysidspr_FH05_to_GA02.zip or eaef14432ff5.signed-mantaray-JDQ39-from-JOP40D.eaef1443 (1).zip, but had errors like:
E: Badbootloader arguments “(null)”
….
….
….
E: Signature verification failed
Installation aborted.
What did I make wrong?
(Can I also write to this blog in German?)
xmas-greetings from Ric
Hi, i came here looking for a solution with the same id device (B.AML8726.6B 12122.), mine is a branded in a different way (also the form factor, but that is just plastic) and come with google play store.. anyway i’m curious about the general wifi performance on your device? mine is quite poor yours? it was poor and you were maybe able to fix it in some way??
I am sorry, but up until now, I did not do a lot more with the stick, than just hack it.
I am too busy with other stuff…
Nice work. But for me it is not working in the recovery it says everything went fine but after reboot nothing changed there is no super user and no root. Also tried to install gapps but the same here. Did you make a wipe bevore or after install or some other special kind of stuff?
I did not remember to make a wipe.
As far as I can say, I wrote down every little step, I have taken.
But, I never really used my TV-stick, before I rooted it.
So, it might help you, to do a complete wipe and factory reset!